

About time! While Bendigo and Geelong forge ever onward, Melbourne’s AOS tourney scene has been desperate for someone to light a fire under it. Well cometh the hour, cometh the man and Smorgan has stepped up (along with Gerard and Hayden) to get things pumping – Sam definitely has the firepower to make it all happen, and his first event was a 60-player sell out. I rocked up with my Bonesplitterz so today I’ll run you through my list, and then follow up with a full report on my games in a future article.
Ready? Let’s go.
The Event
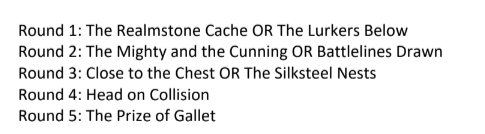
The pack for this one was pretty interesting: Day 1 was three rounds, each of which had two potential missions named in advance, with a roll-off on the day to determine which we would play. There was some real skew in there, including the one where you get VPs for slaughtering Gally Vets and the one where you can’t teleport, so there was a major risk-reward element to plotting your way through the peloton. Rounds 4 and 5 had pre-determined missions that were a little more straight-down-the-line:
The FAQ was aimed at playing RAW to the greatest possible extent, which meant pregame move stacking and DOK Battle Tactics were both in, and Sons of Behemat contesting the Proving Ground was out.
Sam also did a 30-minute list review for the event, which you can check out down below:
Now you might watch that and think that the format looks remarkably similar to my own Power Picks and Coolest Lists, but I did enjoy Sam’s little statistic that none of the Destruction brethren stooped low enough to take Purple Sun. Yeah boi!
The List
There are two general directions within Bonesplitterz that have seen sustained competitive success in 3rd Ed: loads of pigs in Icebone (with or without Kragnos), and Drakkfoot starring a whole heap of Big Stabbas. With Nurgle being so strong locally, I think you have to expect to play them at a 5-rounder, and Drakkfoot is the path I went down for precisely that reason.

When you look at the list visually there are a lot of Big Stabbas taking up real estate on the page, but in points terms there are about 400 points of Stabbas and 300 points of Pigs (and slightly more Morrboys than both) so it’s actually about as balanced a portfolio of units as you are likely to see.

Why Big Stabbas?
I’ve been onto Big Stabbas in Drakkfoot since the book first dropped:
The one unit in your army with rend is perfectly suited to the subfaction that switches off wards, due to the fact that it is by far the best tool for getting through to those wards. What I’ve learned from other people’s experience is the power of running them in MSU: they are great trading pieces who ping out Mortal Wounds on death, they are cheap crap that you can throw into the face of a howitzer (liberating you to get your important charges off), and they can stand in back corners or next to a Gnawhole to shut that shit right down. If I can’t teleport, no fucker can teleport.
In fact, this whole army is minimum sized units; I used a grand total of zero Reinforcement points. This has a couple of powerful impacts in the metagame: it denies meaningful targets to your opponent’s deathstars, it forces them to split shooting and it gives zero fucks for Nighthaunt chain-charging debuffs. Battleshock rarely matters to this army and once you have established a strong foothold in the game, you can switch to game-management mode and set up an onion ring of trading pieces and screens.
Your opponent will be forced to engage with screens that they fail to kill on the Waaagh turn while Big Stabbas hit over the top, and then they’re sitting ducks for your Wurrgog staring. Unless they win Priority, in which case they can crash into your next screen and off we go again. The army structure turns hopeless situations into bumps in the road, and good starts into dominant positions.
Enhancements
Glowin’ Tattoos has been a slam dunk since the book dropped, to give your Wurggog that 4++ ward as a degree of protection against staring himself to death. Wurrgogs are rightly feared throughout the game right now, so Starey McLaserface is bringing a mate along with him for the times it all goes to shit. That second Wurrgog can benefit hugely from Dokk Juice for a once-per-game D6 heal, but after much agonising I went for Mork’s Boney Bits for buffed casting and – more importantly – unbinding and dispelling.
By making my General a Master of Magic he gets a reroll to each of the above, and Bonding him to Krondspine (oh yes) adds in +1 across the board as a solid starting point. So he’s already in pretty good shape to dispel any Purple Suns prowling around.
He also has the least protection to staring himself off, and opponents will naturally want to target my General to whittle down my CP generation, so the Bonding has another purpose in that killing him early just makes Krondspine stronger by putting him on 2s and 2s with run and charge (going Wild actually buffs Krondspine, in case you hadn’t noticed).
What’s more, you can buff his magic further with a Wardokk dance for minimum +2 to everything (still with that reroll); he can secure mid-board Arcane terrain with a pregame move if needed; and he gets an additional +1 for every monster in your opponent’s army. The dearth of monsters in this Handbook has been greatly exaggerated, and most flogs will run at least a Krondspine because they just can’t help themselves.

Worth touching on at this point is what that loadout does to the Wurggog’s Warscroll spell, because that is not to be underestimated. He’s got a long-range (24”) anti-horde spell that just fucking detonates the right units: it has an easy casting value for the entry-level effect, but really you’re fishing for the modified 10+ to smash out a barrage of mortals on every 4+. Many’s the time I’ve rolled the initial cast then rerolled into the higher value.
This combo is so, so relevant in the real world too. Bring Thanuqol and a Verminlord, and you’ve just helped me lift your screens. Bring Krondspine and some dragons, and you might as well have killed your own Namarti Reavers. Everyone is so focussed on the little dude’s mask that they forget he’s also Ye Olde Gaunt Summoner on Balewind Vortex – and just to drive the point home, don’t forget that he can pregame move up into range to set off this hidden tactical nuke turn 1.

The X-factor, the icing on the cake, the umbrella in the G&T, the crackling in the pork sandwich, the Jamie Elliot in the frontline is the unmatched meme value of what happens if you play against one of those BOC lists with 10 Cockatrices or even Stomper Tribe. I’ll be able to cast, unbind and dispel at +14 and you can just lean back and gaze in wonder at my unparalleled power and genius, thank you very much.
Spells and Endless Spells
We’ve got 5 casts and Unbinds to play with, and while of course we want to spend every Hero phase waking moment staring off 800-point models, in practice our opponents won’t always be kind enough to park the heartbeat of their army 11.5” away. This, along with fucking off your opponent’s Endless Spells, is why it’s worth investing in all those casting bonuses.
With a couple of Maniak hit squads prowling around we’ll take Glowy Green Tusks to give them a whole bunch of rend -2, and why not invest in Levitate for the wizard with the buffed casting? The only knock on that spell is that high casting value, but that’s no problem for our little Master of Magic. It won’t always matter, but when it does it will be huge – alongside Krondspine for example it gives you another fast Flying unit to stop KO gunships fucking off whenever they feel like it.
So your spellcasting options are the above-mentioned horde zapper, old faithful Mystic Shield, the rend spell, the fights-last spell and Levitate. Early on we’ll be casting a lot of long ranged damage spells and buffing up the pork torpedoes that we launch at the enemy; as we step into the midgame we’ll be hoping to check some of those spellcasts down to staring, and for that reason the Fights-last spell (with its 12” range) goes on the Wardokk, because any Wurrgogs in that range will be looking at people funny.
I went with Ravenak over the Purple Sun because I’m not a basic bitch it genuinely works better in my list: things that are terrified of the Purple Sun (such as Maw Krushas and Bastilodons) tend to overlap heavily with things that are already terrified of Wurrgog Prophets. Where Ravenak adds an extra dimension is by giving you that potential 26” + Tireless Trackers reach to knock an enemy support hero on the head from across the board. While it’s not as good as dedicated hero sniping, it does hit the required roll against foot heroes with far greater consistency than the Purple Sun, and at 60 points the risk-reward is most definitely there.
Which is all a fancy and long-winded way of saying that when you need to kill a Krulghast, it’s a slightly less shit solution than your next-best alternative. Just remember we’re not playing Order here, so that next-best option is probably something like an allied Squig Gobba, and that should put it squarely in context. Yup.

Battalions
If you want to run a lot of MSU Big Stabbas, that’s already a pretty high floor on how low your drops can be. I generally want access to as many artefacts as I have Wurrgogs, so that means I’m taking a Warlord Battalion, and at that point we might as well fill our boots with Expert Conquerors and Bounty Hunters too.
Morrboys are outstanding in either of the above Battalions, and if you could take double Bounty Hunters I might have a hard decision on my hands; they chuck a surreal volume of dice that loves a damage buff, but they also stick around longer than your opponent expects which can really mess with their objective-capping plans.
So that being the case I opted to put two units of Morrboys into Conquerors, and the third into Hunters alongside the Maniaks. Overall that gives you a really good blend of damage and objective scoring units, with a lot of knowledge of what your opponent is doing before the game starts, while they have no fucking idea which way you will go. And those high drops are a big strength of the list.
How It Wins Games
If you’re not low drop, you need to be comfortable going for or second, and that’s exactly what this list does. Every compromise my opponents have made to lower their drops is now a complete waste, and just gives me more and more information earlier and earlier into my own deployment so I can start probing for the weak spot.
If you’re up against a low-drop shooting list for example, you can apply pressure by moving up a unit of pigs, with their Big Stabba bodyguards along for the ride to soak up Unleash Hell. Park your tanks on their lawn, threaten to dominate the table with a checkerboard of individually-disposable units, and watch the gears start turning in your opponent’s mind.
One of the sentences I heard most over the weekend was “I never take first turn with this army, but against you I feel like I have to”. That was matched in frequency only by my opponents going quiet somewhere around turn 2, staring at the board for a while and then telling me they had absolutely no idea what to do next.
What I cannot overstate is the unexpected mental load this army places on your opponents. If they take one look at it and dismiss it as a bunch of Big Stabbas with a 6+ save, they’re soon destined to be shaking your hand as they slide down towards the lower tables for their next game. Playing Bonesplitterz is different, and it starts before you even get to the table, where the Wurggog freaks your opponent out and they’re constantly having to think about those 12” staring zones. Splitterz are easy to kill, until they’re not. They’ve got linear movement, but they completely rearrange the board state before the game even begins.
One important thing to note is that this army is inherently resistant to debuffs: it has loads of units that can be treated as disposable, and exploding 6s to hit on a bucketful of dice are a great hedge against negatives to hit.
It can also be an Anti-Battle Tactic juggernaut: you can get in front of objectives to block off Desecrate their Lands, the 4++ ward turn regularly shuts down Eye for an Eye, Head-to-Head and Outmuscle, and a couple of cheap Big Stabbas in the corner will zone out deepstrikes and prevent Barge Through. So often your opponent is banking on Barge Through as a “guaranteed” turn 1 play to ease themselves into the game, and now you’ve got them rethinking their plans before you’ve even started.
In broad terms, this army has the speed and wound count to overwhelm shooting armies, the 4++ ward Waaagh to grind with combat armies, and the volume of stuff to ruin target priority for both. It has plenty of high rend and high damage attacks, surreal volumes of dice from your Morboys and Pigs, and mortal wounds galore from your wizards and Stabbas. Oh, and your opponent’s army doesn’t get Wards today either.
To be a true toolkit list you would need some kind of shooting phase, but the army really doesn’t have many bad matchups and can often dig itself out of a hole through Hero phase output alone. What it does most of all is forces mistakes from your opponent – big mistakes, and with great frequency.
Shoutouts
Thanks to Da Boss in Da North, Nathan Watson for chatting Splitterz list tech with me on Twitter – it’s been invaluable.
Thanks to my mate Joel Graham for steering me towards Boarboy Maniaks in Bounty Hunters, because boy did they do some work.
And thanks to ya boy Calvin Rarie for that Friday night pep talk before the event, getting me fired up good an proppa!
I’ll be back soon with the full write up on my games. Spoiler alert – it went really well. Catch you soon, you Maniaks.

7 thoughts on “Rolling Stones and Breaking Bones: Drakkfoot at Snake Eyes GT, Part One”