

by Peter Atkinson
If you’ve ever wondered why 3rd Ed games take bloody ages – tourney slots have generally blown out to 3 hours – it’s Battle Tactics. Dropping one is a pretty big deal, so we’ve all had that game where your opponent thinks about which ones they can score this turn with the minimum possible amount of dice-hopery, and without stiffing themselves for next turn, while their brain melts out of their ears and your life slowly slips away from you. In terms of Gigantic Third Edition Hero Phase Time Sinks, it’s second only to watching them scratch their arse for 5 minutes and then say “Might as well go for a CP”.
Regardless, BTs are a signature part of 3rd Edition, and where the book tactics have landed is frankly all over the place: hitting lucky on the Battle Tactics fruit machine can make a huge difference to an army’s competitiveness at the top end. Sometimes it won’t matter because you’ll ROFL-stomp your opponent, and they can’t score much either when you’ve tabled them in a couple of turns, but if you want the consistent 4-1s or better – which I think should be your target with this book – you’re going to have to beat competent players running filth of their own.
Does Cities have the Secondary support to get over the line when shit gets real? Maybe.
The Criteria
Secondaries are roughly half the points on the typical Battleplan, offering 2 per BT plus 3 for your Grand Strat (giving 13 in total), whereas 1-2-More on objectives offers up to 15. We’ll be ranking the Cities secondaries according to a few criteria, to assess how much they help you hit those 10+3 Secondary VPs:
- Turn 1 EZ Mode. Is there a gimme that you can bank turn 1? Always important because it gives you an easy flow into the game, lifting the mental load on you and putting scoreboard pressure on your opponent. It’s the first thing people look for in the GHB tactics and even when you can reliably score one of those early on, having a guaranteed one-two punch for the first two rounds is a huge quality of life boost.
- Grand Strategy. The GHB Grand Strats are often “win more” and are variations on have stuff left at the end of the game / stop your opponent having stuff left. In this context, having an absolute gimme in the book can swing tight games without any skill or good fortune required – Tzeentch and Fyreslayers are the benchmark here, offering you a 3-0 headstart in every game for no real reason.
- Zingers. Are there 2-3 tactics you can reliably hit most games, to complement 2-3 from the GHB and give you 4-5 every game? In the race to five there’s usually more value in a couple of zingers to get you over the line, even if the book is padded out with some dross and filllers, as opposed to having a whole bunch that are all kind of feasible but also dicey. In practice you’d generally prefer a couple of superstars over strength in depth.
- Synchronicity. How does this army work in with the GHB tactics – are they achievable for common builds? An example here would be Sons of Behemat – their own BTs aren’t amazing, but they had a really nice run with the first GHB in 3rd Edition that rewarded Monsters. With Gally Champs – not so much. So today we’ll be looking at Cities in the context of the Andtorian Locus handbook too.
- Flavour. Getting hit with the “thematic” stick in Battle Tactics is usually a sign that you’ve been stiffed with something random and dumb, like the one in Sons of Behemat where you have to hit a series of dice rolls to fling a model around. While it won’t always help you to hit those consistent 10+3 VPs, good design that makes tactics actually interesting deserves some kind of recognition.
This is a topic that I think is underserved in competitive Age of Sigmar, and we’ll repeat the exercise for other armies to build up a resource over time. We’ll probably cook up some kind of graph eventually too, but since we really want to grab a share of those New Book clicks give that the consideration it deserves to create something awesome, let’s crack on.
The Tactics
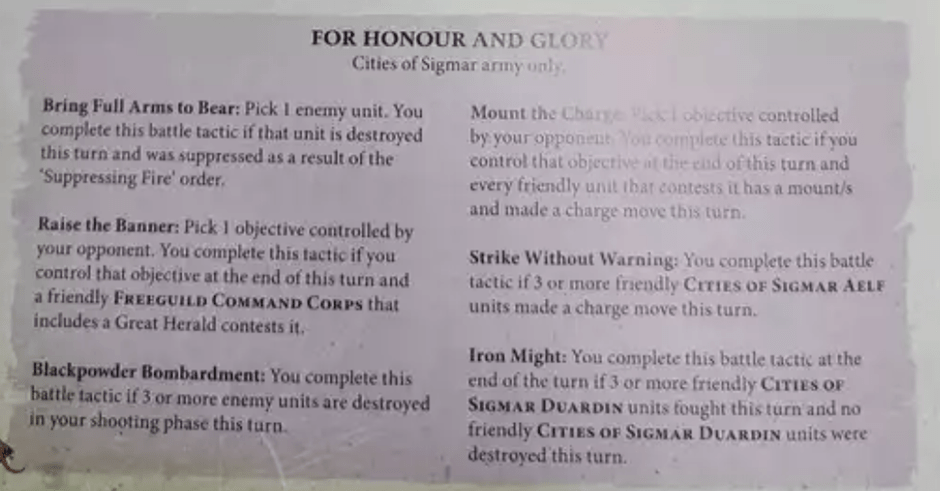
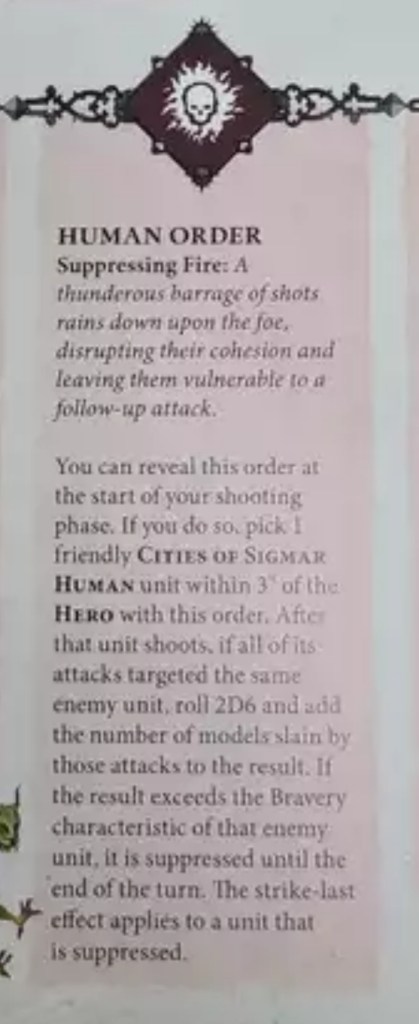
Bring Full Arms to Bear: This one revolves around issuing a Human order to shoot an enemy unit, then beating the target’s bravery with 2D6 plus the number of models slain. And then you have to kill that unit. So unleashing the Dakka into a unit of Grots will probably be OK, as long as you go on to do enough damage in total to pop the unit, but Death or daemon armies might make the first hurdle (suppression itself) dicey at times.
Interestingly, I can’t see anything that says the enemy unit needs to stay on the table to be suppressed; so if you completely shoot off a Mega-Gargant (for example), it can still be suppressed, as long as you win the bravery roll. Needs an FAQ this one but in the interim, you should be able to focus down most things, and even beating Bravery 10 will get more straightforward as you punch big holes in a unit.
Early game? Yes, you will usually have the reach.
Overall quality? Very achievable for any Human army. Marked down slightly because it relies on your opponent bringing the right units.
Raise the Banner: Take back an objective and have a specific unit on there. Hit with the flavour stick, in that it’s only achievable with one specific unit; that unit has some excellent utility though, so it’s well worth a slot in most Human armies.
Early game? Only achievable on turn 1 if your opponent goes first, but a solid turn 2 option.
Overall quality? Pretty good for most Human armies, but a smart opponent might target down the unit that can score this one and especially so if they have the tech to pick out specific models.
Blackpower Bombardment: Shoot off 3 units. You’ve got plenty of ways to soften them up first with magic and so on, but it does specifically have to be done in the shooting phase; you can’t rely on Battleshock getting you over the line.
Early game? Yup, if your opponent has a few soft units like MSU Hobgrot screens. You’re probably not dropping three Mega Gargants though.
Overall quality? In line with the theme so far: will often be achievable, but occasionally you’ll be stiffed by your opponent’s army composition. So it’s easy until it isn’t.
Mount the Charge: Take back an objective, and everything you have on it charged onto there and has a mount. Looks like it’s supposed to be a skill test or at least a memory test, but it should be pretty hard to screw yourself on this one; most of the times you take back an objective it’s by charging onto it and killing what was there. Shout out to Adam Nyborg for pointing out that this appears to include Crew on units like the Great Canon, per 22.3.1 – another one that might need an FAQ.
There’s an edge case where you can stuff it up by power-sliding into combat with Misthavn, because you can close that gap with mounted units and not complete the charge, so watch out for that one.
Early game? Another one you will rarely score at the top of 1, but can easily score from the bottom of 1 onwards.
Overall quality? Very high, you should score this in almost every game where you take cav. Just don’t shoot off every model and walk onto it, and you’ll be fine.
Strike Without Warning: Charge with 3 or more Aelf units. Easy peasy, as long as you take ‘em.
Early game? Another one that’s tricky unless your opponent steps forward first. Aelves move 9” with the right order in place but that’s still a tricky turn 1 charge.
Overall quality? If you’ve got the Aelf units you’ll score this. You can’t fail a 3” charge with +1 from the musician so you’ll get it.
Iron Might: Fight with 3 Duardin units and none of them die. Should be easy to set up, given that your dwarves are inherently tough with good armour saves and solid bravery.
Early game? See above, you’re only getting into combat once the gap has been closed so it’s at least bottom of 1 and probably turn 2 onwards.
Overall quality? Also see above, it’s close enough to an auto for Duardin-heavy armies. If you’ve got enough Duardin units you should have no dramas getting this one every game.
Grand Strategies
All we need is one.
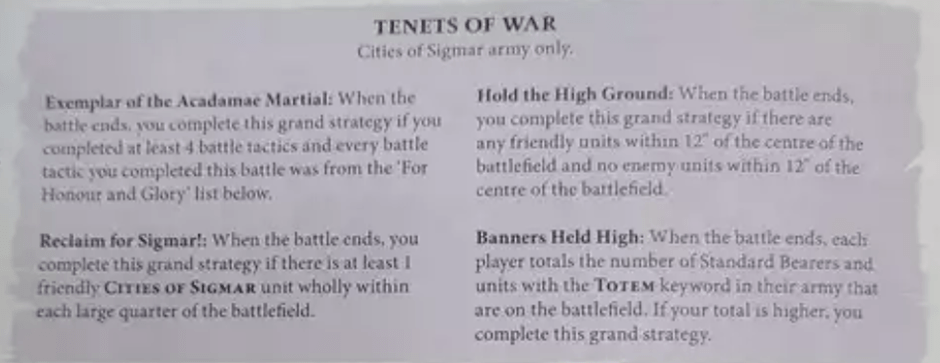
Exemplar of the Acadamae Martial: Standard “Score loads of your army Battle Tactics and nothing else”. Nah. It’s in every book, and it never gets taken – please stop.
Reclaim for Sigmar!: Claim some Lebensraum for the colonist assholes. Having a bunch of units spread out over the table means you finish the game in a dominant position, i.e. it’s win more, and not likely to get you over the line in a close one.
Hold the High Ground: See above, dominating the centre of the board is win more. You’ll score it easily when you wipe the floor with your opponent (and have probably won the game anyway), but in a tighter game it’s way too easy to get screwed out of this one if you go at the top of Round 5. Not what we’re looking for.
Banners Held High: And again, you need to have a bunch of units left alive at the end of the game. Worth noting that you will almost always win the tie-breaker because you have a surreal amount of Totem keywords in this book. Probably the one I’d take.
GHB Tactics
We’ll circle back and update this part after the current handbook cycles out. Or forget. Time will tell.
Intimidate the Invaders: easy for Living City, hard for basic gunlines. That being said, your gunlines will probably table most things by round 4 or 5, and then you can just spend your final turns running stuff around. Good for late game.
Reprisal: A bit easier for Cities than most armies, because they can target down enemy Generals, but with the standard rider that you have to get your own general killed first. Good for late game.
Endless Expropriation: Easy if your opponent is kind enough to cast an Endless, because you have the tools to explode their wizards and send them wild. Good for mid game, but dependent.
Magical Dominance: Again easier for Cities armies than most because they can nuke opposing wizards, and then cast without fear of being unbound. Plus they have a true magic dom faction. Good from mid game onwards.
Magical Mayhem: Kill a wizard with a damage spell or Endless. Maybe you can soften them up with the new Priest chick and dump something through Portals, but you don’t have the teleport for a standard Blizzard Wizard play, so with Hallowheart this is a mid-game onwards play due to ranges.
Bait and Trap: Retreat with 2 units and charge with 2 units. Inherently tough for gunlines but your Mary Sue units are tough as well as deadly, so it will come up sometimes. OK for mid to late game.
Led into the Maelstrom: Charge units with heroes and Battleline and don’t kill the opponent (or die). You’ll want a bunch of little heroes to issue orders, so you can usually tag the end of something benign and not have anything die, but this will be tricky with some common board states. OK for early to mid game as long as your opponent dangles some screens, and you remember not to completely obliterate one of them.
Surround and Destroy: Easy peasy. You can use the extra movement order to scurry over to the edges if needs be. Good for early to mid game.
The Verdict
So circling back round to our initial criteria:
- Turn 1 EZ Mode. There’s not an automatic BT that you’ll lock in every game, although there are several that are plausible, especially if your opponent goes first. If there’s a low-bravery target for shooting you’ll usually have the reach to score Bring Arms, and if your opponent goes first you’ll get the ones for stealing an objective. Otherwise you’re relying on Surround and Destroy so I’d have to say this is a minor chink in the Cities’ armour overall.
- Grand Strategy. The book tactics are mostly win more, but of those, I quite like the Totems one. They don’t have the automatic, score it every time, even-an-inanimate-carbon-rod-could-score-this-one GS that you ideally want. Cities will probably need to win the fight to secure any Grand Strat they take, but to be fair they have the tools to do exactly that in most cases.
- Zingers. Lots of them are contingent on what your opponent brings and the board state, but it’s hard to imagine that you won’t score at least a couple of your book tactics every game – even if you have to wait until round 3 for some of them. The Command Corps, Aelf and Duardin ones are easy mode if you have those units, you should score Mount the Charge easily enough and you have plenty of firepower to achieve the shooting ones – or at least you can build it into your list if you choose to. I’d say you can bank a couple of these as zingers if you construct your list accordingly.
- Synchronicity. Cities has plenty of good wizards and especially in Hallowheart you should be in good shape for the GHB tactics. You can pull out a couple of these to complement your book tactics and find yourself in good shape.
- Flavour. Driving indigenous peoples from their lands and shooting your opponent off the table? Yup, sounds like Cities of Sigmar. You could argue that the tactics are too Human-centric, because you only get one each for Aelf and Duardin units, but the counterpoint is that they are so easily achieved that it’s incentivizing any Cities army to take a more-than-token element of one or the other. Plus the dwarves can have a crack at shooting people off the table. Human gunline with a module of Aelf or Duardin support is pretty much on theme for what this army is right now.

Overall Score: Four Eggplant Emojis out of Five

Cities are an interesting case study: in principle they should be able to score 8 tactics in most games, never mind 5, but they don’t always get the most help in the most critical areas. Which is to say that they don’t have an absolute banker for the top of turn 1, and they don’t have a Grand Strat that will just happen by itself regardless of how the actual game is going.
Cities is an army where going second in the first Battleround open up a lot of possibilities, so that might be worth taking into account at listbuilding stage, which naturally complements the whole thing about gunlines going second and taking you off across a double. For that reason I’d be looking at low drops where possible.
Is it worth foregoing the extra shot at a Primal Dice to secure low drops? Maybe. Hallowheart can chuck an extra PMD in every cast anyway, so one archetype that the secondaries are steering you towards is the low-drop Hallowheart gunline, either as a one-drop or two-drop (which could be either double battle regiment, or battle regiment plus book Battalion). The two-drop gives you enough “stuff” to score an early Surround and Destroy, plus enough Hero coverage for issuing Orders, while still beating any armies that take the Acolytes battalion (i.e. most of them). So that would be my starting point. Another subfaction that lends itself well to Battle Tactics is Living City, which is fun to play and makes a cool theme on the tabletop, although perhaps less competitive overall than the Hallowheart and Misthavn blunt force trauma.
As an opponent, there’s a bit of counterplay to denying these things, but it will mean playing contrary to what the game normally asks of you: dangling screens out in front for the trading game will get them killed and knocked off objectives, both of which feed the Cities battle tactic engine. Something to think about.
In a more general sense, this feels like the book where GW starts to find their feet with BTs and start to use them as a balancing tool. I don’t find it plausible that this was the case in early 3rd edition – Morathi and chums for example weren’t so much worse than contemporary Kruleboyz that they needed free VPs for nothing. There’s a bit more subtlety here, and the tactics are interesting without falling back on RNG; they are achievable without guaranteeing 5+1 every time.
I’ve got my issues with the design of this book (and plenty of them – which we’ll tackle in another article). But credit where it’s due, this package of BTs is well-crafted and hits the right notes.
Good job, GW.
Credit for the cover image to GW

If you’d like to help us continue our work, we’d love to have your support. All Patreon Tiers include Discord access, exclusive articles and regular contests. Our Tiers are priced to be within everyone’s reach, so please click here to join us today!


3 thoughts on “Cities of Sigmar: Rating the Battle Tactics”