

Are they good? Are they shit? Are they fun? Are they frustrating? You know what, there’s room for more than one opinion here – and certainly room for nuance between the extremes. Although I might have my own reservations about where this army will ultimately sit, I was rapt to read about Alex’s early adventures with the army, which really showcased a lot of the good things they do bring to the table.
So let’s sit back and enjoy Alex’s army at work, doing what it does best. Over to you Alex, show us what you’ve got!
Alex Butler
Alex runs the Vaniljsas YouTube channel, a new venture focused on tactical videos offering punchy and practical tips for improving your game. Check out the channel, watch the videos, Like, Subscribe, Comment, all those good things right here.
About Me
Like many of you I started out enjoying Warhammer at a young age, specifically Eldar and Space Wolves from 40K. Following the classic pattern, I then lost touch with the hobby and came back when I got older, but this time jumping into AoS because of the higher focus on fun and excitement.
I jump around armies frequently, and I currently run Ironjawz, Ogors, Fyreslayers and KO. I have always favoured large cavalry focused lists, or a big monster mash – for example in Fyreslayers, I currently run five Magmadroths and no HGB. So I really enjoy leaning into that Timmy style of play, but trying to ‘make it work’ as I go.
Naturally for me, Sons seemed right up my alley: a big stompy army, massive models, and stuffing people in your pants… with all the recent news, what an amazing roller coaster of emotions. But rather than going into that, let’s talk about actually playing a game on the table.
Sons of Behemat
Like many of you, I have looked at Sons of Behemat and wondered where the power is, where is my big play? After having some time with the rules and playing a test game, I believe the route to victory may lie in the tricky plays; but how do we balance this, and get some damage to maintain relevance and keep in the fight?
The List
Stomper Tribe
Warstomper Megagargant – General – Monstrously Tough, Ironweld Cestus
Kraken-Eater Mega Gargant
1 Mancrusher
1 Mancrusher
1 Mancrusher
3 Mancrushers
1990pts
How The List Works
Warstomper
Required to be our General for the Stomper tribes, the aim is to increase our damage against hordes (changing those 1 damage, 10 attack swings from the Mancrusher to 2-3 damage is huge).
Killing hordes will also help capitalise on our Mightier Makes Rightier rules. I am taking your hordes off you, while demanding that you use a horde-sized unit to take the objective off me!
Given that we are locked to a Warstomper general, we need to help him answer some resilience questions, so we’ve gone with +5 wounds as the Command Trait and Reroll Saves for his artefact, hopefully helping him remain relevant whilst acting like a tarpit.
Kraken-Eater
This guy adds some serious utility, with the ability to move objectives around and massively reduce the army’s need to spread out on the battlefield (with a game-changer of a trick later!).
Mancrushers
These are our bread and butter battleline. The Stomper battle traits take these guys from zero to hero the moment they look at hordes. Our set-up is a 3 man unit, aiming to make a big hammer focused on fighting the hordes of enemy models…and hope for the best (fair warning, the army is very swingy).
We are also bringing 3 of these little-big guys as a screen, and general utility. If we have an odd job, we will throw them into the situation and hope for the best, even if it’s just to steal an objective for a turn with the ‘Counts as 10’.
The Batrep: Sons of Behemat vs Slaves to Darkness, Border War

My opponent was one of my main practice partners, and he brought his S2D with a toolbox army set-up. The aim was to have an answer to every question, even if it is a ‘sort of’ answer, rather than getting caught unawares.
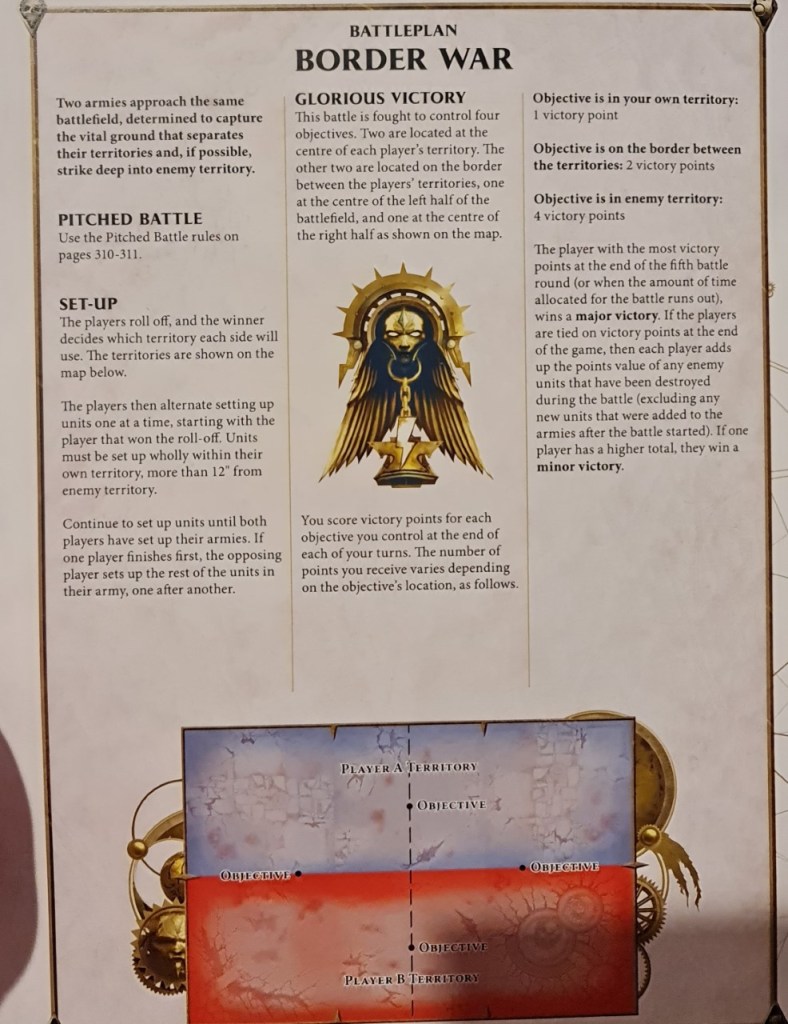
We rolled up Border War as the Battleplan, and after reading the details of the mission, I was positively vibrating: I had an idea for a ‘big play’. This battleplan states that the objectives are worth victory points based on their location, and we just got a model that can move the objectives.
In theory, we can move our home objective (which is worth 1 VP to us and 4 VPs to our opponents) to their side of the board, and give us a second objective worth 4 VPs to us and only 1 to them!
Turn 1
I was out dropped, so I was given first turn and had to make of it what I could.
Channeling my inner Blood Bowl player, I moved up my 3 individual Mancrushers, securing both middle objectives for the easy victory points and creating a wide net. This would force my opponent to bring out his Marauders and Knights to deal with the giants, whilst also bringing enough bodies to capture.
We moved the big unit of Mancrushers alongside the Kraken-Eater, and the Warstomper on the other side, essentially creating a protective cage around our valuable units, the Kraken-Eater in particular. He would get his chance to shine in turns 2 and 3, as I needed to capture the objective before I could kick it forward. With 5 VP secured, I handed over to my opponent for his turn.
My opponent moved up as expected, with the Knights going towards my left flank, and the Marauders going for my right flank whilst shifting his army forwards to gain board position. Both of the flanking Mancrushers died this turn, a whopping 360 points down already, reinforcing my belief about how squishy this army is.
Turn 2
Already a big priority roll! I got lucky and rolled high, eagerly taking the turn. The big opener was the objective kick, punting it up the board an average distance. Not where I need it yet, maybe next turn. The Kraken-Eater followed it up the board diligently.
We pushed our big unit of Mancrushers up the right flank, onto those Marauders who had taken down our lone giant. And wow, the damage total was perfect for an excitable player like me! We got started with some throwing attacks chipping in a small amount of damage, followed by some good charge damage, and my opponent still had 10+ models in the unit so we had +1 damage to all our attacks.
3 Mancrushers all swinging with +1 damage to every attack against Marauders with a 5+ save? We busted them open with headbutts before we even rolled with the clubs, doing in excess of 30 damage over and above the health of the squad.
On the left flank our Warstomper got stopped by Be’Lakor… well… that’s that I guess. Pretty sad that he got stopped in his tracks but I expected this, and would hope for better next round.
Our lone Mancrusher in the middle ran forward, dodging past Be’Lakor and getting a toe in on the backfield objective, capturing it and securing 7VP this turn for a total of 12.
My opponent then moved his Knights in, buffing them up and charging my Kraken-Eater whilst staying away from my now out-of-position Warstomper. What a nightmare, my high value unit who had the big plan was about to feel the pain. Luckily, after all the dice were done, I had 19 wounds taken. *Phew* Not out yet.
My Mancrusher on his home objective was promptly executed (you did a good job buddy, 4VP!).
Now wary of my Mancrushers, my opponent also moved his Chaos Warriors up on my right flank to intercept my team of hordekillers. My Mancrushers were saved by a god-tier dice roll: on 12 dice, I got ten 5+ saves! This was quickly followed by another brutal demonstration of why they were a hordekiller, from both a double stuff ‘em in me bag and the +1 damage paying dividends again (rerolling saves is only so good when the rend pushes you to a 5+).
We were both still in the game, 12-7 in my favour.

Turn 3
Priority roll, this time won by my opponent. Oh no… it’s all coming crumbling down… I won’t get to pull off the big play, surely my Kraken-Eater is going down this turn…
In a twist of fate, he was not within range to make the Knights fight twice, nor reroll all wounds. This meant I got away with it (just), with 31 wounds taken.
Elsewhere, I had him on the ropes. He mostly moved into positions to try to provide a threat in subsequent rounds, and turn those Knights back up to 11 with the Warshrine plugging the gaps in a front-and-center combat role. He secured 3 VPs, and passing the turn to me.
The Big Play
Immediately when my turn began, I kicked the objective 10” into my opponent’s zone, followed by paying a CP to run-retreat my crippled Kraken-Eater over his Knights’ heads and onto his back-field objective, securing 4 VP.
My Mancrusher unit then moved up onto the newly-moved objective, stretching out onto the side objective at the same time, securing both objectives for a total of 6VP.
The Warstomper you ask? Oh. That guy. Yeah… he ran up the left flank and unconvincingly killed a sorcerer, embarrassing for a 480pt model really, but he was the bread that bound my Mancrusher hammers together so we can’t put him down too much.
We then calculated the points, and I was up 24-10. We chatted about the Battleplan, and how the rules explicitly told us that the objective victory points were based on the location of the objectives.
This meant that I could score a maximum of 12 per turn, and him, 6 per turn: we laughed about it and virtually shook hands, and agreed that it was an interesting use of game mechanics.

Conclusion
Unit Performance
The Mancrushers performed mostly as expected, screening and getting a cheeky objective capture, with a shout out to the dice gods on my save roll in turn 2, and some shockingly good damage against those unprepared hordes of enemy models. I expect my opponent will behave differently against them in future, reducing the shock value; watch out for that swingy damage though, folks.
My Warstomper was Be’lakored by Be’lakor, a tragic situation which was expected. In games of Age of Sigmar, we have to expect that sometimes we will face an answer to a large point sink, in this case disabling it during a critical turn. When I did get to attack though… what’s with that? Why don’t you get the damage bonus of your little guys? Ugh.
The Kraken-Eater was the submarine, the hidden star of the show, before all the spinning plates that made my army collapse he was able to push the objective up and create a no-win scenario in my favour. Once again, like his brother the Warstomper, the damage was a joke. Whilst this tactic was funny, and proved amazing, I don’t expect my opponent to let me do this again, so I expect his role will be to push objectives closer to each other and let me castle up instead in future.
The Big Play
Looking at other battleplans, it looks like this can also be done on Scorched Earth, Battle for the Pass, and Total Commitment, which were in GHB20 alongside the points for SoB. Is this intentional from GW? How do you feel about it?
Personally, I like to think that the GW rules team would think of things like this before printing. However, I have emailed it into FAQs and asked others to discuss it with the playtesters. Hopefully we can get confirmation on whether this is your Sons of Behemat edge-case play that adds some interesting game to the army, and makes them relevant in the more spread-out battleplans.
The Army
Having a game like this has really excited me about the army: it has completely undone my bad feelings, I am now fully on board.
Will we lose games? Yes.
Is it going to get beaten by top tables and opponents who have experienced the army before? Most likely.
But will you, the player, have fun? Definitely. I have no doubt about it.
Maybe for my next game I will play football with all the objectives and more Kraken-Eaters, or even set myself a personal challenge to use Gatebreakers to destroy my opponent’s faction terrain. For me, this game is all about the social experience and the fun along the way.
For the performance-minded folks, whilst we probably have issues on the top-tier competitive scene, it still has game and can sit in the fat middle.
If you would like to hear more from me, or see some of my ideas for tactics, I am Vaniljsas/Alex across the various chats, on Twitter I am @_Vaniljsas_ and I have recently started on YouTube as Vaniljsas (https://www.youtube.com/channel/UCuyHO8DZBONtecuRmzR2Wfw).
Thanks for reading!

2 thoughts on “Sons of Behemat: List Tech and Batrep with Alex Butler”