

(Or how I learned to stop wearing pants and learned to love the Waaagh!)
It’s the community that makes wargaming such an important part of our lives, and although they’re a small faction, Bonesplitterz has a really cool community. Seriously – people love this army, and there is a band of dedicated players who keep coming back to the ‘Splitterz through thick and thin.
The WhatsApp chat, the Facebook group and the TGA forum all have small but knowledgeable communities who chat Savages day after day, week after week, year after year. In my most recent post I mentioned the “Shirtripper Special” in reference to the chad move that Shirtripper has been advocating over on TGA, namely pregame moving up to claim the centre objectives before the game begins.
Shortly afterwards, Shirtripper himself posted this detailed guide to Bonesplitterz on the forum as a Google doc, and I’m honoured to host it here on Plastic Craic. Enjoy.
Calvin Rarie of Atlanta, Georgia has been playing Age of Sigmar for 4 years now. Calvin is an enthusiast for under-represented armies and is looking forward to taking Bonesplitterz to GTs next year across the Southeast USA – hopefully to include Adepticon.
Over to you, Calvin.
An Introduction (to Nudity)
Hello! My name is Calvin, and I’ve been a Bonesplitterz player for a while now, stretching back into the World-That-Was of 2.0 when Warscroll Battalions were a thing. Most of Age of Sigmar has been unkind to the naked idiots running amok in the Orruk Warclans, with other armies getting the spotlight while the sole semi-competitive builds of Bonesplitterz got steadily worse. This was reflected in their played and win percentages at the end of 2.0, with only Gloomspite Gitz being played less (and winning even less) than the Savage Orruks of Bonesplitterz. Poor Gitz.
With the release of 3.0, things started to pull around with several events being won by Bonesplitterz armies fielding large blocks of Arrowboys shooting 90x a turn, with exploding 6’s to hit and causing mortal wounds on 6’s to wound thanks to the Priest/Wizard/All-Star that was the Wardokk. Things were looking pretty good for the Savage Orruks, and there was even excitement for the new book.
Until the spoilers came out.

Pretty much universally there was a lot of anger and disbelief at GW for the changes they made–gutting a lot of what Bonesplitterz unique like the Monster Hunter table in a format where Monsters are king. In fact, if you just straight up counted the number of words printed on the warscrolls before and after the new book came out, there were almost 30% fewer words printed in total for Bonesplitterz!
Naturally, wargamers like myself did what we always do and knee jerked our way straight off the Cliff of Despair and wrote the army off. However, I’m a fool for the sunk cost fallacy and by god I have these painted Orruks and I’m going to play them, damn it.
So I did. And I started to win. Way more than I did back in 2.0. They are good.
This guide is going to take us through how Bonesplitterz play and what I’ve learned, as well as some lists that might help you if you decide to take the plunge into what I think is Age of Sigmar’s most fun faction!
Who are the Bonesplitterz?
Bonesplitterz are one of the three main factions of the Orruk Warclans – the others being Kruleboyz and Ironjawz. Kruleboyz are of course the new Orruks on the block, relying on sneaky tactics and their venom-encrusted weapons to deliver mortal wounds en masse to their enemies. Ironjawz meanwhile are typically flying around the board smashing into their opponents while riding pigs or flying, angry Mawkrushas – or on the rare occasion, walking up the board on foot to smash whatever poor unfortunate soul is between them and their target.
Bonesplitterz, meanwhile, don’t get anything flashy like angry vegetables or weird swamp poisons. Instead, they get the power of Make-Believe and being really, really, really into fighting in the nude. Where some armies rely on things like rend and combos to dish out damage, Bonesplitterz instead relying on the raw volume of attacks to do the work – which when backed up by their battle traits and sub-factions traits can mean disaster for whatever is unlucky enough to get charged by screaming, muscle-bound nudists.
You can typically define Bonesplitterz as a very fast, very mobile semi-horde army that gets into your face and stays there the whole game. If that sounds interesting, then let’s explore what they have to offer!
Battle Traits
Bonesplitterz have several battle traits that you get for taking a pure BS army:
- Mystical Warpaint
- A 6+ Ward save army wide. Unlike Death armies, your troops don’t have to be babysat by heroes in order to get this benefit. This Ward can be boosted once per game by calling:
- The Bonesplitterz Waaagh
- Once per game at the start of the combat phase, you can have your Bonesplitterz general call a Waaagh which turns the 6+ ward save into a 4+ Ward save for that phase.
- With the right timing, this can be absolutely bonkers. We’ll see more in a bit, but when you can typically charge your opponent in their own deployment territory this ability can really help you hold on for dear life, and deny your opponents the ability to maneuver onto mid-field objectives.
- Once per game at the start of the combat phase, you can have your Bonesplitterz general call a Waaagh which turns the 6+ ward save into a 4+ Ward save for that phase.
- Spirit of Gorkamorka
- Units with 5 or more models have exploding hits on unmodified 6s in melee. Dakka dakka dakka, indeed.
- Note: this does disqualify some traditional favorites like Big Stabbas or Rogue Idols from being able to benefit, but you make up for it with large blocks of Orruks being able to dump buckets of dice in combat and come away with additional hits.
- Units with 5 or more models have exploding hits on unmodified 6s in melee. Dakka dakka dakka, indeed.
- Tireless Trackers
- After deployment but before the first battle round begins, half your army rounded up can make a 5” move.
- Only BONESPLITTERZ can use this, but that 5” move is great. It becomes an 8” move with the Great Hunter Command Trait. More on this later.
- After deployment but before the first battle round begins, half your army rounded up can make a 5” move.
Bonesplitter Warclans (Subfactions)
With 3.0 and a new battletome, when you build your Bonesplitters army you can pick one subfaction and it gives you an extra battle trait and (usually) unlocks extra battleline options – no mandatory command traits or artefacts.
- Icebone (A++)
- Unlocks Savage Boarboys as battleline, and when a unit rolls an unmodified 6 to wound in melee, that attack deals mortal wounds equal to its damage characteristic, and the attack sequence stops.
- Holy moly is this good. Given that the army essentially has no rend across the board, combining this with the Spirit of Gorkamorka means that you produce a lot of attacks that can produce a lot of mortals.
- NOTE: this does not have the unit size restriction that Spirit of Gorkamorka has, so it works on everyone.
- Unlocks Savage Boarboys as battleline, and when a unit rolls an unmodified 6 to wound in melee, that attack deals mortal wounds equal to its damage characteristic, and the attack sequence stops.
- Bonegrinz (C)
- Unlocks Savage Arrowboys as battleline, and adds 1 to their attacks with their Stingabows.
- Oh how the mighty have fallen. For basically all of 2.0, Bonesplitterz was the shooting army for Destruction. Now? Not so much – but thanks to All-Out Attack a block of 30 Arrowboys can deliver a surprising amount of pain in the shooting phase. You take Bonegrinz to relive the glory days or because you have 60+ Arrowboys and you want to play with them, dammit!
- Unlocks Savage Arrowboys as battleline, and adds 1 to their attacks with their Stingabows.
- Drakkfoot (B)
- Unlocks Savage Morboys as Battleline, and attacks from DRAKKFOOT units can’t have Wards applied to them.
- This gets better the more Damage 2 attacks you have (read: Big Stabbas and Rogue Idols) but overall good regardless of your opponent since the Amulet of Destiny is a thing.
- Unlocks Savage Morboys as Battleline, and attacks from DRAKKFOOT units can’t have Wards applied to them.
Bonesplitter Command Traits and Artefacts
I’m going to be honest with you here: the artefacts and command traits for Bonesplitterz aren’t great, with one major exception for each. I’ll be talking about them in great detail here and why they are good–but understand that you’ll almost never take a different command trait, and your second artefact will likely just be the Amulet of Destiny.
- Glowin Tattooz (Artefact)
- Adds 2 to the ward save of the bearer. Out of Waaagh means a 4+, with Waaagh active it’s a 2+.
- Okay, so you’re going to take this every time, because you’re going to be taking a Wurrgog Prophet every time. He’s our best caster, but more importantly he has an incredibly powerful warscroll ability that gets significantly stronger with a 4+ ward save. Spoilers: I’ve done things like kill Kairos from full with him and this artefact. Did that catch your attention? Good.
- Adds 2 to the ward save of the bearer. Out of Waaagh means a 4+, with Waaagh active it’s a 2+.
- Great Hunter (Command Trait)
- Lets you do an 8” pre-game move with Tireless Trackers instead of 5”. Can only be taken by a Savage Big Boss.
- This command trait right here is a little game warping with how the rules work. Not to say it’s Archaon levels strong but here me out:
- Most non-”The Vice” missions put objectives about 11” from friendly territory. Objectives can be captured by units that are within 6” of the objective. Got it so far?
- A 5” Tireless tracker move will never let you put a unit on the objective. An 8” move will.
- After set-up but before the first battle round begins, players capture objectives they have units on that their opponents don’t. Usually this means you can capture all mid-field objectives before the first turn.
- Because in AOS you retain control of an objective even when you take your models off of it, you’ll be in a position to control the majority of the objectives on the table and then charge off of them.
- This command trait right here is a little game warping with how the rules work. Not to say it’s Archaon levels strong but here me out:
- Lets you do an 8” pre-game move with Tireless Trackers instead of 5”. Can only be taken by a Savage Big Boss.
I’m serious when I say Glowin Tattooz and Great Hunter makes it into every Bonesplitterz list. They are head and shoulders above any other command trait or artefact in Bonesplitterz and – hot take here – the best mono-faction picks you can make in the entire book.
We’ll get into more depth later with how this plays out in practice, but for now remember these two: they’ll only get more important as we go on.
A note on Mount Traits:
Orruks now have Mount Traits! Woohoo! But only one Bonesplitterz Hero can get one, and that’s the Maniak Weirdnob. Since he can only take the non-Monster mount traits in the book, the only one for consideration really is the Fast ’Un mount trait:
- Once per game in the Hero Phase, you can make a 12” normal move with this unit.
The Lore of the Savage Beast
Now down to 4 spells that are all much different than before, there’s one slam dunk winner, 2 useful spells, and 1 that you will basically never take.
- Glowy Green Tusks (A)
- Gives mounts for a BONESPLITTERZ unit wholly within 18” rend -2 on their attacks, on a 5 to cast.
- Put this on Boarboy Maniaks and launch them at the opponent. Massive damage increase on average for cavalry in the army.
- Gives mounts for a BONESPLITTERZ unit wholly within 18” rend -2 on their attacks, on a 5 to cast.
- Power of the Were-Boar (B)
- Casting on a 6, pick a BONESPLITTERZ unit wholly within 24”. That unit gets +1 to charge/run/to hit in melee, but that unit can’t shoot.
- Take a block of 30 Orruks with Stikkas and suddenly the block of Orruks on the charge hits and wounds on 3+.
- Never cast this on Arrowboys.
- Casting on a 6, pick a BONESPLITTERZ unit wholly within 24”. That unit gets +1 to charge/run/to hit in melee, but that unit can’t shoot.
- Gorkamorka’s War Cry (C+)
- Casting on a 7, pick an enemy unit within 12”. That unit fights last.
- Seems pretty good, but the only wizard who will get within 12” of an enemy unit safely is going to be the Weirdnob (remember that Fast ‘Un mount trait we talked about?).
- Wurrgogs should never take this, because if an enemy is in range that unit is going to get mulched by the Wurrgog Mask.
- Casting on a 7, pick an enemy unit within 12”. That unit fights last.
- Squiggly Curse (F)
- Casting on a 6, pick 1 enemy hero within 3” of the caster and they take d3 mortal wounds. If that hero dies from the MWs, then the caster gets +1 to cast for the rest of the game.
- Categorically worse than Arcane Bolt since you can pop the bolt when you want. If your wizards are in combat with the enemy, you’re already in trouble.
- Casting on a 6, pick 1 enemy hero within 3” of the caster and they take d3 mortal wounds. If that hero dies from the MWs, then the caster gets +1 to cast for the rest of the game.
Leaders
Sorry to say but I’m not even going to review Kragnos here. You play him because you like him a lot, not because he’s competitive. Unfortunately the largest Centaur ever just doesn’t survive well right now and just doesn’t do enough to warrant paying God prices.
Wurrgog Prophet 150pts (A+++)
- A level two caster (meaning two casts/unbinds/dispels) with Bravery 8, 7 wounds and a kickass Warscroll ability.
- His Warscroll spell casts on a 5 and lets you pick an enemy unit within 24” and roll a dice for each model in the unit. On a 6+, they take a mortal wound. If it was cast on a 10+, instead they take mortal wounds on a 4+. Pretty good when stacked near a Rogue Idol for the +1 to cast!
- The real reason to take the Prophet is his Mask ability. What used to be an artefact is just now baked into his warscroll:
- At the start of the hero phase, instead of casting spells you can choose an enemy unit within 12” of the prophet and roll a die. On a 3+ they take d3 MWs. On a 1-2, the Prophet takes d6 MWs. You can repeat this process until A) the enemy unit dies, B) the prophet dies, or C) you decide to stop rolling.
- Yes you read that right. For 150 points you get into a staring contest with the unit of your choosing and roll a die until someone’s head explodes. This can cause some hilarious results, with tales of Mega-Gargants with an Amulet of Destiny dying from full thanks to some hot dice.
- It’s because of this ability you always, ALWAYS put the Glowin Tattooz on him as it drastically extends his lifespan. If you run two Wurrgog Prophets, the second will probably get an Amulet of Destiny if you go that route.
- Because this ability happens at the Start Of the Hero Phase, you can choose to do it before or after a Heroic action if you want to try for the heroic recovery. Also combos well with an Emerald Lifeswarm or a Wardokk’s healing dance.
Savage Big Boss 65pts (A+)
- A foot hero with a 6+ save and an attack profile of 6A/3+/3+/-1/2D. His only warscroll ability is that after he fights, he can pick a BONESPLITTERZ unit wholly within 12” of him and within 3” of an enemy unit, and if that unit hasn’t fought it fights immediately.
- Most Bonesplitterz take him as a 65 point upgrade to the army in the form of the Great Hunter command trait for that sweet, sweet 8” pre-game move.
- However, that warscroll ability lets you do some pretty insane stuff in the combat phase.
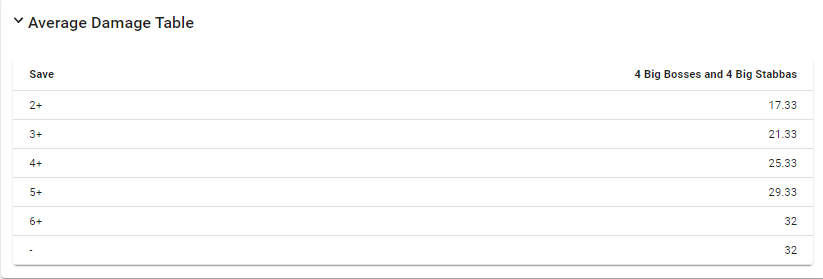
- Let’s say you have 4 Big Bosses, and you charge them and another unit of yours at your opponent’s unit. The first Big Boss fights, then you get to activate the next. Then the next. Then the next. By the time the 4th one finishes attacking, you’ll have made 24A/3+/3+/-1/2D for 260 points. And THEN you get to fight with another unit after that if you have one.
Maniak Weirdnob 100pts (B)
- Mounted level 1 wizard with a Warscroll spell that gives +1 to wound in melee on a 7 to cast. Can take non-monster mount traits–which will always be Fast ’Un.
- As a mounted hero, he’s pretty good. Being able to run around and keep up with Boarboys helps him stay relevant by buffing them with spells. The Fast ’Un mount trait means you can do some pretty sick maneuvering running around screens to tag back objectives people move off of.
- Probably the only contender to carry Gorkamorka’s Warcry, since he is the only wizard in your list that can reliably get close to enemy units to cast without getting killed.
Wardokk 80pts (C)
- A level 1 wizard with no warscroll spell, but instead of casting a spell he can do a dance that on 3+ die roll either A) heals a BONESPLITTERZ unit d3, B) give a BONESPLITTERZ unit +1 to their save until your next hero phase, or C) give a BONESPLITTERZ unit +1 to cast/unbind/dispel until your next hero phase.
- Formerly a priest and a wizard, the Wardokk has definitely lost some versatility. Before the new book, you could pray/cast/dance, now you can either cast or dance in the hero phase, but not both. Still, for 80pts he can make your block of Orruks tough to shift.
Special Considerations: Mega-Gargant Mercenaries
- So there’s an argument to be made with the Mega-Gargant mercenaries, namely of the Gatebreaker and Kraken-Eater kinds. The former hits really hard so if you’re looking for pure damage output, he’s your guy. But as we’re about to see, the Kraken-Eater can kick objectives beneath blocks of 30 Savage Orruks, making taking back that objective nothing if not an absolute pain in the ass.

Troops and Behemoths
For simplicity, just know that each unit below except for Big Stabbas has a Musician, Standard Bearer and Champion: +1 to charge if you have a Musician, +1 to Bravery with a Standard Bearer, and the Champion gets an extra attack.
Savage Orruks 165pts (B)
- Generic battleline regardless of your subfaction choice coming in units of ten. 2W each with a 5+ save and a 5” movement. Can be equipped with Chompas for 4+/3+ with a 1” reach or Stikkas with a 4+/4+ with 2” reach. Gets +1 to wound on the charge.
- These guys can get absolutely infuriating for your opponent’s to shift off an objective. At 2W each and on a 32mm base, these chaps represent upwards of 60 wounds your opponents have to chew through with both a 5+ save and a 6+ ward (or a 4+ ward on the really important turns). Due to coherency rules, you’ll almost always put Stikkas on them for that sweet reach.
- Perfect target for Mystic Shield or a Wardokk dance.
Savage Orruk Arrowboys 145pts (C/B for Bonegrinz)
- Battleline in Bonegrinz where you can take them in blocks of 30. The third attack is now locked behind the Bonegrinz subfaction so at base they shoot twice on 5+/4+, but they each now attack twice in melee on 4+/4+ as well. Bows have an 18” reach and have -1 rend against Monsters. Still 2W each, still 5” movement, but only a 6+ save.
- Outside of Bonegrinz, you likely won’t be playing them, as they don’t benefit from Icebone or Drakkfoot very much. In Bonegrinz where they are battleline, however, taking 30 represents 90 shots which after an All Out Attack comes to 90A/4+/4+/-/1D. Not great, but respectable, and spooks the hell out of some of your opponents when you start rolling 90 dice.
Savage Morboys 155pts (C-/B- for Drakkfoot)
- Battleline in Drakkfoot, comes in 10s. 5” Movement and 2Ws like usual, but they have 3 attacks each at 4+/3+/-/1D, and can get +1 to their attacks if they charge. Still only 1” reach.
- I’m not the biggest fan of these guys, even in Drakkfoot where they play best. Volume of attacks is critical, but coherency makes maximizing their attacks a challenge, and being slow on foot means you have a harder time picking and choosing your fights.
Savage Boarboys 140pts (B/A in Icebone)
- Cavalry Battleline in Icebone, coming in sets of 5 with 12” movement, 5+ save, and 3 wounds each. Can be equipped with Chompas for 2A/4+/3+/-/1 at 1” reach or Stikkas for 4+/4+/-/1 at 2” reach. Their boars have an attack profile of 3A/4+/4+/-/1. When they charge, Stikkas and Boars get +1 to hit and wound for that turn.
- Boarboys are my bread and butter, and the reason to run Icebone. 12” movement means with an 8” pre-game move you’re almost always within charging distance of your opponent turn 1 and still be able to retreat and run around tagging objectives.
- When I have the points, I take these guys in 10s, which is going to be true for the Boarboy Maniaks in a minute. For coherency, you can typically get 8 into combat with the back two maintaining cohesion. Turning them sideways lets Stikkas fight two ranks deep.
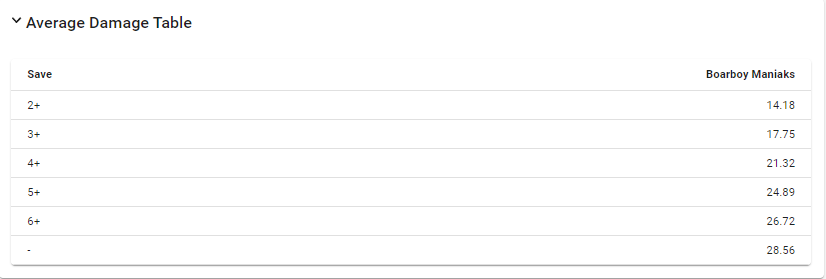
Savage Boarboy Maniaks 145pts (A/A+ in Icebone)
- No longer battleline. 12” movement and 3W like Boarboys, but you replace the rider with a Morboy who has 3A/4+/3+/-/1 with an additional attack on the charge.
- These guys are the bread butter of most lists I put together. With 10 Maniaks you can usually get 8 into combat using the formation above, which with the champion represents 56 attacks that explodes on 6s to hit and (in Icebone) causes MWs on 6s to wound.
- These guys are the perfect target for Glowy Green Tusks.
Savage Big Stabbas 80pts (B/B+ in Icebone or Drakkfoot)
- Two Orruks on a cavalry base carrying a tree trunk with a spear tip tied to it. What’s not to love?
- Comes in pairs for 80 pts, 5” movement with 4 wounds each and 3” reach. Each model makes 3A/3+/3+/-2/2. When they get killed by a melee weapon, you roll a die and on a 4+ or a 2+ for a monster, they hurl their spear one last time and deal d3 MWs to the attacker.
- Since they max out at 4 models, they never get exploding 6s to hit. That being said, they are one of only two sources of -2 rend for Bonesplitterz that doesn’t involve a Mega-Gargant. Pair these bad boys up with 4 Big Bosses and murder whatever they touch.
Rogue Idol 430pts (B+/A in Icebone and Drakkfoot)
- A giant pile of animated rocks from ForgeWorld that does quite a lot. 16W with a 4+/5++ save that can move 10”. Gives +1 to cast to Orruk Wizards within 6” and +1 to bravery for Orruks wholly within 18”. Gets +1 to hit on the charge, does 1 MW at the end of combat to units within 3” on 4+ die roll, and when it dies it explodes dealing d3 MWs to each unit within 3” on a 4+ as well. Oh, and it’s a TOTEM so it can issue commands, too.
- The Rogue Idol is not only versatile, but has a pretty good combat profile as well. Its first profile is 2A/3+/2+/-2/d6 with deteriorating to wound rolls as it goes down the brackets. The second profile is 10A/3+/3+/-2/2D with the number of attacks going down on lower brackets.
- It’s the perfect companion piece to a Bonesplitterz army, being quite tanky for its points and can hit hard with some good dice, especially on the charge. That +1 to cast makes the Wurrgog’s warscroll spell much better, and helps guarantee those buffs to go off as well. I use him to escort my Wurrgog around.
- If you’re averse to buying from FW, you can always look out for alternatives in the 3D printing world, or literally just glue some cool looking rocks you found in the wild and paint a scary face on it.
Actually Playing Bonesplitterz
With the units reviewed, let’s talk about playing Bonesplitterz. In short, these naked idiots compete with Ironjawz as the most aggressive army in the game, but play differently. You’ll still be charging T1 most of the time, but buffed up Gore-Gruntas and Mawkrushas on average do more damage. So why play Bonesplitterz then?
Well, this is a game of objectives. And where Ironjawz rely on buffs on small hammer units to clear your opponents off the board, Bonesplitterz uses larger, less powerful units to charge opponents in their deployment zones and keep them there.
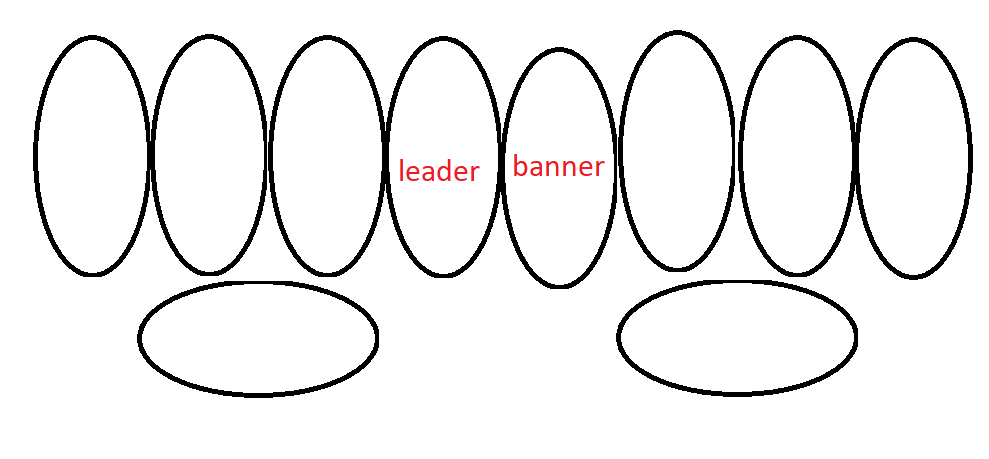
For example, let’s take Savage Gains. Assume you’re playing with the Icebonez subfaction and you take a lot of Boarboys in a 1-drop list. Savage Gains has 11” deployment territories for each player and a 22” no-man’s land in the middle. Let’s assume you deploy your boars like this:
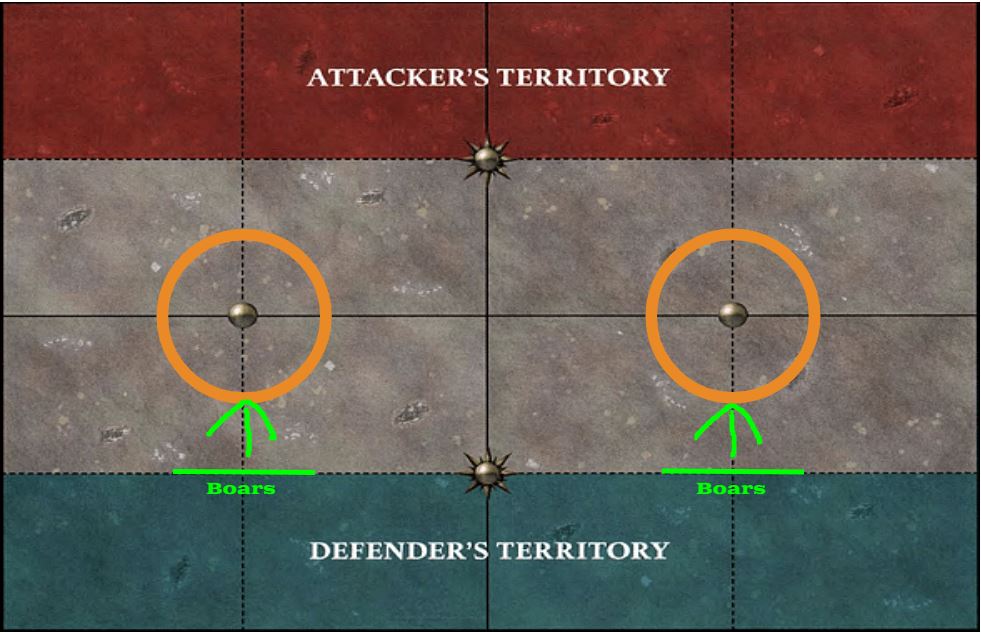
The circles are the 6 inch bubbles around objectives you need units in to capture those objectives. With a Savage Big Boss that has the Great Hunter command trait, you get to make an 8” move with those boars pre-first battle round, resulting in something that looks like this:
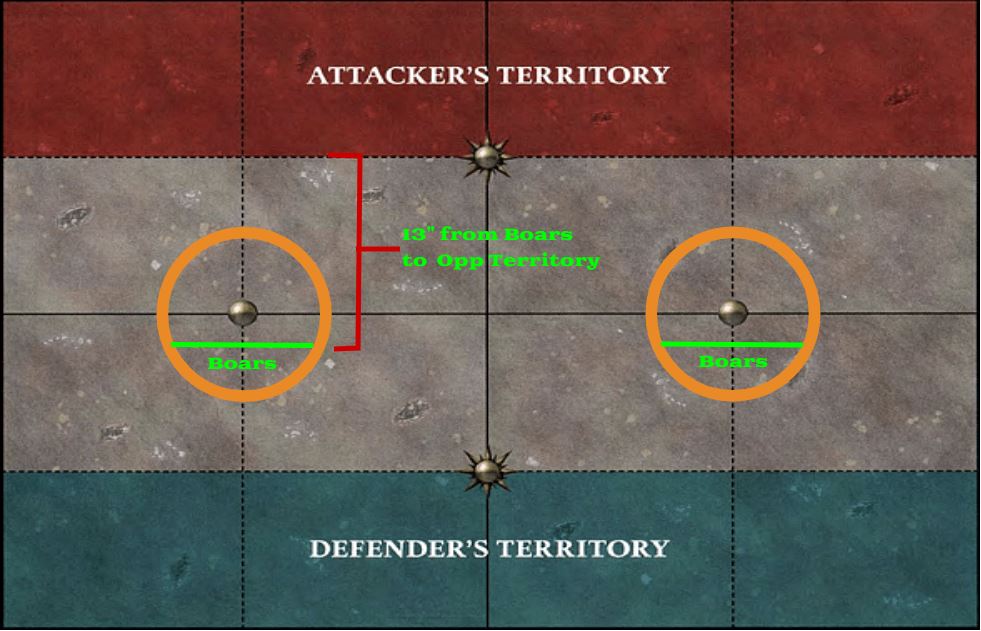
So now, that deployment is over, and set-up is now finished, each player gains control of each objective they have units on that their opponent’s do not. Meaning you’ve just captured the majority of the objectives on the map before the battle begins.
Here’s where it gets good.
In Age of Sigmar, you retain control of objectives even if you leave them entirely (with some exceptions depending on the mission). This allows those Boarboys you used to capture the objectives to move off the objectives and charge your opponents. Thanks to a 12” movement and the +1 to charge from the Musician, that means unless your opponent deploys really far back, you’re going to get the charge practically every time.
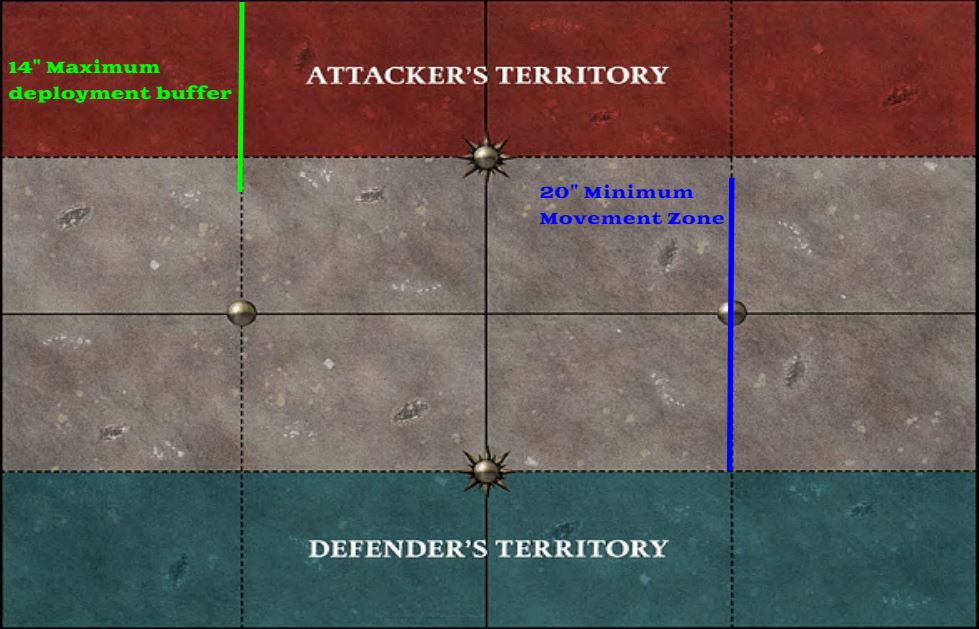
Looking at it from another perspective, your opponents typically line up with their army on their border, creating a 3” bubble from their territory that you can’t step into. I call this a “deployment buffer zone” that restricts movement on T1. Because your boars get an 8” pregame move and a 12” normal movement and a +1 to charge, this means your boars have an absurd 23” minimum threat range on T1. If you go first, your opponent is getting charged. And remember, they can only redeploy once.
So what do you do now? Well you charge, of course! You’re not likely to completely kill what you’re attacking, but you can typically severely cripple anything you touch. The best part is you’ve now locked them in their deployment territory, severely restricting their movement.
Let me tell you this now: Age of Sigmar is a game of movement with some dice rolling in between movement phases. Few armies in the game have our mobility, and once you grab your opponent by the belt buckle in their territory, it could be multiple rounds before they can begin to break free and grab objectives. Most of the games I have won happened because I grabbed all the objectives I could and held on for dear life – sometimes denying my opponent all of their points in a round.
But let’s say you don’t want to play with boars and instead enjoy large blocks of Orruks. That’s great! Because thanks to their 32mm bases, you can absolutely choke up objectives with bodies. Since your average objectives in a mission have a 6” aura around them, that means you have a 12” circle to work with. Because you have 32mm bases, that means each base is a 1.26” circle. When you account for coherency and max out the distance between each Orruk, and using some fairly complex math, you get about 31 bases that you can fit into that objective. Given that we can take Orruks in blocks of 30, you can literally cover the entire of the circle and keep your opponents out.

Sample Lists for Each Subfaction
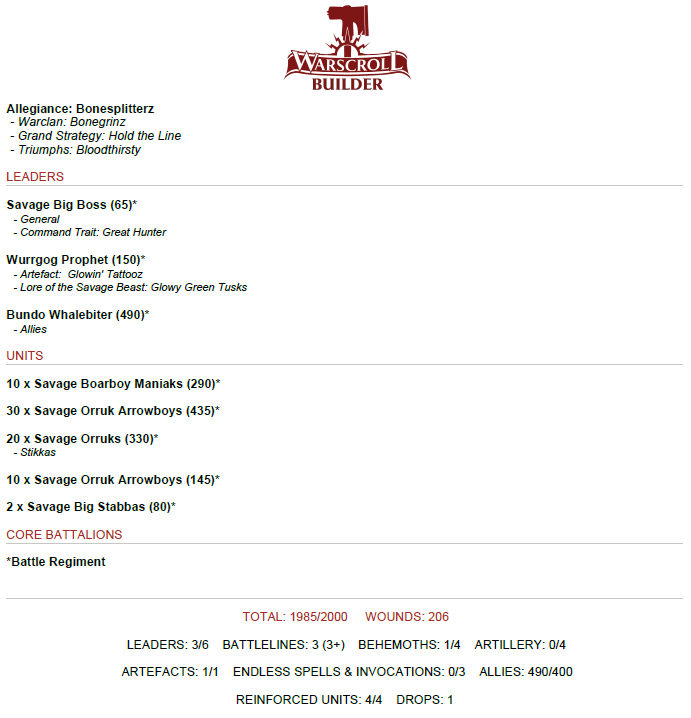
Icebone
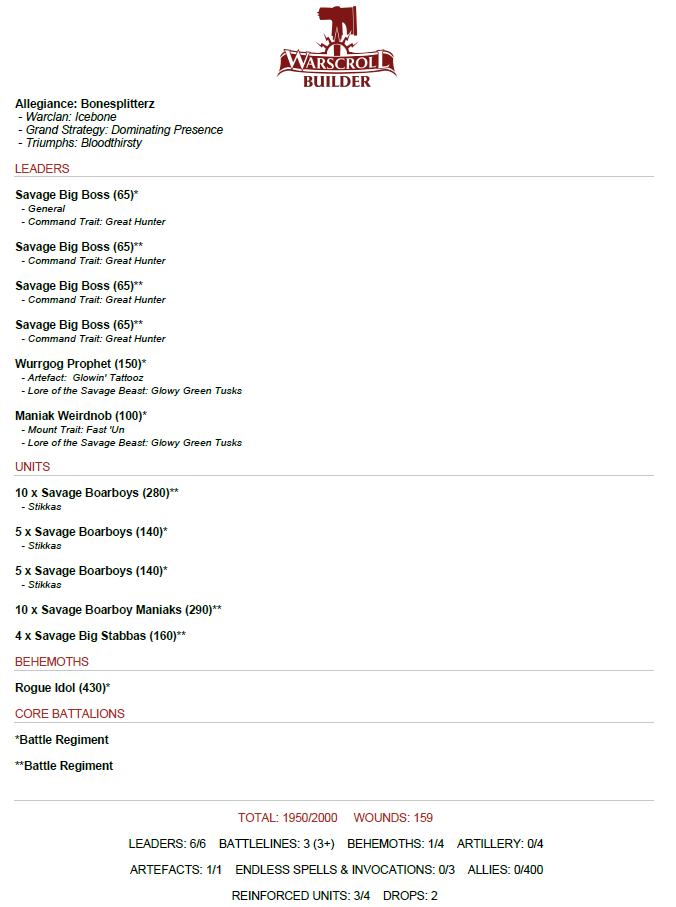
In this list, we’re looking at 5 big threats here: the 10x Boarboys, the Maniaks, the Wurrgog Prophet, the Rogue Idol, and the blocks of 4 Big Bosses and 4 Big Stabbas. In 2 drops, you’ll usually be able to get the first turn against most armies meaning you get to do the whole charge and block in the first turn. I’m currently 6-0 in local tournaments with this exact list. Fishing for the triumph means you can make the Big Stabbas hit and wound on 2’s with an All-Out Attack. Six units will get a pre-game move.
On that note, most of my lists involve fishing for triumphs, as eking out every advantage also denies resources to your opponents, and that’s the key to victory with Bonesplitterz. You can easily trim this down to a 1 drop by gutting all but one Big Boss and reinforcing the Boarboys.
Bonegrinz
This is mostly theoretical here, as Bonegrinz is currently the least played subfaction for Bonesplitterz since their focus is on Arrowboys. The above is something I’m looking to take soon, where I intend to take advantage of having 30-orruk blocks standing on objectives supported by a Kraken-Eater kicking objectives under them. Getting the Triumph boosts Arrowboys by a lot, and with this list you’re looking at 4 units moving pre-game
Drakkfoot
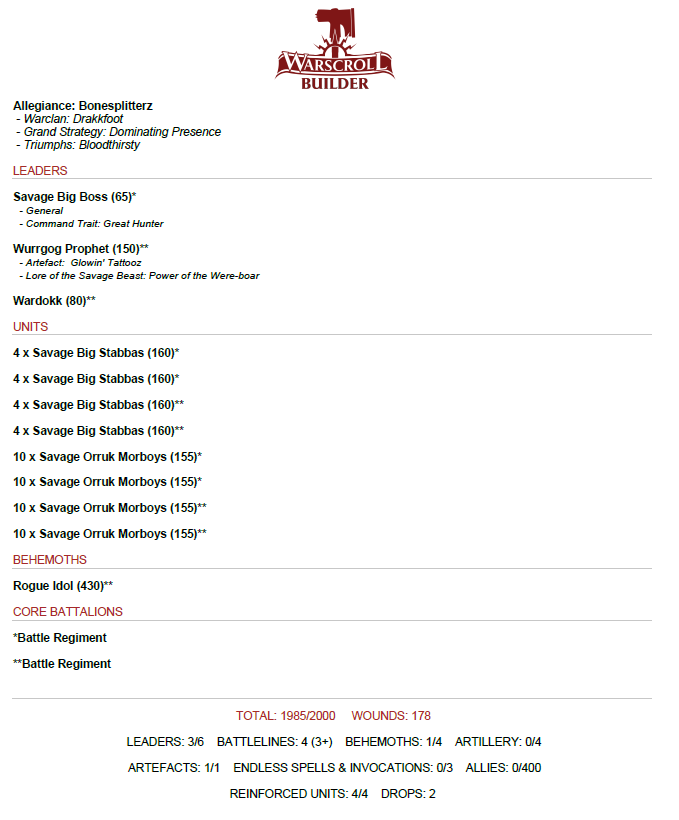
Alright so hear me out here: in this 2 drop list, you basically have the Morboys being followed around with the Big Stabbas just behind them. Thanks to their 3” reach, if the Morboys get charged then they get punched back by the Stabbas. If not, then on the charge you can deal some immense damage. With this list, 6 units will get that 8” pre-game move.
Final Thoughts
I don’t think Bonesplitterz is a 5-0 army at a major GT, but you can definitely 3-2 and 4-1 with it. The strength in the army is catching your opponents off-foot and denying them points at every chance you can get.
That said, this army is fun. In my opinion they are much, MUCH better than where they did in 2.0, and by far the best part of the army is getting to explain it to everyone around you because I guarantee 9/10 of your opponent’s have never played against Bonesplitterz.
In fact, the single best thing about this army is explaining how the Wurrgog Prophet works, followed up by having to show your opponent the warscroll to prove you’re not just making it up. I personally keep a tally of what the Wurrgog has killed, with the crowning achievement so far being killing Kairos outright from the top. Next step for me is to bring down a Mega-Gargant.
If you have any questions about Bonesplitterz or my thoughts, you can reach out to me on Discord @Calvin#6383 or on TGA as Shirtripper. Thanks for reading and I hope it helps!

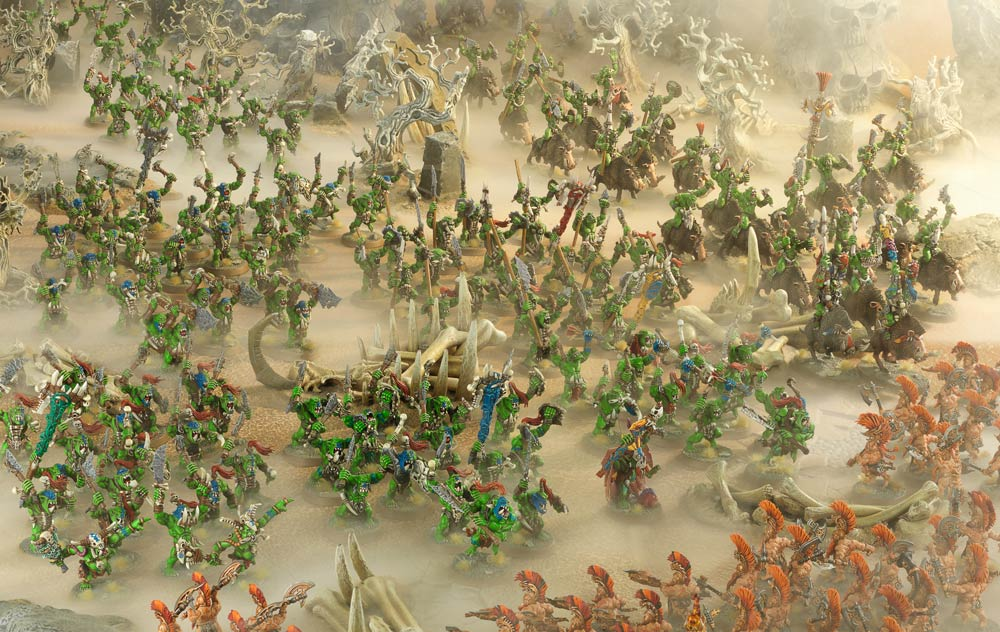
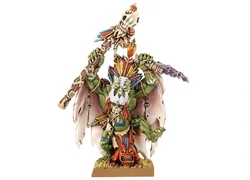
Credit for the cover image to Games Workshop. All uncredited models painted by the ripper of shirts himself.

Love the positivity for the faction, glad there is hope out there and honestly I might be building a list, they are pretty easy to paint
LikeLike
Wow this is a fantastic review! I have played against Bonesplitterz with my Legion of Azgorh at Adepticon 2019 and they were indeed super fun! They’re super green skin is also quite striking and seeing as how I don’t have a green army yet, I think this might be on the docket. Destruction is really scratching the itch these days.
LikeLike
This is beautiful and it really temps me to start my own Bonesplitterz army.
LikeLike