

Tonight, I am staying at the palace of Prince Kaunitz, where I shall sleep two or three hours. The Russian army is not only defeated, it is destroyed.
I kiss you,
Napoleon
~ Excerpt of a letter from Napoleon to Josephine, 1805
Well hello there! I want to say a big thank you to everyone who reached out and got in touch after my most recent post. Although the DVT is still lingering and I’ll be on medication for a while longer, I do feel much better now, and I’m essentially operating back to normal in all aspects.
Over the last couple of months I’ve not really played or looked at AOS at all – it must be at least 3 months since I played a game, as I’ve focussed heavily on MCP – but I put that right this week by cracking out the Bonesplitterz. So let’s see how that went, shall we?
The Context
This was a practice game against my mate Adam’s Ironjawz. Adam has just picked up IJ and is learning them for a teams event, so this was as much about giving his Bloodtoofs a hit out as anything else.
Adam was running a highly competitive Ironjawz list, rocking the modern classic double Krusha with Amulet and Destroyer, with a side order of Gore Gruntas.
As for me, I ran a Bonesplitterz army trying out some Spiderfang allies. I wrote this list to make use of some cool units that I like (Big Stabbas, Spiderfang) and although it’s not cutting-edge competitive, it’s not trash either:
Allegiance: Bonesplitterz
– Warclan: Icebone
– Grand Strategy: Get Dem Bones!
– Triumphs: Inspired
Leaders
Wurrgog Prophet (150)**
– Artefact: Glowin’ Tattooz
– Lore of the Savage Beast: Glowy Green Tusks
Wurrgog Prophet (150)**
– Artefact: Dokk Juice
– Lore of the Savage Beast: Glowy Green Tusks
Savage Big Boss (65)**
– General
– Command Trait: Great Hunter
Battleline
5 x Savage Boarboys (140)**
– Chompas
5 x Savage Boarboys (140)
– Chompas
5 x Savage Boarboys (140)
– Chompas
Units
10 x Savage Orruk Morboys (155)
10 x Savage Orruk Morboys (155)
4 x Savage Big Stabbas (160)*
– Reinforced x 1
4 x Savage Big Stabbas (160)*
– Reinforced x 1
4 x Savage Big Stabbas (160)*
– Reinforced x 1
5 x Spider Riders (100)
5 x Spider Riders (100)
Behemoths
Skitterstrand Arachnarok (200)
– Allies
Core Battalions
*Hunters of the Heartlands
**Warlord
Additional Enhancements
Artefact
Total: 1975 / 2000
Reinforced Units: 3 / 4
Allies: 200 / 400
Wounds: 187
Drops: 14
What the fuck? A monster in a Bonesplitterz army?
Ah yes, but spiders don’t have bones, so the ‘Splitterz would have no reason to hunt them. Arachnids have a chitinous exoskeleton instead, which is right there on their warscroll in the “Chitinous Legs” attack profile.
Aesthetically, Bonesplitterz and Spiderfang fit together like a dream, and there’s honestly no fluff reason why it doesn’t work either. I would personally love to carve them out of their current books and give them a new home together, but sadly I’m not yet king of the world, so until my promotion we’ll have to settle for allying them in with one another.
Pregame
Important to note is that Adam is very new to IJ. The mission was Savage Gains since that’s one they’ll be playing at the tourney.
Deployment
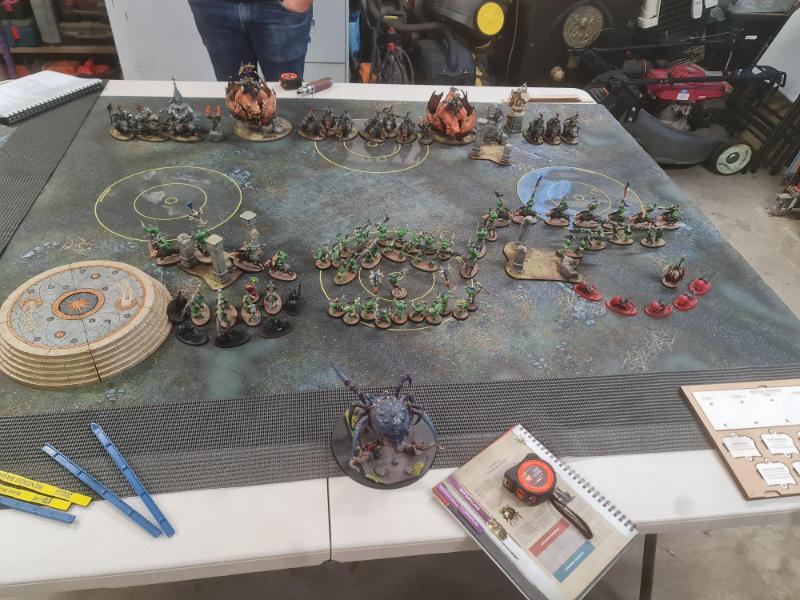
This was a schoolnight game, and when I arrived my opponent had already set up the table and terrain so we could smash straight into it. Keen observers will note that nice big expanse of open battlefield covering the entire central strip of the table, with nothing whatsoever that could possibly inconvenience the progress of Adam’s Gore Gruntas.
He might be new to Ironjawz, but he’s not fucking stupid.
Kicking off with the “Shirtripper Special,” I pregame moved forward to claim the objectives before we’d even started (Rule 18.1.1, motherfuckers). This does come with the substantial cost that you’re giving up an easy turn 1 Conquer, but it did achieve the goal of spooking my opponent. Not so much in terms of the alpha strike potential, but moreso in this case that I could run up a few units and zone off the centre objectives completely. So my opponent took first turn to prevent that, and I clenched for what was coming.
The goal was to set up little mini bunkers, with Big Stabbas ready to hit over the top of screens (2.5″ back so they are in range to swing, but your opponent’s 2″ reach can’t get to them – the classic Glory Hole). And meanwhile our boy the Wurrgog Prophet is ready to zapp people by looking at them funny when they step up into range – I put the Glowin’ Tattz Wurggog opposite the Krusha with Destroyer, bypassing the 5++ Amulet shrug on the other Krusha. The 6++ shrug Wurggog facing him on the other side could either stare at pigs instead, or cast some spells.
Round 1 – Ironjawz
Here they come!

If there’s one good thing about playing against Ironjawz, it’s that you know exactly when to call your Bonesplitterz Waaagh. My opponent went all in on the Alpha, which I believe was both a tactical and strategic error as Adam finds his way with Ironjawz.
Tactical because he left his home objective wide open to my Skitterstrand bursting up onto it; strategic because he should probably have attacked in waves (in my opinion). As it is, a lot of his units were fighting at damage 1, and although Adam massacred large parts of my screens, he did leave himself wide open to the counter punch. Trading his units of 3 buffed pigs for my screens, then building up to the coup de grace after that, might have been the better play against Bonesplitterz – this build loves to soak up a big combat turn and then hit back with a haymaker.
My opponent secured Conquer and both central objectives for a 7-0 start. My screens were in tatters, but the Big Stabbas had done some reasonable chip damage in return, and we were ready to start staring.
Round 1 – Bonesplitterz
Now you see them….

…now you don’t!

The main Wurggog stared down a full unit of Gruntas. Over on the other side, our boy blew himself up after putting out only 2 wounds into the other Gruntas; the drop off from the 4++ Wurggog to the 6++ really is huge. All the same we cleaned those Gruntas up in combat no problem, between the Big Stabbas and the Spider Riders that are just about to swing in the photo below.

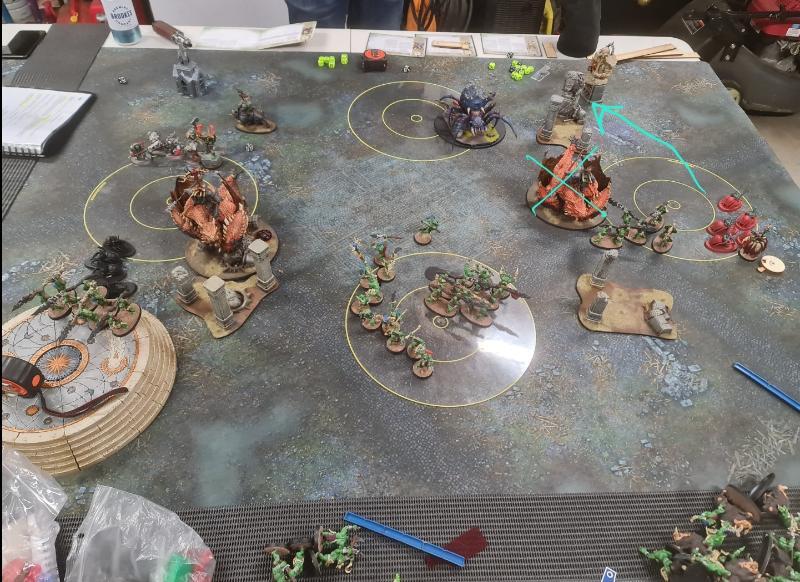
See that little fella up at the top? Our Skitterstrand jumped right onto the objective and claimed Monstrous Takeover. As it happens, he’d have got onto the objective even if it wasn’t wide open, because the little legend rolled a natural 10 to make the charge and crash into the Warchanter:

Funnily enough, the Warchanter slapped 7 wounds on him with his one activation. But even more funnily, the Skitter mercked him in return. Cop that!
By this point the Destroyer Krusha was bleeding heavily after a few swings from Big Stabbas that were perched in the Glory Hole, his own attacks having gone mainly into the Boarboys that had him locked up. We’re poised at 9-7 and already in a good position, although the Amulet Krusha is untouched and already building up extra wounds and attacks, with Fast Un up his sleeve.
Round 2 – Bonesplitterz
I won priority for the double, and my opponent was very exposed at this point. The Destroyer Krusha went down hard, and although the Amulet Krusha is a force of nature, he can’t be everywhere at once.
What clinched the game was running those Riders up the edge. Billy Big Balls could come back and splatter the half-dead spider, but then he’d have to waste another turn moving across to tackle the Spider Riders – otherwise they were poised to step straight back onto his home objective. Adam realised he was done, and that’s all she wrote!
Come on you Boyz in Green!
Final Thoughts
I’m not going to oversell this, because my opponent really did play into my hands here as he learns Ironjawz. But I do think it’s a great matchup for this particular Bonesplitterz build whoever is at the helm, because they love a combat unit crashing into their screens. Your opponent will get less value than they should on your 4++ turn, and you can start chipping away from the off with your 3″ reach Stabbas. Then they’ve stepped right into the lion’s den and it’s Wurrgog Time.
I loved running the Spider Riders, and they would be very hard to drop from here. There’s so much value in 100 point units that can flex between acting as mobile screens (strung out sideways, in this case to prevent superfast Krushas getting in over the top), contributing chip damage mortal wounds to finish off a weakened unit, or acting as fast trading pieces for objectives and Battle Tactics like Savage Spearhead.
I would consider a unit or two as Allies in pretty much any list I run from now on – they are certainly not an auto-include, but they are most definitely the kind of piece you thank yourself for bringing once the battle is underway.
Similarly the Skitter pulled his weight, even though I picked him for Rule of Cool more than anything else. He does give you access to Monster Battle Tactics, and the deep striking threat should help to keep your opponent honest.
Two Wurggogs felt like plenty and any more is really for meme value in my opinion. I’d even consider taking the Amulet on the second one, because although you aren’t getting full value (since you have a native 6++ ward) it’s still a huge step up in survivability when the staring starts.
Overall I’m enjoying Bonesplitterz in 3rd, but I have also played them mainly in favourable matchups (ask again when I’ve been shot off by Dragons or Sentinels). If I had one (realistic) wish it would be for the exploding 6+s to be army-wide rather than units of 5+. It does feel a bit crap that dedicated combat units like Big Stabbas and the Savage Big Boss are frozen out of it, especially when the max unit size for Big Stabbas is 4.
C’mon, man – at least make the minimum unit size 4, so we can run them in 8s.
A couple of tips
So the first and most important thing to say is that if you turn up without any screens and let Ironjawz rip the heart out of your army turn 1, that’s a “you” problem.
Unlike JuST ShoOT THe hERoes virtually every army has access to some kind of chaff, even if via Allies, and the positioning and screening of units belongs at the core of any combat-centric wargame.
So if you get riggedy riggedy rekt by the Ironjawz alpha, Games Workshop didn’t do that to you, and Ironjawz didn’t do that to you – you did that to you. Bring some chaff, for fuck’s sake.
Next thing to say is that I always carry an empty pie-plate base in my army case, and it’s of huge importance against Ironjawz. It’s probably hard to tell with the naked eye, but over on my right side of that first photo there is a hole that was created by pregame moving almost half my army forward – and it is exactly too small for a Maw Krusha to land in.
With their Mighty D and Fast Un moves, then +1″ to charge in the Waaagh turn, they can easily vault a screen with a good charge roll, so make sure you don’t leave them a landing pad. It’s also a good tip to have one handy if you are the one playing Ironjawz, so you can see whether a charge move is actually possible without the whole picking up your model, realising it’s not, then arguing over where exactly it started herp a derp circus.

There is one more learning point here, from my own deployment. This one is quite wordy and technical so if that’s not for you, feel free to skip ahead to the next line break.
You will note that I used the Spider Riders to screen the back of my units and prevent the hypermobile Maw Krushas getting straight into the juice, and also with the intention of running them up the field later for Battle Tactics and game-clinching chad moves.
More specifically, my plan was that I wanted to do my 8″ Bonesplitterz move up onto the objectives, and then maximize the Bonesplitterz Waaagh turn with 4++ saves across my entire frontline, both of which require Boarboys up front. What I should really have done is squared the circle by switching one unit of pigs for one unit of Spider Riders, leaving one of each in the backfield. This would still have given me the advance moves to get up onto both objectives on turn zero, with three of my four screens on the 4++ save (both units of pigs and the Morr Boys).
The difference would have been one unit of pigs in the backfield ready to step forward with their slightly longer move than the Riders, and with the internal buffs available that can make them a decent combat threat in their own right (specifically the rend -2 spell). So I would still achieve my early structural goals in terms of objectives and screens, but with one superior unit still up my sleeve and one chaff unit thrown under the bus.
So thanks for reading, good luck to Adam and Jay this weekend, and please do let me know if you’ve got any feedback on the list.
It’s not set in stone, and I’m happy to develop it further – I don’t think this is a truly competitive build, but it can scare the life out of a few who are – and importantly, it’s a joy to play!
Lots of key decisions to make for both players, plenty of big exciting moments, some of the coolest models in Warhammer and our favourite minigame of staring people off the board (sometimes including ourselves) – what’s not to love?
As for what’s next on the blog, I’m still focusing on MCP and the regular one day events for that game in Melbourne, but I do intend to post sporadically on here again. I’m hoping that a good Christmas FAQ will reignite the fires for AOS, and in the unlikely event that they bin their unbearably shit coherency rules I’ll be all in.
More probable is that I straddle two horses after Christmas, playing both systems casually and posting in here from time to time. I hope everything is good where you are, and thanks again to everyone who reached out – it really does mean a lot.
Credit: Cover image by Games Workshop; all photos taken by me on the shitty phone that I’ve dropped one too many times, except for the frikkin’ sweet Warchanter close-up that was taken by Jayden

I am glad to know that Bonesplitters have at least half a chance in this meta, and seeing some spiders is great !
LikeLike