

By Calvin Rarie
The long, long road of Gallet has finally reached its end, and the hot Galletian summer is giving way to the bitter cold of Andtor. As we reach the end of the road for this season, I hope we can all look back warmly and remember the good times, when foot heroes couldn’t be shot to death immediately, or infantry could reach over each other when they only have 1″ ranges on their weapons, or the pure joy of getting to play Twists and Turns.
Well, that last one is a bit of a lie. Say what you want about the past few GHBs, but one thing we can all agree with unanimously is that those books had some god awful missions in them. None was as mind-bendingly awful as Twists and Turns, though there have been others that are in the same category of mission–that category being the “Why the hell would anyone actually want to play this?” category. As the GHBs rolled out every six months, this category kept growing while the number of typically-played missions grew smaller, which was one of my biggest complaints about this past season. One can only play Jaws of Gallet so many times, after all.

All that being said, how do the new missions stack up for the upcoming General’s Handbook? As someone who has played a lot of Age of Sigmar the last 12 months, I can say confidently that I am very excited about these missions, and we’ll likely see most if not all of them this season in tournaments!
Here they are, in no particular order, with a grading scale with zero objectivity:
Power Flux
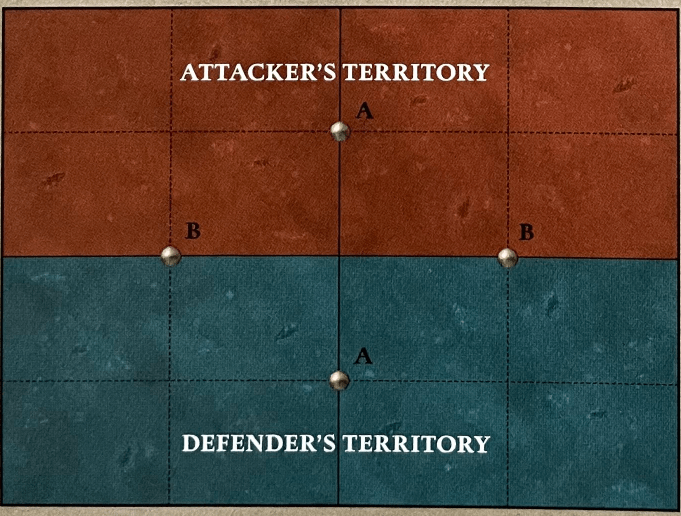
First off is a spicy one. Deployment on this mission is your typical 9″ away from enemy territory kind of deployment, so nothing special there. However, you’ll notice the objectives are marked with either an A or a B–that’s because they are paired together.
At the start of each battle round, after priority is determined, the player going second picks which pair of objectives to activate, and it’s only those objectives which can be scored! Points are scored as following:
- 1 point if you control at least one activated objective;
- 1 point if you control both activated objectives;
- 1 point per objective that:
- You control;
- Is contested by a friendly Andtorian Locus;
- Has no enemy Andtorian Locus units contesting it;
- 1 point if any enemy Wizards were destroyed in that battle round;
- 2 point if you completed your tactic.
This can create some REALLY interesting strategic scenarios, as the always safe play at the start of the game is to pick the A objectives–that way you and your opponent both score at parity, with a max realistic T1 score being 4 points (1 objective with a Locus and a battle tactic). But if you don’t have a Locus, maybe you get really aggressive, and aim to fight on the B objectives instead, which could get you a higher lead than if you went with the A objectives.
Overall, a SUPER interesting mission, one that I think we’ll see a lot of, and it’s a rare type of extra-scoring mission that doesn’t completely dumpster Sons of Behemat.
Grade: B+
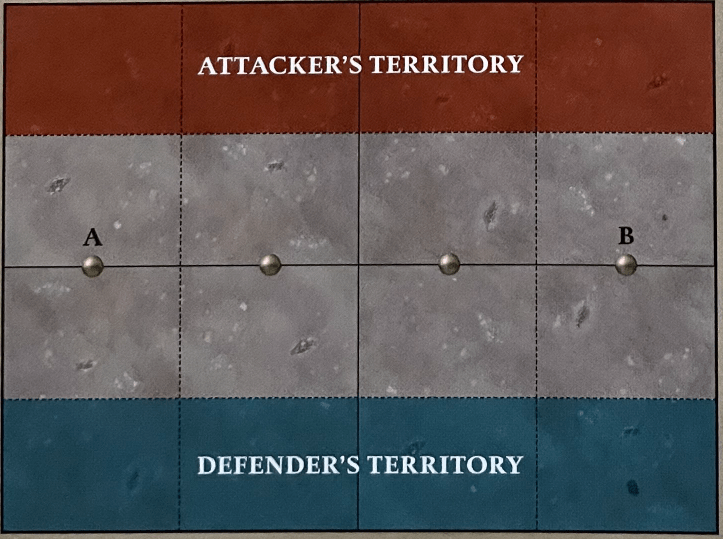
Geomantic Pulse
Hoo-boy, strap yourselves in for this one!
See the objectives marked A or B? At the start of the second battle round, the player going second picks one of those two to become the Pulse–after which at the start of each subsequent battle round, the objective next to it becomes the Pulse, with no objective being the Pulse twice.
Points are scored as follows:
- 1 point if you control at least 1 objective;
- 2 points if you control the Pulse;
- 1 point for each objective you control adjacent to the pulse;
- 2 points for a completed tactic.
That means the most you can score each turn is:
- T1: 3 points
- T2: 6 points
- T3 -T4: 7 points
- T5: 6 points
This is a mission that rewards boldness, and absolutely punishes all-in strategies on committing only to half of the table. Did you push in on the A objective and lose priority into the second round? Now you’re likely going to be in a very, very deep hole. However, if you were able to grab ahold of A with a few units, but position yourself heavily onto B, now your opponent is in a real pickle–give you the double turn and decide where the Pulse goes, or take the turn to re-position, but potentially give up early points that are hard to get back?
I anticipate seeing this in every tournament pack, and I know it will be in mine. This is some grade-A mission writing, and will probably be the first mission I test the new GHB on when points come out. Grade: A+
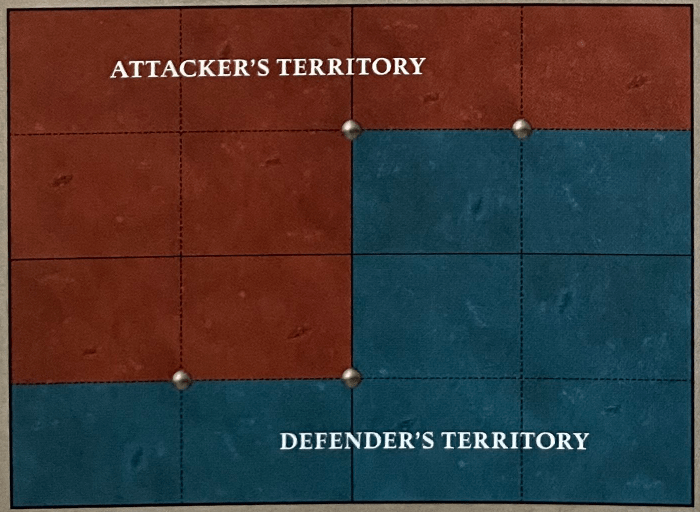
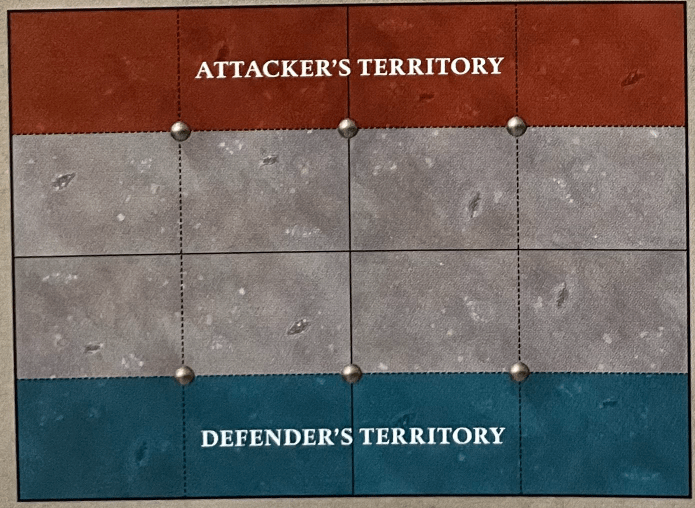
Nexus Collapse

Check out that wild objective placement!
Deployment is 9″ away from each other, as usual. The catch to this objective is that at the start of the second battle round and for each battle round later, after determining priority:
- The player with the fewest VP can remove up to 2 objectives from the battlefield–if there’s a tie on points, both players roll off and the winner can remove just 1 objective;
- Roll a dice for each unit within 6″ of a removed objective and on a 4+ they take d3 mortal wounds.
Scoring is your typical Hold 1, 2, More affair–but there’s an argument to purposefully scoring low so when you go into Round 2, you can pull the rug out from beneath your opponent, and then score big from there on out! Just make sure to be careful doing that, since you can easily put yourself behind by removing objectives when you don’t need to. Just because you can, doesn’t mean you should after all.
With the return of 6 objective missions, anticipate armies like Sons of Behemat or Fyreslayers to really be pushed to the limits–but that being said, this I think in particular is a big winner for Megas–once you’ve got two objectives gone, you’ve got four big fat fellas just ready to hold those objectives to the death.
Another big hitter in my opinion, and I really appreciate sometimes the simpler scoring missions. Expect to see this one often.
Grade: B+
Lines of Communication
We now arrive at one of the meh missions. Scoring is your typical Hold 1, 2 More affairs, with the schtick being that issuing commands has a potential tax in this mission.
Basically, the player going second each round picks a phase (like combat) to disrupt, and whenever an enemy model issues a command during that phase the opponent rolls a dice. On a 1-2, nothing happens, but on a 3+ they have to spend an extra point to issue that command, or they can choose not to but that command still counts as having been used, and that initial command point is lost.
Imagine your opponent is playing Teclis, is in a battle regiment, and makes you go first. They pick a phase and then disrupt you, and on their turn they cast Total Eclipse. They then win priority into the second round, and pick a phase to disrupt with Total Eclipse active–now you have to apply 2-3 command points per command. No thanks.
This mission also sucks if you are an OBR player, since you not only are most of your faction abilities commands, you now have to roll a dice every time you issue one, which will absolutely slow the game to a crawl. Again, no thanks.
Not big on this one myself, and I probably won’t include it in any tournament packs.
Grade: C
Every Step is Forward
Despite the funny-number deployment zone, I’m not too keen on this one, which is a shame since I love wild deployments. This is another typical scoring scenario with Hold 1, 2, More with the typical 9″ away or more deployment restrictions. The schtick here is that charging models count as one extra on an objective, while units that retreat can’t contest objectives any more.
So uh, I guess if you’re a Nighthaunt player you lose half of your mobility and a lot of potential debuffs just to keep playing the game. I’m not a fan of missions that punish players for taking armies whose faction abilities more or less turn off just to play the game.
Grade: D
Limited Resources
Ok, this one is a bit wild. You get the drill here: Hold 1, 2, More scoring and 9″ away in deployment.
The way this mission works is very interesting:
- When you gain control of an objective, you start siphoning from it.
- If you control the same objective at the end of your next turn after scoring VP, you can no longer control that objective, though you can still contest it to prevent your opponent scoring it.
I want to go on the record and say that I love this mission. I think this is great mission design, as it absolutely forces people who play typical castle strategies to come out of their shell, while aggressive players can be punished by taking the middle too quickly and leave them without being able to score points.
That said, this can definitely be an easy one to screw up from a player’s standpoint–if you play this mission, make sure to be clear with the board state, as you could pretty easily forget which objectives you can and cannot score.
I’d expect to see this one often, but it’s not a sure-fire first pick each event.
Grade: B
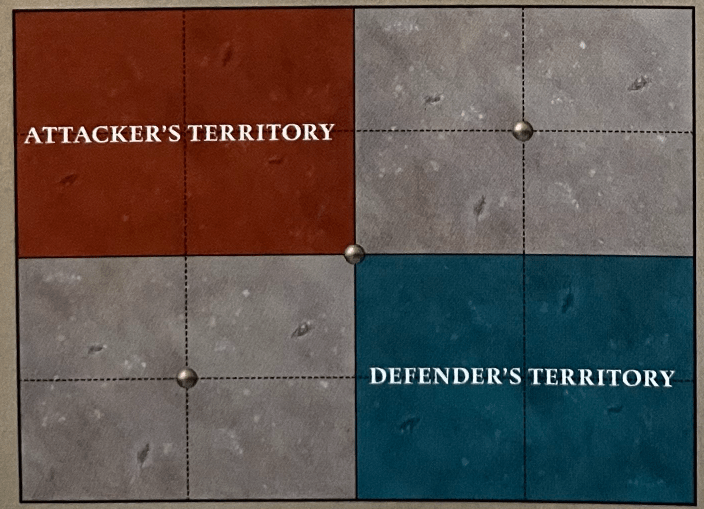
Spring the Trap
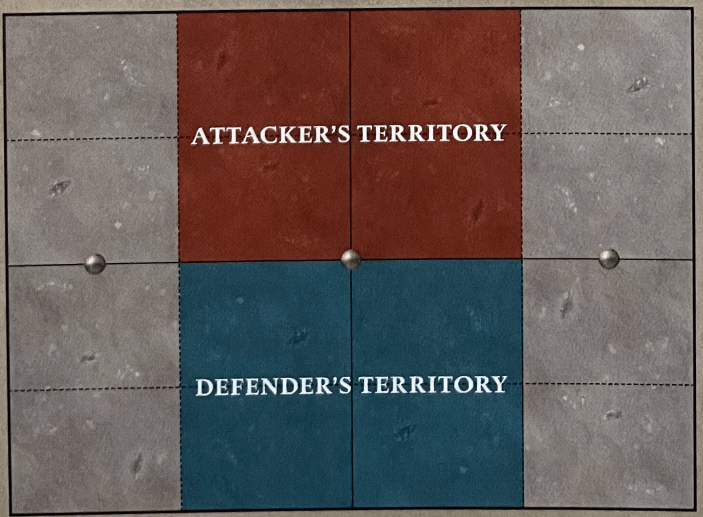
The usual deployment and scoring guidelines here. For Spring the Trap though, with some careful planning and maneuvering you can set up some pretty cool plays thanks to the twist:
- During deployment and after units have been set up, the attacker rolls a d3 and starting with the attacker,that player can put that many units into Reserve, and the defender then does the same.
- From Round 2 onwards, players can set up those units they reserved onto the battlefield wholly within 6″ of the battlefield edge and more than 9″ from all enemy units.
This is some cool design, and offers flexibility to some armies who just don’t have that kind of mobility or teleport shenanigans. Anything with charge bonuses absolutely wants to get put into reserves. Could you imagine a Kragnos or Skarbrand coming out of reserves and 3d6 charging right into your lines? Sign me up.
Neat fact, because the flank objectives are 7.5″ away from the table edge, it is very difficult to screen out coming in from reserves onto the objective. Make sure to measure those deep strike distances well.
Note that there’s an issue with the wording here:
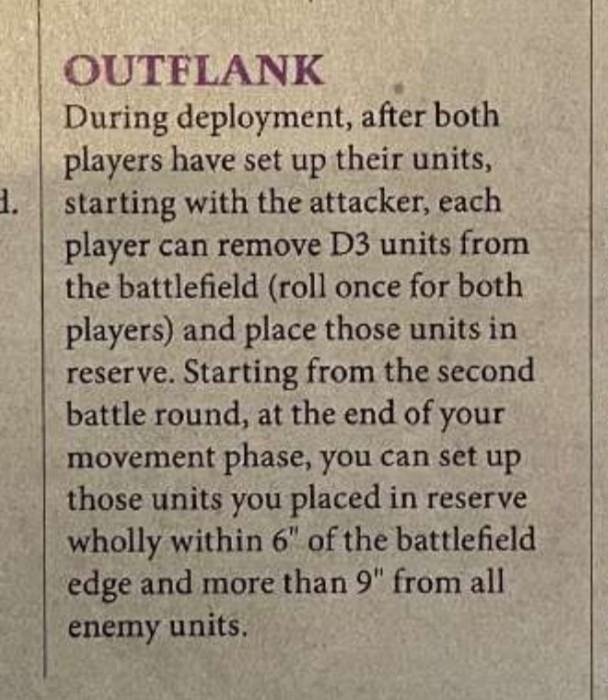
“Each player can remove D3 units from the Battlefield”. It doesn’t actually specify that they have to be that player’s units, so on paper you get a turbo-charged version of Kruleboyz Sneaky Tricks: you get to lift your opponent’s screens and Alpha strike them, or make Teclis take the bench for a round.
I think we all know that’s not going to last past the FAQ, so until then: Play it like how you know it’s supposed to be played, you knuckleheads.
Overall, good design, and I expect this to be akin to the previous eason’s Nidus Paths. You’ll see this a lot.
Grade: A
Fountains of Frost
This mission might as be named “Stubborn as a Rhinox: the Mission.” Why? Each Andtorian Locus counts as 10 models when contesting objectives. The kicker is that at the start of each battleshock phase, you roll a dice for each objective contested by 3 or more units, and on a 4+ each unit suffers d3 MWs.
Given that you can have mounted Andtorian Locus units, anything that flies and moves fast and is a Locus unit will be worth its weight in gold. However, if you don’t have a Locus unit or a reliable way of killing them you’re probably going to have a bad time. Something about 3 Fungoid Cave Shamans taking an objective away from a Mega-Gargant is just funny to me.
That said, I don’t expect to see this one too often. It’s a strict feels bad competitively for folks not running Locus units.
Grade: C+
The Icefields
Get your slide-whistles ready because this mission is HILARIOUS. Scoring and deployments are the usual here, but boy does this mission have a goofy twist:
- Whenever a unit runs, they take d3 mortal wounds.
- Whenever a unit charges, for each 1 in the roll, they take d3 mortal wounds.
Never in my life did I imagine we’d be in a world where you could miscast on a charge, but here we are! I love this unironically–it’s so annoying and yet so endearing to put small heroes under the clear and present danger of slipping to your death! Or, you know, cause Doomseekers to hit harder because they ran for a turn, or make Skarbrand angrier, or Mangler Squigs move into their weird good brackets. It’s also really amusing that running a Slaangor unit triggers its Slaughter At Any Cost ability, letting it move an extra d6″.
I love, love, love how silly this is, and the very real threat it exudes builds over time. You’ll see this one in a lot of packs, I reckon.
Grade: S-Tier
The Frigid Zephyr
Night-fighting, at long last! Deployment and scoring works the same as normally, but on this mission visibility is limited to 12″ for both friendly and enemy units, and models cannot fly. Hoowee.
At the start of the second battle round and onwards, the player going second rolls a dice and adds the battle round number to the result–on a 7+ the squall dissapates and the game returns to normal.
This mission really screws with a lot of armies here, but in a good way:
- KO has to get within 12″ to shoot at you, making it easier to charge them;
- Ironblasters just do stone nothing Round 1;
- Unless you have a Spellportal, basically no offensive spells are going off T1;
- Unless they are within 12″ of the dispeller, Endless Spells can’t be touched
And so on. It’s a simple enough premise that I think a lot of players can get behind, but some armies get really taxed by the mission. I don’t see this coming up too often in packs, because shooting armies definitely get the shaft here, along with some spellcasting. It’s a fine mission, but probably not a first pick you’ll see often.
Grade: B-
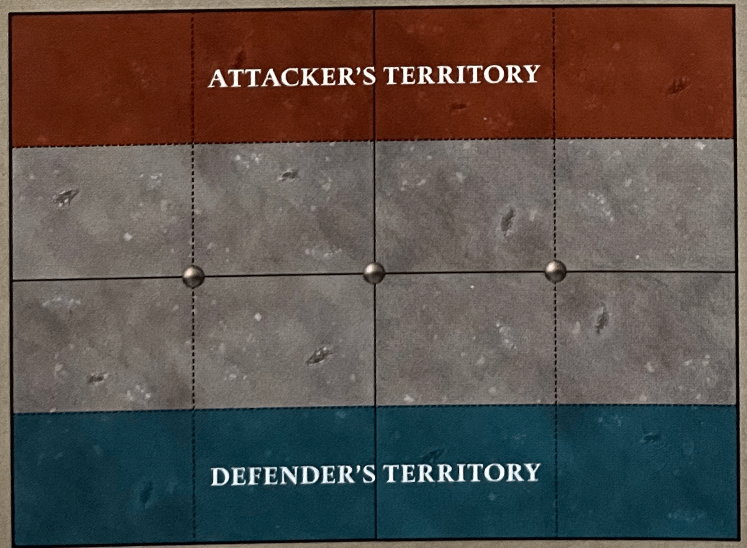
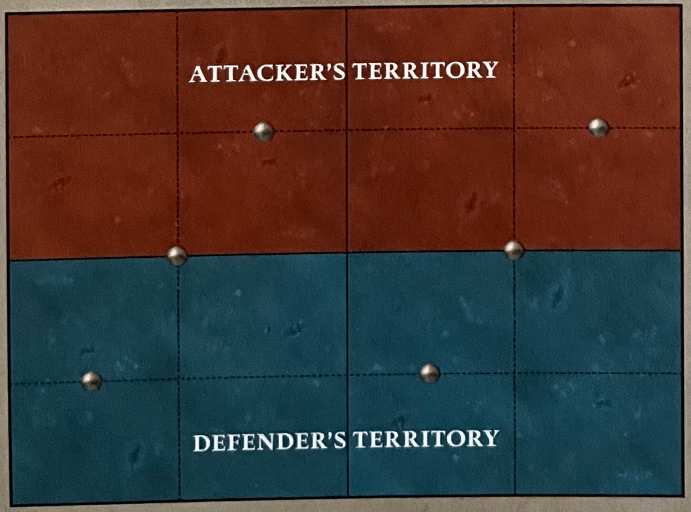
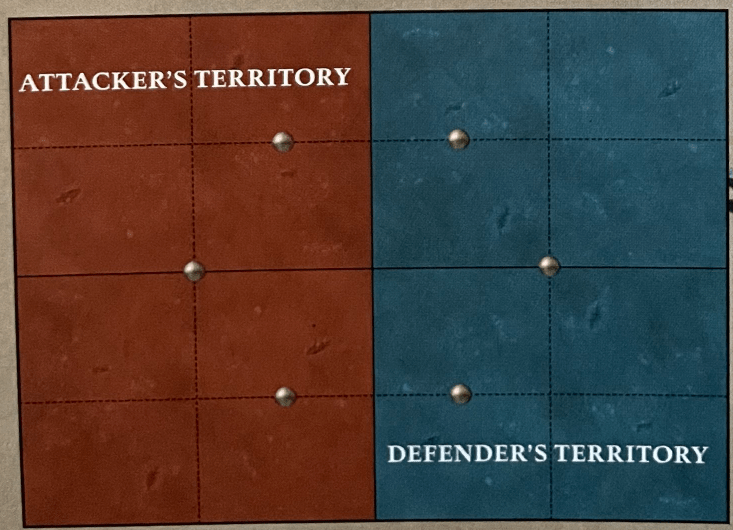
No Reward Without Risk
So I want to talk about deployment with this mission:
Notice anything missing? Because if you did, right now you can deploy directly into combat on the center point. Guaranteed to be a mistake that will likely get a Day 1 Faq, but I wanted to mention it here first.
Anyway, scoring works like normal here, but the catch to this one is what happens when a Wizard dies:
- When a Wizard is slain, before it gets removed, you roll a dice.
- On a 4+, that Wizard fucking EXPLODES, dealing d3 mortal wounds to each unit within a number of inches equal to its Wounds Characteristic.
This is the funniest mission ever. Imagine someone decided to take a Mega Gargant with an Arcane Tome and it dies on the center-point–given that a Mega’s 130mm base is 5.1″ across, that means there’s a 75″ circular explosion when it dies. Or, you know, the whole damn table plus bits of your opponent’s tables too.
Oh and then you roll for Timberrr!
Grade: S+ tier
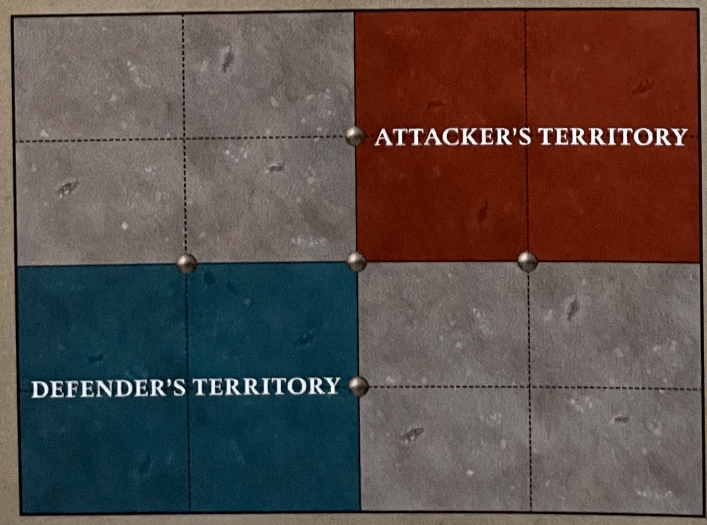
Towers in the Tundra
So, this mission has a bit of a mecahnical issue.
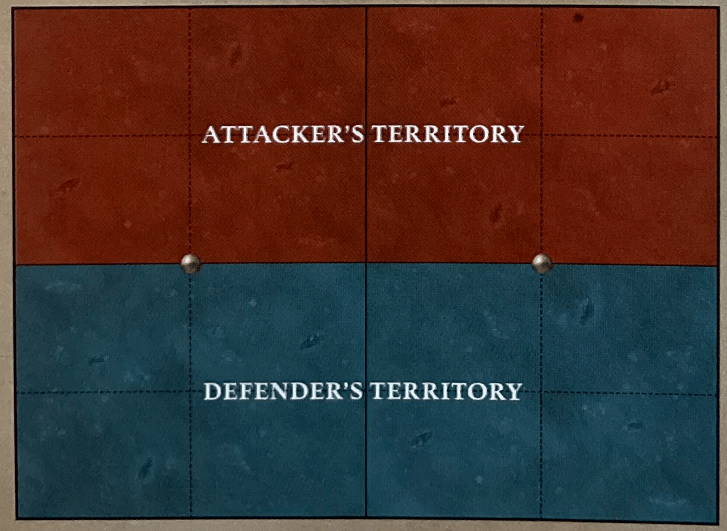
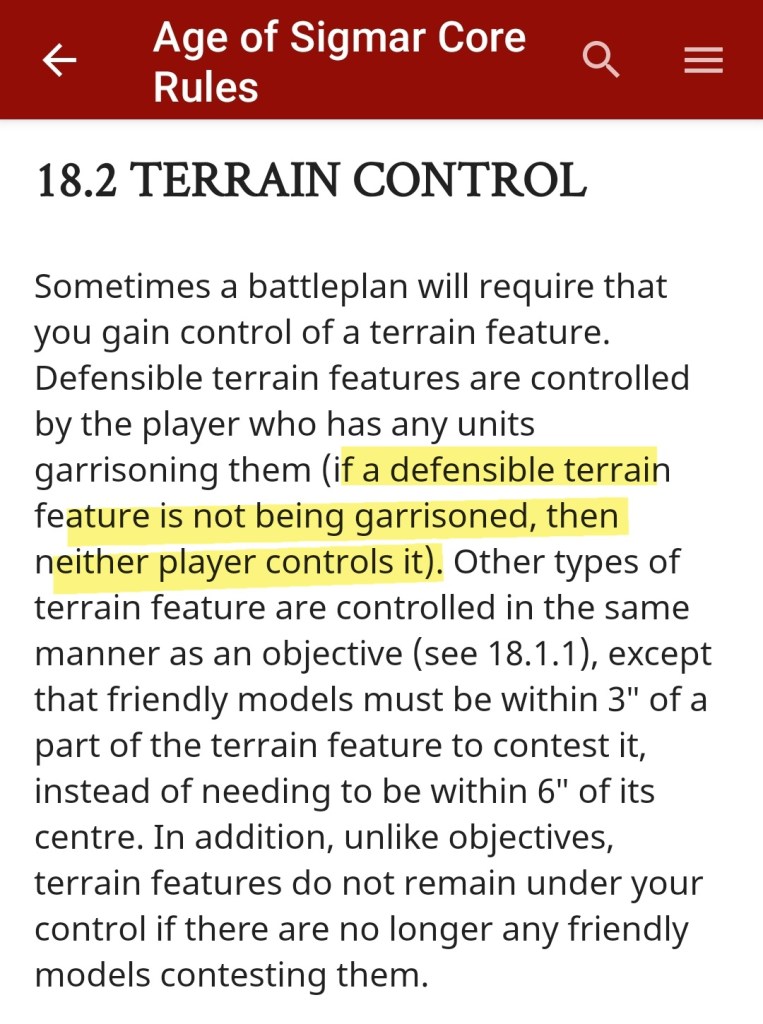
After territories are picked, each player picks a defensible terrain feature (garrisonable) or a faction terrain feature wholly within their territory to be a Wizards tower–that terrain feature gains the Arcane scenery rule in addition to any other scenery rules.
Scoring works like this:
- 1 point for controlling at least one objective;
- 1 point if you control both objectives;
- 2 points if you scored a tactic;
- 2 points at the end of the game if you are garrisoning the Wizards’ Tower in your territory, OR 2 points IF your army included no units that could garrison the tower AND you control that tower;
- If you are unaware, you can’t control a garrison terrain feature unless you are inside it, so the idea here is that you can still pick something like a Loonshrine and score points off it, right? Well…
- 2 points at the end of the game if there are no units garrisoning the Wizards’ Tower in enemy territory.
So uh, if you pick the Loonshrine as described above, your opponent just automatically gets two points at the end of the game? That seems a bit nonsensical. Also, if you’re playing Sons of Behemat and don’t take a Regiment of Renown, I guess your opponent just gets points for showing up?
Don’t play this one until GW puts a fix on it, if ever. This is SO CLOSE to being a fun mission, but it just misses the mark too badly with little consideration for the Core Rules here.
Grade: Funsies Only, never in an event
Closing Thoughts
If you can’t tell, I’m very excited for this mission line-up we have going into the new GHB. There’s some real, out of the park home runs mixed in with some good choices, and a couple complete misses for a competitive event. That said, none of them are objectively terrible, just a few don’t quite make it into the realm of “I’m going to have fun and have a great game here.”
As a TO, here are my top 5 picks that I know I am going to draw on, with some or even all of them showing up at some point:
- Geomantic Pulse
- Spring the Trap
- Nexus Collapse
- No Reward Without Risk (assuming its deployment rules get FAQ’d)
- The Icefields
What are your favorites from the Battlepack? Any in particular you would want to avoid at all costs? Played any so far? Let us know, we’d love to know more!
As always, “Flesh Eater Courts expeditus est.”
Credit for all images to Games Workshop

If you’d like to help us continue our work, we’d love to have your support. All Patreon Tiers include Discord access, exclusive articles and regular contests. Our Tiers are priced to be within everyone’s reach, so please click here to join us today!


3 thoughts on “Mission (Im?)Possible: General’s Handbook 2024”