


CALVIN TOOK OUT A 5-0 with the notorious Gorechosen at Nashcon last weekend. In this article, Calvin will address what made the army so cooked, run through his games at Nashcon to give you a feel for what it was like to play with and against, and deliver his verdict on the recent….”updates” the army has received.
Every once in a while—and it’s been a while for Age of Sigmar—GW releases a set of rules that gets an almost universal hard reaction from the community that beggars the question, “Was this tested at all?” In living memory, the last time something like that has happened was the release of Slaves to Darkness when you had the “Chosen Pokeball”, where a Gaunt Summoner could drop 10 Chaos Chosen effectively anywhere on the table who could 3d6 charge with impunity. It was something like an average threat range of 40”, with minimal counterplay. Thanks to point increases and rules errata, that’s no longer the nightmare that it was.
Fast forward to now and you get the Khorne Battletome, which is by all accounts a pretty darn fair and maybe TOO fair of a book, if current win rate percentages are any indicator…except when you get to the back of the book and see the Armies of Reknown, which are both broken. Baleful Lords is broken because you can only take Bloodthirsters, so at most you end up around 1750 points in a list. Gorechosen is broken because did anyone actually read these rules before going to print?
In case you don’t know what the army does, let’s jump into a summary of the rules followed by a brief breakdown of why these rules are too good. If you’re already familiar with that part, you can skip ahead to the tournament report:
Battle Traits
- The whole army is on a 4+ Ward.
- We’ve seen 4+ ward infantry before (RIP Wurrgog Prophet), but a single foot hero with effectively double health isn’t a big deal. 16-17 foot heroes with double health each is a very big deal, especially when they all also have 3+ saves.
- If you’re curious how many Chaos Chosen attacks you need to kill a single 6 wound, 3+ save, 4+ ward hero in one activation with no modifiers, it’s 22. You know, 2/3 of a 560 point unit’s activation.
- We’ve seen 4+ ward infantry before (RIP Wurrgog Prophet), but a single foot hero with effectively double health isn’t a big deal. 16-17 foot heroes with double health each is a very big deal, especially when they all also have 3+ saves.
- The whole army has Crit (Mortals).
- Okay, big deal, so does Kruleboyz—except basically every hero in the Gorechosen have Damage 3 attacks. And while attacking with ONE hero isn’t that big of a deal (until it is, more on this later), attacking with 12 of them adds up, especially over protracted, multi-round combats which is where the army excels.
- The whole army can, when slain, roll a dice and on a 5+ they Heal (1) and all remaining damage falls off.
- This is pushes the army into absolute absurdity. Want to know what the definition of insanity is? Fighting and killing the same hero for four straight turns, over and over and over again.
- Yes, this ability is on a 5+, but sometimes you just roll hot—and rolling hot here means your opponent can do literally nothing about it.
- This is pushes the army into absolute absurdity. Want to know what the definition of insanity is? Fighting and killing the same hero for four straight turns, over and over and over again.
- You get to pick a second artefact in the deployment phase. Brace yourselves.
Those are just the battle traits, which already are some INCREDIBLE rules that could really push an army over the top as is. Next up are the enhancements:
Enhancements
- Heroic Trait (you only get one) – Crowned in Butchery
- Adds 20 to the unit’s control score in combat. Basically means that your unit is at least 22 OC while in combat on average—you know, more than a Mega-Gargant?
- Artefacts (there’s three total but only two matter, and you get both)
- Warmonger’s Icon – Once Per Battle, Any Combat Phase
- The bearer and up to D3 Gorechosen units within the bearer’s combat range get Strike First.
- Strike First is the most powerful ability in the game, which is a hill I will die on. Activation Wars are incredibly important to win, and Gorechosen does it better than everyone else. This isn’t the last source of Strike First OR Strike Last the army has, by the way.
- The Scarring Blade – Any Combat Phase (NOT once per battle)
- The bearer inflicts d3 mortal wounds on themselves, and then for the rest of the turn everyone in your army gets that many extra attacks. The bearer can no longer be healed or roll the dice to stand back up when they die. However, the bearer can roll wards to negate those wounds.
- Most of your heroes have only 4 attacks, which is a manageable number. Between this artefact and the Bloodsecrator, you could get your entire army up to 8 attacks each—that’s 8x Damage3, Crit (Mortal) attacks across 12 or so different heroes.
- The bearer inflicts d3 mortal wounds on themselves, and then for the rest of the turn everyone in your army gets that many extra attacks. The bearer can no longer be healed or roll the dice to stand back up when they die. However, the bearer can roll wards to negate those wounds.
- Warmonger’s Icon – Once Per Battle, Any Combat Phase
- Prayer Lore (all pray on a 4+, super-pray on an 8+, 12” range)
- Skin of Brass—pick a friendly unit to worsen rend attacks against them by 1, on a super pray pick another unit as a target as well. The whole army is basically on a 3+, so this makes dudes even tougher and survive combats that they shouldn’t.
- Cowed and Broken—pick an enemy unit in combat with a friendly unit, roll 8 dice and add 1 to the roll if super-prayed. Each 4+ is a mortal wound. Mortal wound prayers are good!
- Eruption of Apoplexy—inflict d6 mortal wounds on an enemy unit in combat with a friendly unit. If the enemy unit dies, before the last model is removed deal d3 (or d6 on a super-prayer) to each unit within 6” of that model, friendly or not.
- Wanna set off a nuclear bomb? This is how you do it.
Okay, so it can’t get better right? Well, now we get to talk about the units you can take, which are basically every mortal foot hero in the Khorne book, with the only restriction being that you can only take a maximum of 1 Mighty Lord of Khorne. Everything else though is spammable, and some of these abilities are so ridiculous that I’m including a tournament FAQ section at the end with recommended fixes for local events.

Unit Choices
- Mighty Lord of Khorne (has to be the General if taken)
- Importantly, he’s on a 60mm base which is useful because he’s almost always going to be the one that takes the Strike First Artefact, as well as the +20 control score Heroic Trait. He also hands out a +1 to wound bubble wholly within 12” of himself, and since the whole army wounds on 3s naturally basically everyone around him is wounding on 2s.
- He can also hand out Strike First to one of your heroes (which is everyone) in YOUR combat phase. Between that and the Strike First Artefact, you could fight six times in a row before your opponent gets a chance at retaliation.
- He’s also the only source of natural Rend -2 in the army, going up to Rend -3 thanks to the Skullgrinder’s deployment phase ability (pick a hero within 8” and add +1 rend to that unit’s attacks for the rest of the battle.) Perfect for finishing off tough nuts to crack.
- Realmgore Ritualist and Slaughterpriest
- They’re Priests! Priests are great, since prayers can’t be interacted with. Slaughterpriests have a natural Unbind plus a pretty nifty ability that lets them pick any unit in combat range and on the ol’ D3 2+ you deal that much mortal damage and gain one Ritual point. I’ve killed enemy units this way before—Khorne cares not from whence the blood flows, after all.
- The Realmgore Ritualist has a really strong once per battle (army) ability that lets you pick an objective or a terrain piece within 3” of the Ritualist and for the rest of the game that objective/terrain piece projects a wholly within 12” bubble of +1 to wound. Between that and the Mighty Lord of Khorne you can basically make a whole table +1 to wound always. Bonus points if your event has huge terrain.
- Deathbringer
- Oh baby, the star of the show. This little lad is an absolute monster, and the workhorse of the army.
- First off, he’s a 6 health, 3+ Save, 4+ Ward hero that has Damage 3, Crit (Mortal) attacks. One of these guys is not scary. 8+ of these guys are horrifying.
- Deathbringers also have two abilities, one of which is almost assuredly getting an erratum:
- They have a reaction where if an enemy unit gets issued a command while within 8”, you roll a dice and on a 5+ that command is wasted alongside the command points.
- Rules as Written, because this does not have the (army) tag, each Deathbringer in range gets a shot at it. This is almost assuredly getting a fix, and as a TO I do not believe it should be played “Rules as Written” in the interim.
- At the end of any turn, one Deathbringer gets to pick each enemy unit in combat with it and roll 2d6—if you roll above the health characteristic of the unit then one model dies, or if it’s a manifestation it gets auto-banished.
- While big monsters dodge this ability, literally everything else is at risk. Foot heroes, big cavalry models, Purple Suns and so on.
- They have a reaction where if an enemy unit gets issued a command while within 8”, you roll a dice and on a 5+ that command is wasted alongside the command points.
- Skullgrinder
- Your other source of Damage 3 in the army. While Deathbringers are 3+/3+/-1/3D, Skullgrinders are 4+/2+/-1/3D with Anti-Monster. Getting Rend 2 vs monsters is a big reason why you take more than one in a list.
- The other reason to take them is their Once Per Turn (Army) Any Combat Phase ability that is absolutely getting a rules change—pick an enemy unit in combat with the Skullgrinder and roll a die, and if you roll equal to or lower than the control score of the enemy unit, that unit gets Strike Last.
- Rules as Written, this guy basically always gives out Strike Last at least one place on the table. Even if you change it to control characteristic, there will still be matchups with big monsters where your opponent is sending at least one unit to a guaranteed death before they even get to activate.
- Bloodsecrator
- He’s 5 OC which is important for staking out your backfield objective—and he’s no slouch in combat if you really amp up the number of attacks between the Scarring Blade (which he should be carrying) and his Once Per Battle (Army) ability to give everyone an additional attack in the combat phase.
- Also, he makes Rally rolls better, adding 3 dice to any Rally commands issued wholly within 12” of him. Rallying is extra powerful when the additional wounds all get a ward on top. Wanna demoralize your opponent? Heal a hero with one wound left back to full.
- Bloodstoker
- You can definitely run him, and there’s a Battle Trait in the army that lets him pick friendly heroes to get run and charge, but that’s basically unnecessary because while this army is slow, it’s inevitably going to get into combat.
- Skull Altar and Wrath-Axe
- The Skull Altar is pretty neat, giving you a super banish that doesn’t eat a prayer activation if it is garrisoned—pick up to d3 enemy Manifestations and roll a banish roll for each one. It also gives the Priest inside the altar +1 to chanting rolls. If your opponent isn’t playing many Manifestations, or they have Scouting Force, don’t deploy it.
- Wrath-Axe is an extra unit to fight with an auto-slay ability—in any combat phase if it charged the same turn, roll 2d6 and on an 8+ slay one model from an enemy unit that has a unit size of more than 1. Hilarious against Stormdrake guard.
So to summarize:
- You get an army of 3+ save, 4+ ward heroes that require unbelievable amounts of work to kill a single one of them.
- The majority of them are either heroes that can eat commands AND auto-slay models, or hand out Strike Last.
- The majority of them also have Damage 3 Crit (Mortal) attacks, routinely going to 2+ to wound, and can reach up to 8 attacks each in a given combat phase, meaning they will eventually punch through anything they are in combat with.
Any of these points make a strong army. The combination of these things makes a broken army.
A couples of final notes have to do with terrain and activation economy—if you are playing on large terrain, it is comically easy to get almost the entire army into either cover or obscuring, which makes shooting armies REALLY hate this army. And Places of Power? Nothing is more demoralizing than watching four or more heroes healing two at the start of the turn.

As for activation economy, if I have four Deathbringers in combat with one of your enemy units, you get one activation to my four, and if just two of my Deathbringers killed your one unit, then the others get to pile-in if they have charged. This doesn’t sound huge in abstract, but what this effectively means is that you are ALWAYS setting the tempo of combat.
The List(s)
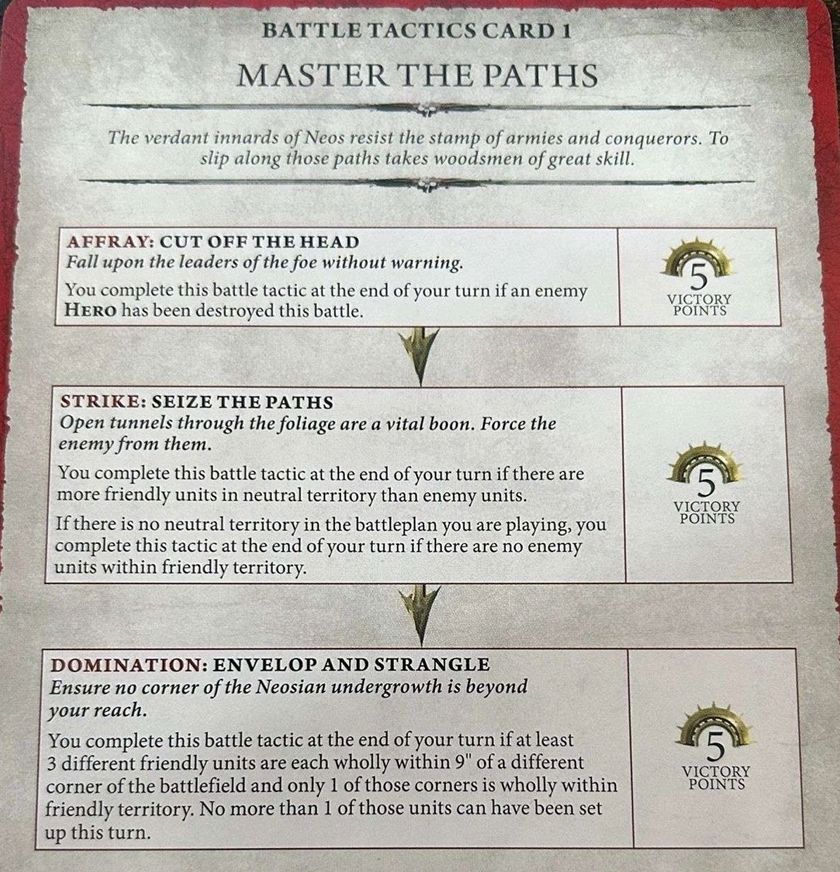
Nashcon is a two-list format, where you can take two different lists or, if you want to, the same list twice just with minor changes, but they can’t be identical. The differences between my lists were that one had Master the Paths for missions with neutral territory, while the other had Attuned to Ghyran for missions with no neutral territory, and both had Restless Energy. Wrathful Cycles is also a good choice for the army—the rest are not good choices. In a traditional 1 list format, Attuned is probably better on average, though there’s arguments for any of two from those three. You usually don’t need many tactics to win, because this army wins on Primary like no other army in the game.
Nerf This Army 2000/2000 pts
Blades of Khorne | Gorechosen Champions
Army of Renown
General’s Handbook 2025-26
Drops: 5
Prayer Lore – Gorechosen Champions Prayer Lore
Manifestation Lore – Gorechosen Champions Manifestation Lore
Battle Tactic Cards: Restless Energy, Attuned to Ghyran/Master the Paths
General’s Regiment
Mighty Lord of Khorne (150)
• General
• Crowned in Butchery
Deathbringer (120)
Deathbringer (120)
Deathbringer (120)
Deathbringer (120)
Regiment 1
Realmgore Ritualist (130)
Skullgrinder (100)
Skullgrinder (100)
Skullgrinder (100)
Regiment 2
Slaughterpriest (130)
Skullgrinder (100)
Skullgrinder (100)
Regiment 3
Bloodsecrator (130)
• The Scarring Blade
Deathbringer (120)
Deathbringer (120)
Deathbringer (120)
Regiment 4
Deathbringer (120)
Skull Altar
At five drops, I had the priority re-roll in 4/5 games except for one where we had the same number of drops. It’s a ridiculously powerful tool to have, especially to potentially deny a double turn or fish for a double turn that can devastate your opponent. I took only two double turns during the event, and one of them was game winning.
The Event: Nashcon
Friends, I’m not going to lie. My games basically ran the exact same way each game:
- Break up all your drops so you have perfect counter-drop information on your opponent.
- Deploy your Mighty Lord of Khorne with 3-4 Deathbringers and 2-3 Skullgrinders around him. This is your primary deathball and the greatest source of pressure you have.
- Depending on the number of objectives, put 1-2 Deathbringers and 1-2 Skullgrinders on side objectives. Bonus points if those objectives are adjacent to Places of Power, which you will use basically every single chance you get.
- After deployment, your opponent is usually going to make you go first—start running literally everyone right at your opponent. Hug obscuring terrain as much as possible, practice the buddy system and make sure everyone stays near each other where you can. One hero by themselves isn’t (usually) a threat, but 3-4 near each other punch harder than every unit in the game.
Honestly, if you end up playing against this, or a similar kind of list, sometimes it’s best to just go first and score your Primary points while you can. This army is not good at tactics, but it’s basically unbeatable at fighting on Primary. You will lose combat if you just stay standing around on the circles while these guys get closer to you, so score uncontested Primaries while you can.
So let’s talk through the gameplay experience for each round.
Round 1 – Xavier with Daughters of Khaine on Roiling Roots
This was a funny scenario—coming into the event I was one of two Gorechosen players and he was one of two Daughters of Khaine players, and neither of us wanted to play this matchup. Me because 80 half naked women are much tougher to kill than they look, Krethusa is basically an entire set of Battle Traits by herself, and Daughters of Khaine can do a fantastic job of keeping up on scoring without having to interact much with their opponent. Xavier didn’t want to play this matchup because Gorechosen is bullshit.
I took the Attuned to Ghyran list because scoring Master the Paths against DOK is really, REALLY hard—getting those five points top of 1 is usually all you need, anyway.
We deploy, he makes me go first (everyone did, by the way), and I started the slow process of running towards him. His castle of 80 Aelves, a Cauldron, Hag Queen, and Krethusa shifts around on his side, while two units of Doomfire Warlocks and his Khainite Shadowstalkers move around the battlefield. I win priority into R2 and give away the double, so that it forces Xavier to move and take action to score points—and to later set up getting a double turn to end the game.
Over the course of essentially four rounds, I tighten the noose around his castle with 10ish foot heroes, creating a wall of Gorechosen that he can’t single out in combat without dragging multiple in. I spend 3 CPs over the course of three turns to redeploy a single Deathbringer to go fight a unit of Doomfire Warlocks on his side objective, and meanwhile I roll some hilariously bad hit rolls that meant two Deathbringers only kill one Warlock, which essentially cost me 10 points which cost me dearly in the event standings, as Major Victories were weighted higher than Minor Victories in the event pack.
By the time the bottom of 4 comes around, I finally decide to engage his castle and put the entire army into combat, locking him in with me in his territory. The only thing not in his territory at this point is a pack of half-strength Doomfire Warlocks who came back in his last movement phase thanks to Krethusa. I win priority into five and—since I cannot score any tactics in R5 anyway—I take the double turn to score maximum on primary and put me up by 7.
Even with an auto-run the Warlocks don’t have the speed to get onto any of my objectives to flip them, so at most he can score is 5 points, leading to me winning a nailbiting 47-45 win at the end. Patience won me the game here, since if I had engaged his castle at any point before R4, he would’ve enveloped the heroes, which would’ve kept them from getting on to his back objectives. Sometimes, the best thing to do is simply project power rather than exercising it to your detriment.
This was by far the closest game, and Daughters can definitely beat Gorechosen—not reliably, but they have the best shot at it.
Command Points eaten from Deathbringers: 5 (including a counter charge)
Heroes come back to life: 3
Total Models lost: 3
Round 2 – Joseph with Oops All Huskard Ogor Mawtribes on Cyclic Shifts
Joe—or Jogor as I am going to call him from now on—is a club mate of mine in the Georgia Warband. He is pretty much a Beastclaw Raiders main, bringing the Monster Trucks with him everywhere he goes, and it’s a gorgeous army to look at. His two lists were a Kragnos and non-Kragnos version of traditional Monster Truck lists and—since I don’t have any monsters, except for myself because I played Gorechosen—he elected to take the Oops All Huskards version, complete with the Fang of Ghur and the Mage-Eater Big Name (which hands out -1 to ward rolls to enemy units within 6” of the bearer), which is a GREAT effect against Gorechosen.

I took the Master the Paths list because at some point, at minimum one of his heroes is going to die.
I set up my deathballs, he creates a parking lot of trucks, I go first, and I starting marching the wall towards him. On his turn he sets up a wall of the most expendable monsters he has and a unit of Yhetees as well. He nudges up a Stonehorn Beastrider onto a midfield objective.
I win priority into R2, and this is where the raw power of this army comes out. I basically managed to get ¾ of the army into combat, including a lone Skullgrinder who charges the Beastrider hanging onto that midfield objective. Jogor counter-charges (and dodges the 5+ command eating) to get another Huskard into combat with the lone Skullgrinder. He puts 5 mortal damage on the Skullgrinder, who lives with 3 wounds left.
Now, because I have just charged with 10 or so individual units, I have a lot of pile-in flexibility. I roll the 3 for the extra attacks from the Sacrificial Blade Artefact, and pop the 1/game +1 attacks from the Bloodsecrator. I strike-last the Huskard who counter-charged, pop the Strike-First artefact on the Mighty Lord of Khorne, and hand out Strike First to another unit. I fight first five times in a row, killing three Yhetees and two Huskards in the center table before the Skullgrinder singlehandedly murders the Stonehorn Beastrider thanks to All-Out Attack and rolling four 6s to deal twelve mortal damage and wounding 3 more times at Rend -2. This army is dumb. The Huskard then kills the Skullgrinder, who fails to stand up.
Bottom of R2, half of his Monster Trucks are dead, he fails his Prayer rolls on some unbelievably cursed dice rolls, and charges in with his Frostlord and Big Name Huskard, doing good impact mortals on the way in, but two Monster Trucks’ worth of impact mortals isn’t enough to overcome the bloodlust of one heavily armored dude who is too angry to die.
Combat goes poorly for Jogor, as I hand out Strike-Last to the Big Name Huskard, weather an attack from the Frostlord, and then proceed to butcher the two cows. At this point, I’ve lost three models and he’s down to two Frost Sabres and a Huskard. We call it and I buy him a beer as compensation.
Command Points eaten from Deathbringers: 3
Heroes come back to life: 2
Total Models lost: 3
Round 3 – Landon with Lords of the Clan Sylvaneth on Liferoots
Landon is semi-local to my area, driving a couple of hours to attend an event that Jogor runs called Southern Fried Sigmar (it’s a good time!). I give him the run down on the army, and after discussion I land on the Master the Paths list because he’s got six units and five of them are heroes, and Liferoots has a tiny sliver of no-man’s land to make scoring part two easy.
This game is where I honestly started to feel very bad playing this list, because Landon literally could not have done anything against it. Liferoots is probably the most over-powered mission for Gorechosen—two objectives and all you do is stand next to terrain? Insane mission.
The course of this game was basically 12 heroes clumped together walking straight at Landon’s army. Here’s what happens:
- Landon summons seven trees over the course of the game, and rolls 24+ mortal damage for them.
- Landon also summons Soulsnare Shackles for 7 turns in a row, and does upwards of 30+ mortal damage for them.
- Alarielle has to fight the same Deathbringer three times in a row, and kills him three times in a row thanks to the 5+ revive, before Striking and Fading Away.
- I finally fail a Skullgrinder roll against a Monster, and one of two Durthu’s gets to fight.
Despite all of the above, I lose one hero. One. The entire game. If you include the guy who stood back up three times, I lost two. Landon puts up as good of a fight as can be made, but the Goretide cannot be resisted.
Command Points eaten from Deathbringers: 4 (including a counter charge)
Heroes come back to life: 4
Total Models lost: 1 (2 technically)
Round 4: Dillon with Slann + Kroak Seraphon (and Callis and Toll) on Surge of Slaughter
Dillon’s a great friend of mine, and a store owner down in Birmingham, AL. He also helped provide prize support for Nashcon. Gear Gaming, represent!
Dillon builds a castle of castles on his home territory objective—20 Saurus Guard each bodyguarding a Slann and Kroak, an Ark of Sotek up front, and a unit of three Kroxigors babysitting a side objective. I got with the Master the Paths list because eventually one hero on his side is going to die. Very importantly, there’s a chunky Place of Power terrain near his objective, which becomes crucial later.
I put 80% of my army dead center of the table and start the arduous process of getting my army into combat. Two heroes run off to fight his Kroxigor, while everyone else girds themselves for what’s to come.
Friends, I got Kroak Bombed at least fifteen times. Minimum. I ate at least one Magical Intervention with a Deathbringer, but still. That’s forty five D3 mortal damage, not including the other damage I take from the Shrine and the Bastiladon—and that last one got absolutely mauled by a Skullgrinder killing him with mortals alone.
Despite getting exfoliated by Kroak’s sandblaster spell, I still manage to get in about 8 guys into his backfield, who quickly punch through two units of Saurus Guard. Thanks to the Place of Power next to his objective, I manage to heal at least 12 damage off my guys over multiple turns, which keeps me running in the game.
The rest of the game becomes a meatgrinder, where after some whittling down I’ve got 4-5 heroes fist fighting Kroak on his home territory after murdering a Slann. Dillon capitalizes on me foolishly pulling my Bloodsecrator off my home territory, which swings him almost 20 points. Despite this, it’s not enough, and I pull ahead to take the win.
We did some rough math and we’re fairly sure I took at least 60 mortal damage that game—and it wasn’t enough.
Command Points eaten from Deathbringers: 6
Heroes come back to life: 5 (including a Slaughterpriest who “died” 3 times in a row)
Total Models lost: 8 (the most all weekend)
Round 5 – Dustin with Tzeentch on Bountiful Equinox
Nerds vs Jocks! A fitting final matchup to see who gets the 5-0.
Dustin has Kairos and a Lord of Change with a Mutating Blade, 20 Blues, some Pinks, a Changeling, and a reinforced unit of Flamers. I go with the Attuned to Ghyran list, because scoring Master the Paths step two versus Tzeentch on a map with no neutral territory is straight up impossible when you’re walking everywhere and don’t have shooting.
He makes me go first, and I start the slow, methodical process of moving everyone up, making sure everyone can hug terrain and start zoning out the entire table. He teleports his Flamers into my backfield in a gap that I left open and did some shooting, and meanwhile his castle of brims and big birds rotate to my top right. I win priority into R2 and take it, continuing to apply pressure. A blob of Deathbringers in my top of left of the map starts getting close to his Pink Horrors on that objective, but a clutch 5” Redeploy keeps me from engaging with them. Meanwhile, I jump my Slaughterpriest out of his throne and move up a Skullgrinder next to the Flamers to eat a covering fire.
I then start tightening the noose around my opponent, engaging his Blues with a couple of heroes and fighting the Flamers in my backfield. I play VERY poorly here, and let my Slaughterpriest die without fighting, giving up an easy 5 Intercept and Recover points. Not much else happens.
Important note: Burning does a great job at toning down the “Stand up on death” nonsense that the army has, and basically created a CP tax for the rest of the game since I was rallying literally every chance I got.
Dustin then does some more maneuvering, the sole remaining Flamer in his unit dies from the Retreat damage, he teleports Pinks into my backfield near my lone Bloodsecrator hanging out on one of my objectives, and the Lord of Change moves up to prepare to charge my lone Deathbringer on my own backfield objective. I opt to redeploy the Bloodsecrator out of charging range even with his Destiny Dice, so instead the Lord of Change gets the guaranteed charge to flip my objective to his side. The LoC fails to do any damage, and meanwhile the Deathbringer punches back 9 damage. The LoC powers through (and doesn’t lose the Command) but stays on the objective to score points.
I win priority into 3, and this is where everything goes wrong for Dustin. I get essentially the entire army into combat at this point—which, by the way, I’ve been fighting Soulsnare Shackles for 5 straight turns, again—kill 10 Pinks, the rest of the Blues, and the Lord of Change with a clutch 9” charge from the Skullgrinder fresh off of killing the Flamers. He’s basically down to Kairos, Changeling, ten Pinks in my backfield. Dustin scrambles and puts up a great attempt at eeking out points, but it’s not enough.
To summarize how this whole event has been, at one point Dustin makes a charge onto a Deathbringer which—if he Powers Through with Kairos—would give Big Bird enough movement to flip an objective from me, which would’ve gained him 10 points.
I rolled the 5+ to deny the Command. I promised Dustin a beer and never got him one, so I owe him two beers the next time I see him. This army is stupid.
Command points eaten from Deathbringers: 6
Heroes come back to life: 4
Total Models lost: 4
Event Summary
What a weekend! Due to the Minor Victory in R1, I got 3rd place. My club mates Kevin and McKenzie respectively walked away with 1st and 2nd place. That’s a Georgia Warband sweep for 1-3!
Meanwhile, my opponents collectively went 17-7. Four of them went 4-1, and finished in the top 15. Everyone was great, and I’m glad to have made three new Warhammer friends despite how utterly salt-inducing Gorechosen are.
I also walked out with a bitchin’ sword, so there’s that too.
Command points eaten from Deathbringers: 21
Heroes coming back to life: 15
Total Models Lost: 21

Verdict on the Nerfs to Gorechosen
Hot off the press, we have a bunch of much-needed updates to Gorechosen:
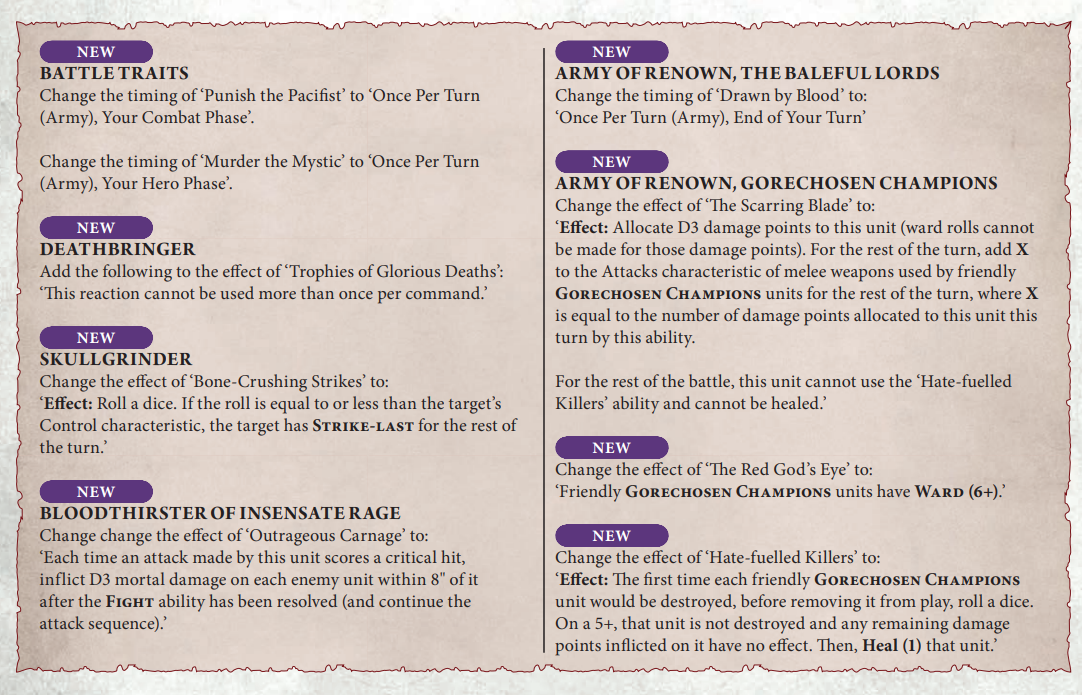
Overall, I’m happy with these. The army definitely needed to be “looked at” and GW have been bolder than I expected here. The 4+ ward was insane and I was thinking they might move to a 5+ ward, so going straight to the 6+ is more decisive than I thought.
These changes focus hard on the durability and NPE side of things. The headlines are:
- Stand Up can only be rolled once per hero. Makes sense, it was bullshit that you could keep rolling this before.
- Ward goes from 4+ to 6+. Makes sense, that army-wide 4+ was stupid.
- Command Denial (Deathbringer Warscroll) rolls can’t be spammed. Makes sense, allowing multiple attempts at that roll was a terrible idea.
You also can’t Ward the self-inflicted damage when you roll for the extra attacks, but the damage side itself (extra attacks and Strike First) has largely been left intact. This feels like the right direction: target the nerfs where they belong, and let Khorne keep fighting.
Overall I’d expect this package of nerfs to take Gorechosen from being one of the most overtuned in the game to being a playable meme list – which is exactly what it should be.
So What’s Next?
I’ll be playing the army again this weekend! Post-nerf this time around, so I’m looking forward to comparing the experience before and after.
The good news is that I think the army should have a bit more counterplay in future other than:
- Play Daughters of Khaine with Krethusa and don’t miss your prayers.
- Play 27 Slittabosses.
- Point over your opponent’s shoulders and say, “Oh my god it’s a bear!” and while your opponent has their back to you, you reach down and steal their models.
I’ll let you know how it goes.

If you’d like to help us continue our work, we’d love to have your support. All Patreon Tiers include Discord access, exclusive articles and regular contests. Our Tiers are priced to be within everyone’s reach, so please click here to join us today!


Honestly, shame on Nashcon’s organizers for allowing an unFAQed, overturned army to rampage so freely. So many feel-bad experiences for people who have been testing their armies and have to face an autolose from the newest broken list. At least you had the decency to apologize and get beers for your opponents. I would have avoided using such an army entirely. Personal opinion.
LikeLike
Kudos to anybody who gets off their arse to organise an event in my eyes. If you or anybody else disagrees with allowing a given army you’re welcome to arrange your own event, and I hope it gains the same success and traction as Nashcon. And I also hope that nobody wishes “Shame on you” if they’d have ran it differently.
~ Pete
LikeLike