


It’s finally upon us: The Honest Wargamer has splashed the full Helsmiths of Hashut rules all over the internet. Check out Rob’s video below, and today we’ll be highlighting some neat combos for the angry Short Kings of the Realms that have jumped out to us.
What we’re doing here today
This isn’t a full Battletome review – all the rules are already out there, so there’s limited value in just rattling through them all over again. We’ll be focusing on analysis rather than regurgitation. The format will be:
- Running through the army’s battle traits first up, to give it all some context
- Then focusing on some powerful tech and combos that we like
The rules are out in the wild and these are the points that are known at this stage:

Good tech is good tech, so let’s get into it.
Battle Traits
So these traits are entirely centered around the Desolation Tokens (DT) and the Daemonic Power Points (DPP). To summarize, once on every turn (yours and theirs) if a unit is not in combat you can mark a terrain piece or objective that they are contesting with a DT, and these will earn you DPP equal to the number of DT you have placed down. You can distribute these DPPs as you like to friendly units, maxing out at 3 each1.
In addition to that when you’re really fiending for it you can spend a CP to give a unit an extra 2 in the early game and 1 in the middle to late stages of the game. There are only 8 terrain features and anywhere from 2-6 objectives so managing this is pretty crucial to how the army plays. The buffs they trigger vary greatly in impact so you’ll need to get maximum value.

I have done some doodling on TTS on how best I think you can manage these tokens. I’ve marked in green the objectives/terrain in your own deployment that are guaranteed to Desolate, and the red ones are more opportunistic. I’d be looking to score 1s early, 2s mid and 3s late game.
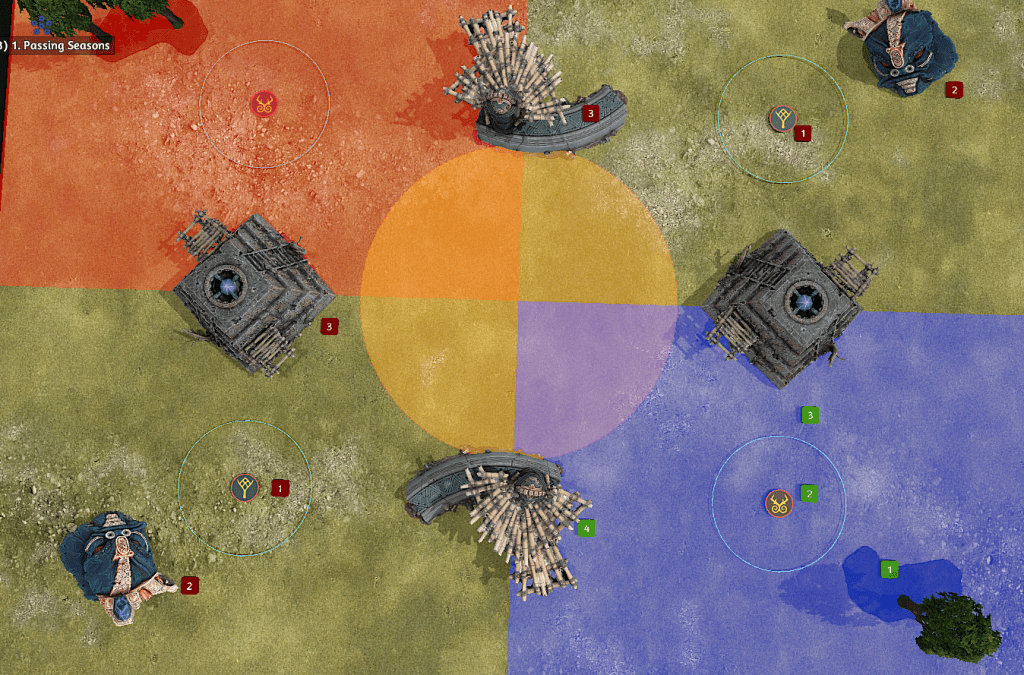
So here we have a relatively linear battleplan in which you end up mostly fighting around the yellow region in the center. By battle round 3 you might find it difficult to regularly be getting these tokens as most of your army is in combat or dead. So leaving those green ones for something like a support hero or Artillery piece to Desolate helps keep that Desolation token engine running right throughout the game, while aiming to Desolate the red ones when the opportunity presents itself.
Battle Formations
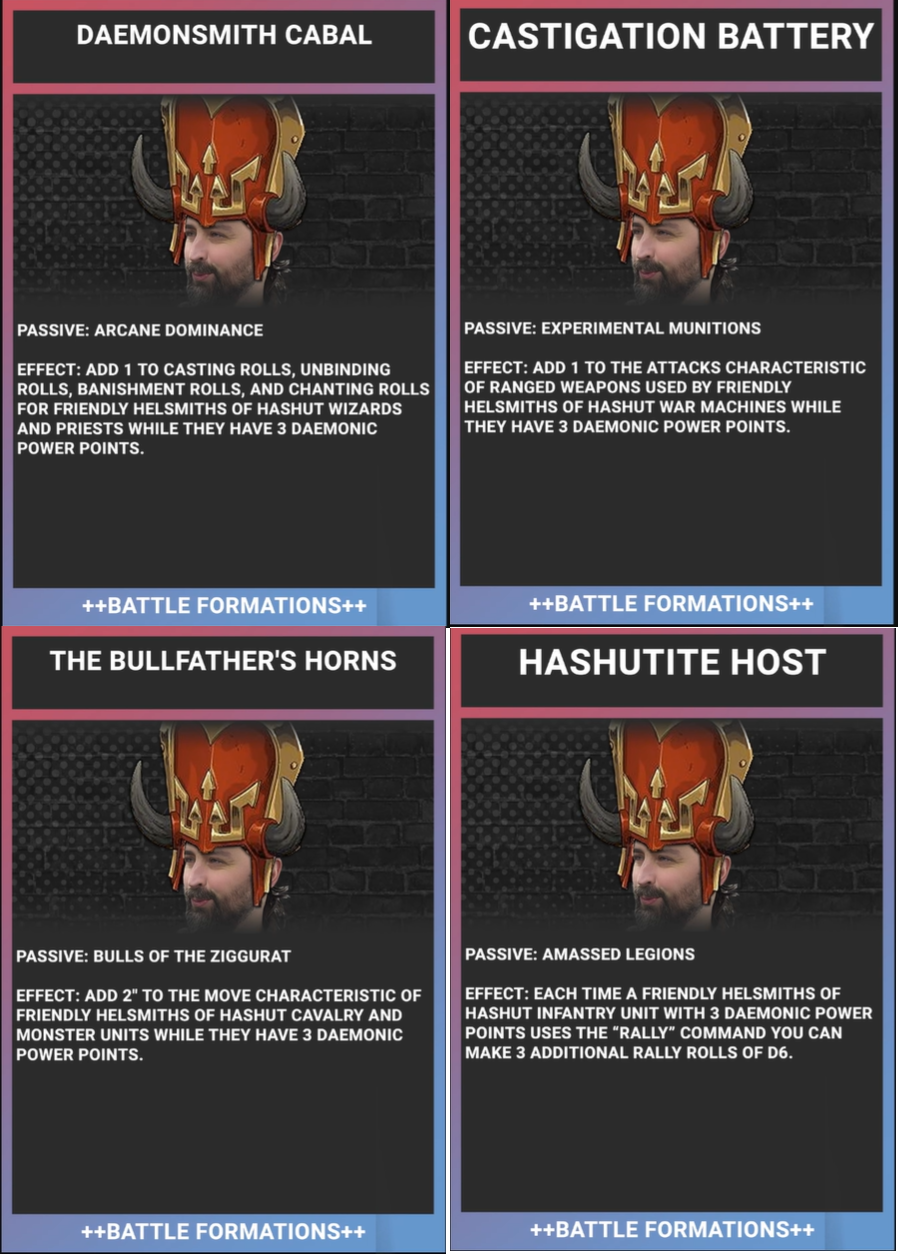
These are all designed around giving a buff to a specific type of unit that has the full 3 DPP. The first and best one to me is Daemonsmith Cabal giving +1 to cast, pray and banish while having 3 DPPs. A lot of the support Heroes will want to have 3 DPP and the bonuses are pretty nice given that there are some decent spells and prayers you want to get off.
The +1 to shooting attacks for Warmachines from Castigation Battery and those extra rally dice from Hashutite Host seem okay? Just feels like a lot of early game investment without really adding a lot to the army’s synergy – just a couple extra bits of damage here and there.
Lastly The Bullfather’s Horns give +2 move to cavalry and monsters. While this might be alright on the new big cows I am a bit unsure on how I feel about this on the cavalry; the additional move is nice but the two units leaked don’t show really strong abilities with their DPPs so I am unsure if you are going to get the best return on investment from those DPPs here. The cav do look great but I’m not sure that “their” subfaction is the best way to go.
Heroic Traits

All the traits seem pretty alright, each giving decent bit of synergy. The Servile Automaton seems pretty nice with a punchy Minotaur Mech and Eye for Weakness feels almost auto-include for most lists. That +1 to wound is a really solid buff and the Chaos Dwarves are lacking some synergistic pieces across the roster, so this is definitely a big win.
With Fire, You Worms! you launch another volley of shooting but hitting on 6s. Looks tempting if you’re taking a big, reinforced block of Danny DeVitos with guns, but this trait only does a couple of damage in your opponent’s turn on a unit of Infernal Razors even with 3 DPPs and a reinforced unit.

While we’re on that subject – the damage output is quite comparable between the two multi build options. I think you always want to take the Blunderbusses as they have greater range, do a little bit more damage and have the ability to inflict Strike Last which helps a lot with activation wars.


Infernal Razors with Flamehurlers and 3 DPP, also using all of the above
Artefacts
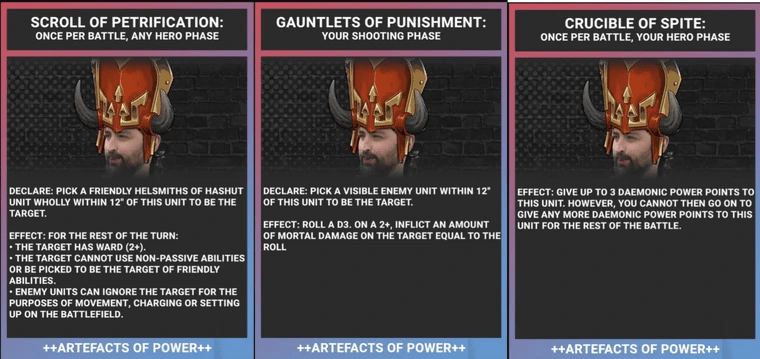
There are a couple of neat uses for these. The Scroll of Petrification is pretty neat and basically turns a friendly unit into a faction terrain feature for a turn. It’s kinda hilarious to see a 2+ ward in the game but there are a few neat tricks you can do with this. One big one is keeping a unit alive that’s in imminent danger of dying – this is a cheeky play that can deny someone the first step of Master the Paths or deny late-game scoring of Treasures from Intercept and Recover.
The Gauntlet of Punishment maybe offers some Mortal Damage but is pretty whatever, and lastly Crucible of Spite for a once-per-game 3 DDP turbo boost is nice when you really need it and I think will be the most commonly taken.
C-C-C-Combo
Now that we’ve seen the army-wide abilities, let’s get into the combos.
Fat Stacks
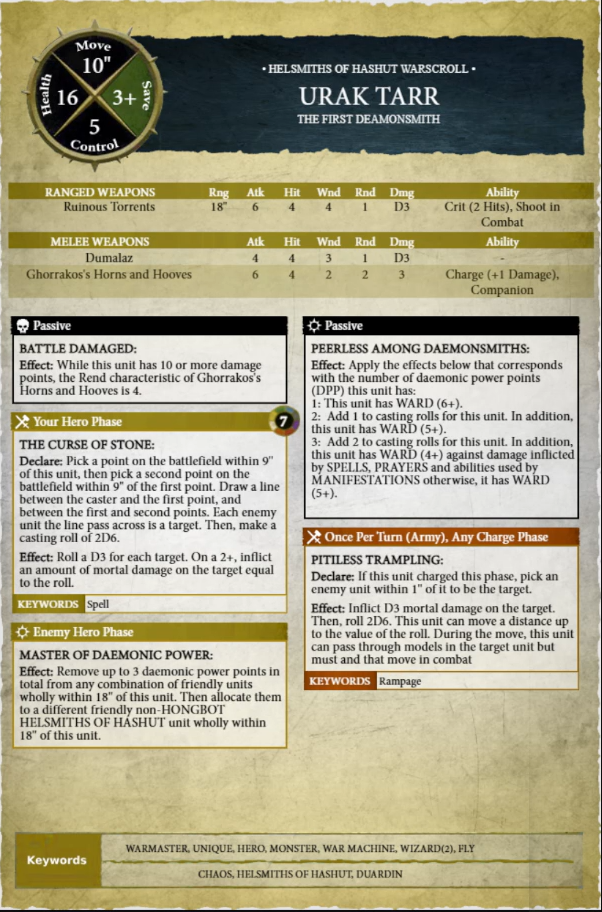
First up, we’re in Daemonsmith Cabal and stacking the DPPs on the Biggest of the Cows, Urak Tarr. When loaded up with the full 3x DPP he gets a 5+ ward and 4+ against any magical damage as well as +2 to cast. The battle formation ability stacks up with this, giving him an additional +1 so he’s casting at +3, allowing him to shit out manifestations like a bad curry or throw out some decent splash damage with his warscroll spell The Curse of Stone (or Ashen Smog), potentially putting out 2d3 to a few units huddled around terrain. Basically turning him into a much cooler Kroak.

A decent point to note is that these don’t require line of sight, so if your opponent is electing to abuse obscuring you can reward them with some decent MWs. Those lore spells are powerful, but with tricky CVs: halving a unit’s move or melting a high save unit can become pretty reliable when you are at +3 to cast.
Switching Gears
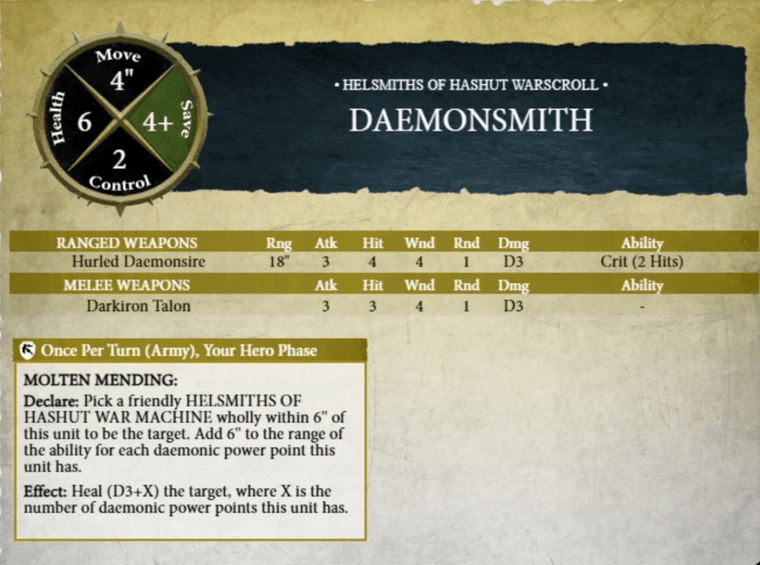
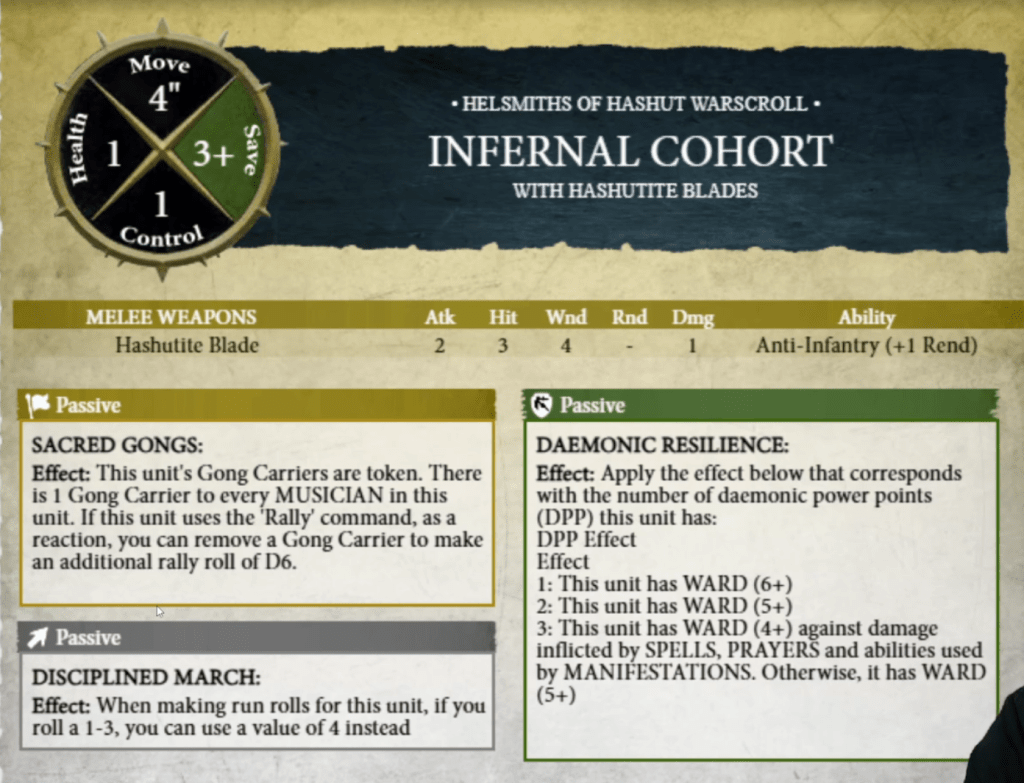
Urak Tarr’s Master of Daemonic Power to shuffle your DPPs around also has some neat tricks. For example, a Daemonsmith or artillery piece isn’t doing much with them during an opponent’s turn, so you can pop the big heal and then move them to a unit that could benefit like the Infernal Cohort to grant a 5+ ward. In general, using this ability for switching gears to a more defensive bonus will keep you getting the most out of your army’s abilities.
Fully Charged
Another spicy use of this ability is to give 3 DPPs to a unit of Anointed Sentinels giving them +3 to charge, combined with their Zealous Counter-Attack to get Strike First on the counter charge, making it quite a headache for your opponent to deal with. Additionally, if you can predict your opponent’s turn well enough you can use the Eye for Weakness HT to mark your hammer unit with +1 to wound as this ability lasts until your next turn.

To amp this to its maximum potential: with the prayer Furnace Blessing and an All out Attack you can have 19 attacks at 2s and 2s, Rend 2, Damage 3 (Crit Mortal). There’s not a lot in the game that can shrug that off.

Engine Builder
Another prick of a thing to deal with is a bunch of Dominator Engines (with either Bane Maces or Immolator Cannons) and paired with the Kruleghast Ashen Elder, giving you a stack of 2+ saves that ignore the first damage point each phase.


In addition, to make them even more of a kidney stone for your opponent, they are all war machines so you can sit in Obscuring2 and not be shot or Kroaked off the board.
Then to add to this further, you can really ruin someone’s day by taking Servile Automaton HT: now you’re looking at an Automaton with strike-first and a 5+ ward to the Dominator Engines with Bane Maces. I generally prefer the Bane Maces over the Immolator Cannons: that 8 inch shooting range wounding on 4s doesn’t sound amazing.
Our Initial Verdict
Hopefully that’s given you a few ideas to get working with. This is an army that plenty of players in the Craic House are excited about, and a couple of members of the writing team will be actively playing the army.
Overall, I think the Short Kings have a few neat tricks and there’s a lot of fun you can have here. As a Short King myself I’ll be testing this army and I’ll be sharing further thoughts – and some competitive lists – once I have managed to get a couple of games in.
In the meantime, if you just can’t get enough: this short3 story was pretty cool too, so check it out. Catch you soon.

If you’d like to help us continue our work, we’d love to have your support. All Patreon Tiers include Discord access, exclusive articles and regular contests. Our Tiers are priced to be within everyone’s reach, so please click here to join us today!


One thought on “Short Angry Men – First Impressions on Helsmiths of Hashut”