

by Peter Atkinson
It’s been a hell of a ride, hasn’t it? Sons of Behemat have a hard-earned rep from the early days of 3rd Ed when any clown could walk onto objectives and stand there for a while, and score a 4-1 with minimal effort. The game and the army has moved on a long way since then and they’ve ended 3rd in the most interesting shape they’ve ever been:
- Brodd’s Stomp was easily the most interesting AOR and has scored a ton of podiums – if you’ve never bounced faction terrain off your opponent’s head, let me tell you, it’s one hell of a drug
- If you still think they’re all about standing on circles, you’ve clearly never played against the MSU Mancrusher list which is low-key one of the coolest armies around in late 3rd. Watching them sequentially Redeploy a dozen lil’ monsters and becoming a spectator in your own movement phase is quite the experience.
- The Rabble Rowza ROR list provides the screens and Battle Tactics to really make the Mega-Gargant engine purr, exactly as predicted in our review of the Harbingers. And that’s before even considering the synergy to make Monsters (i.e. your whole army) run and charge.
So mud sticks, and fair enough – our army was an absolute nightmare for a long time there. But Sons have matured into a much more interesting proposition over time, and it’s an army I’m planning on maining myself in the early days of 4th. Let’s have a look at how they’ll play.
Overview: Playstyle and Win Condition
Classic Sons of Behemat revolves around setting a DPS test for your opponent: you get onto the objectives and stand there, wracking up points on the Primaries with your obscenely dominant control score. You’ll generally lose the fight, but your job is to lose it slowly: if your opponent can’t chop your guys down quickly enough, you’ll have ran up an insurmountable lead on VPs.
4th Ed shapes broadly the same: your guys are still 35 wounds on a 4+ save with Control 20. So you’re tough to knock off an objective, and probably controlling it while you’re on there. This is how you’ll be winning games:
- Still dominant on objectives. High Control Scores, and Megas love to fight side by side, so two of them together can largely zone out an objective.
- Broad decline in output across the game could help you set a tough DPS challenge. Lots of armies hitting on 4s now, and some aggressive terror units like Squigs are shaping to be far less of a threat.
- Most armies got more expensive (a lot of them only field around 1700 points in old money), but ours didn’t. Can still field 4 Megas (including Brodd) or 3 + a portfolio of Mancrushers.
There are a couple of headwinds to your playstyle in 4th however:
- You bracket relatively quickly, and drop to Control 10 after 15 damage taken. It’s not that hard to do 15 damage to a 4+ save.
- Other armies have some Control Score tricks of their own now, and you don’t completely block out the objective scoring zone, so you won’t always dominate every objective you’re standing on.
- The underdog mechanic can hurt you: since Sons generally build up an early lead and try to hang on, you’ll be giving away the underdog bonus in a lot of cases. To avoid this you’ll have to burn a battle tactic, but whether that’s worth it is very situational (not all underdog mechanics are equally powerful).
So these are the questions facing Sons early in 4th. They still win games like they always did, but you have a choice: do you want to lean more into damage and play the tabling game now, by finding ways to work around your blanket 4+ To Hit rolls? Or double-down on the chicken-shit DPS test aspect and take every durability bonus on offer? The good news is, this Faction Pack gives you the tools to try both.

Army Mechanics
Battle Traits
The key mechanic really is actually tucked away on your Warscrolls – it’s that Control 20. What you do get for playing Sons as a Battle Trait is access to a suite of fun and powerful Rampages:

- Gargant Charge is fine, but a pale shadow of the charge mortals this army could formerly deliver. Quite a big downgrade and in a world where Fights First is shaping to be very common, you’ll miss the scope to kill models outside of the combat phase.
- Earthshaking Roar is money in the bank. It’s essentially the classic Roar, which is and remains one of the best Rampages in the game. No All Out Defence, no All Out Attack, no bespoke bullshit like Gotrek’s double pile-in. Cha-ching!
- Colossal Slam is one of those classic GW masterstrokes, and I’m delighted it’s here to stay. Mega-Gargants doing wrestling moves on their opponents sits in that nexus of powerful and cool that just keeps on making us fall back in love with the game. Hook them off an objective, hook them into combat with your mate and go to town on them. Any time you get to move your opponent’s minis is just absurdly powerful in AOS. Everyone will call this the Suplex and you will forget it has another name.
- Jump Up and Down is your horde fucker-upperer. Very nice to have in the portfolio.
Note that all of the above can be performed by any Gargant (including Babies), except for the Suplex.
Shout out to Timberrrrr! which has been a Warhammer Giants thing for aeons. Longbeards like me remember the 4th Ed Fantasy starter set which came with this template for fallen Giants:
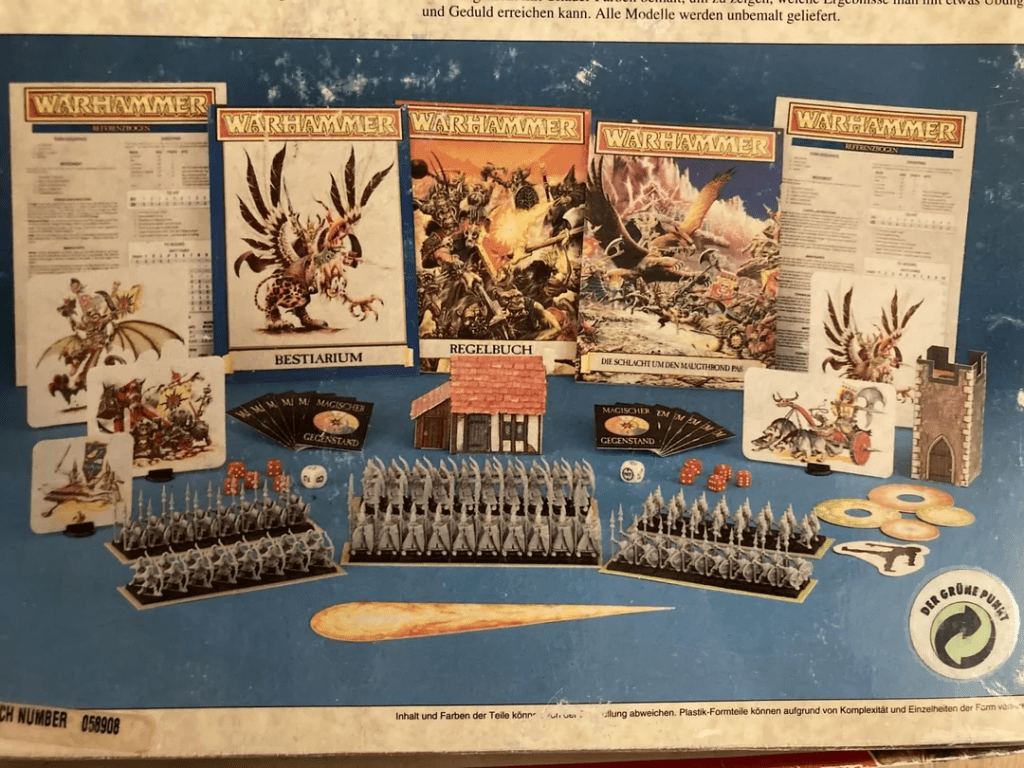
The cardboard Grom the Paunch in that box was our equivalent of the iconic cardboard Deff Dread, and is the reason I still love Goblins (and by extension, Destruction) to this day. We’re honestly living in a pretty sweet timeline where a playable army like Sons of Behemat even exists.
Artefacts of Power
We’ll do these first, because I feel like we need to mention Glowy Lantern before we discuss the Tribes.

Amberbone Totem is no more than OK and will never see play.
Glowy Lantern on the other hand is simply amazing. You’ll be casting from scratch, so factor that in to your choice of which Manifestations to take, but this is serious business. Free Manis are huge in 4th Edition and you really don’t want to be frozen out of having access. But even better, you get to choose which one at Deployment, so you can flex it to match your opposition. Worth noting (and shout out to Christian Snow for spotting this) that you don’t actually become a Wizard, so RAW no Place of Power for you. This is still the best option though, and the one I’ll be taking 9 times out of 10.
Mantle of Tusks and Horns is not to be sniffed at. Once per Game artefacts are usually a mug’s game, but this one could offset your native 4+ to hit and give you the oomph to break your opponent’s back in one critical turn. Put it on the shortlist.
Extra-Calloused Feet is another aggro artefact that I don’t hate. There’s a bit of a wombo combo with this one that we’ll cover shortly – again, don’t rule it out.
Kingslaughter Cowl has nice Quality of Life by adding +1 to multiple profiles: remember they all have their signature weapon, plus a Stomp, plus a Death Grip and this adds attacks to all of the above. Note also that you only have to be in combat with a Hero, and not necessarily pile all your attacks into them: you could just farm them for extra attacks you direct into another unit. Keep this one up your sleeve as an option in Taker Tribe (which we’ll come to soon).
Glowy Shield of Protectiness is decent but too niche to be “the one”, and I’ll usually be looking elsewhere.

Battle Formations


Taker Tribe is just incredibly powerful, and the power behind this article’s title. The key thing here to note is that timing again: you make your choice at Deployment. So you get to see what your opponent has brought first, and then flex your second artefact choice accordingly. Coupled with Glowy Lantern, you’ve just got unprecedented scope for live list-tailoring in real time. Highly, highly competitive.
Breaker Tribe is the other one that makes the shortlist. 6++ wards on your entire army is a game-changer: all you have to do is bunch up, which Gargants want to do anyway. These two are both excellent and the only two I’m considering competitively in early 4th.
Boss Tribe gives you chain activations which could be devastating, especially if you load up on aggro tech. It certainly is worth at least giving it a try, but I’ll be taking one of the other two above first. Even in a fightin’ list, I’d rather have the second aggro artefact from Takers.
Stomper Tribe is too nice for my tastes. The anti-horde specialist Tribe, and outside of maybe a skewed Teams list I just don’t see that it helps you win games as much as the others. The only one I’m putting a line through at this stage.
Heroic Traits
Brodd (spoiler alert) will be in every competitive list , and as a Warmaster has to be your General, but you can slap these on any Hero (unlike the old Command Traits); so essentially you can slap these on any Mega barring Brodd.
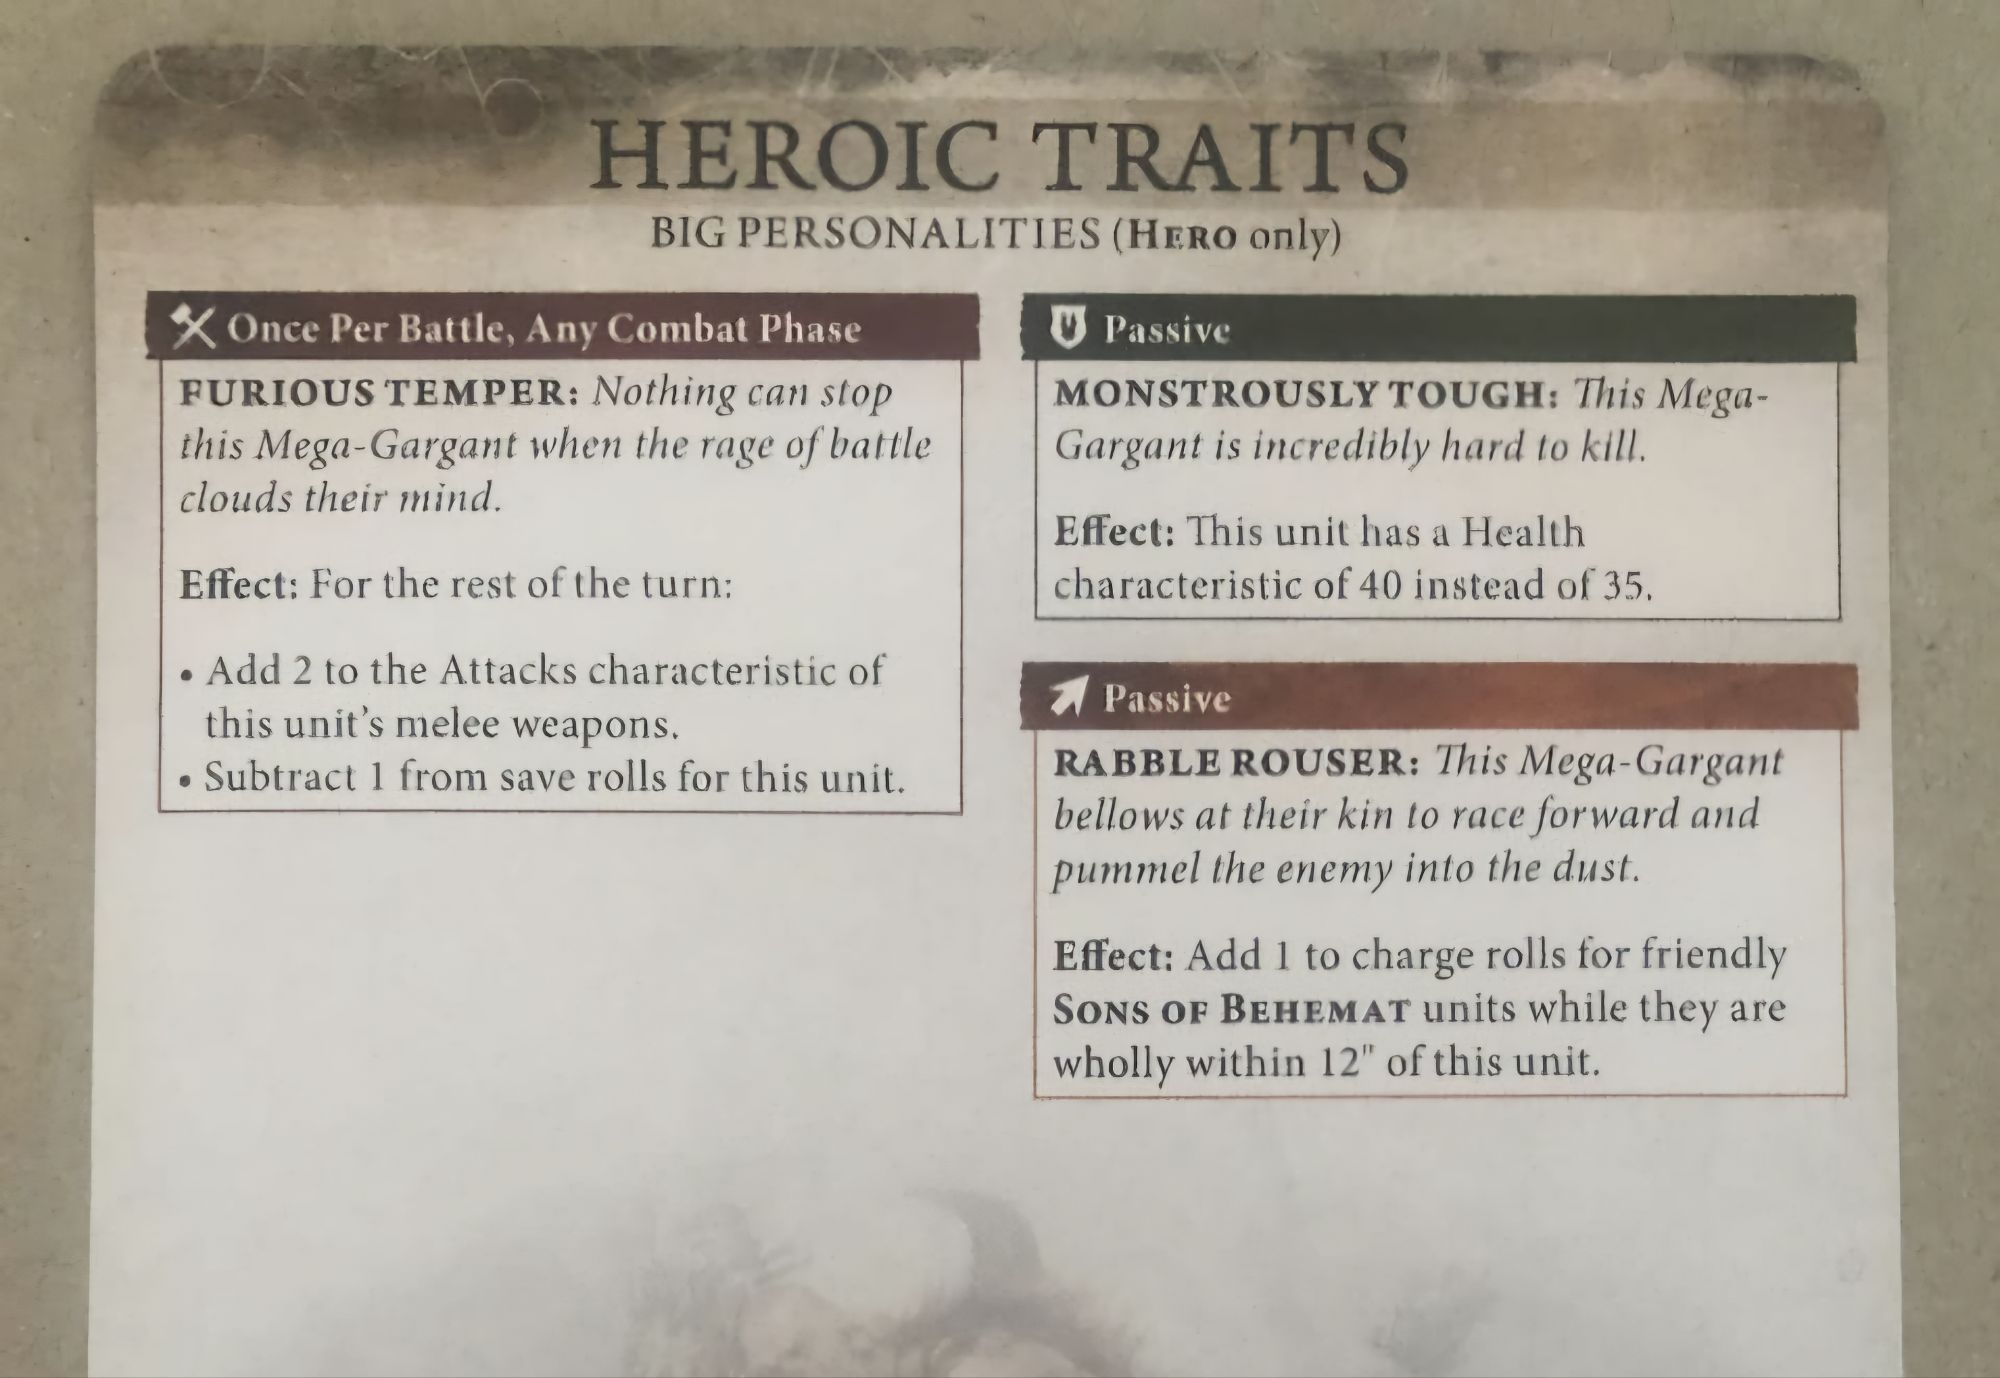
Furious Temper is actually quite interesting. I’m not too stressed about incurring the -1 to save penalty because it’s more of a Nuke button: you unleash it at a key moment, to bust a combat wide open. The idea being that you’ll limit what damage comes back at you by simply turning the enemy into red paste on the soles of your feet. Just remember that the Megas all have 3x weapon profiles, so you’re getting an extra 6 attacks at high rend and multiple damage. Don’t rule it out.
Monstrously Tough is the one you’ll be taking most often. 40 Wounds is serious business – it really does make a massive difference in practice. Especially when you combine it with the 6++ ward subfaction, so you’re chucking even more dice at it and multiplying up the additional effective wounds.
Rabble Rouser won’t be taken much. +1″ is more important than it sounds: not just adding additional length to your charge, but meaning that you can’t possibly fail a 3″ charge, which is important in a world of Countercharges. But overall, durability and output will be more important to this army than straight-line speed. Sons are not reliant on zipping around the board, so the speed tech that I normally value extremely highly in other armies is of less interest here.
Warscroll Focus
The full Destro pdf roll be dropping later today, but for convenience, these are the key warscrolls that we’ll be reviewing:


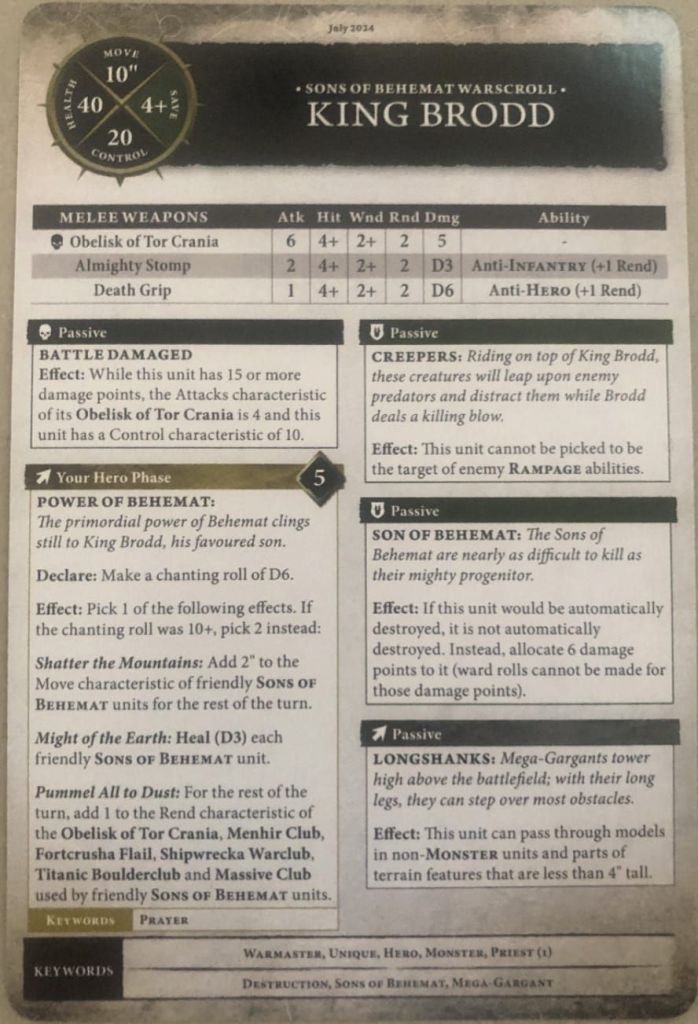

The headline is King Brodd himself. In one word: Indispensable. He’s up to a mighty 6 attacks at Rend 2 Damage 5 on his signature profile, plus the standard Mega Stomps and Grips. Brodd is not just a tank, he’s a warrior to be feared in his own right. As he should be.
Brodd does a huge amount to help you win games. As a Priest, he’s got the power to sack off annoying Manifestations that are getting in your way (without having to waste a turn getting through them), and his Prayers are immensely impactful. Brodd’s kept an updated version of his signature ability to switch off enemy Rampages (have a look at the warscroll, because as our mate Brad B pointed out it’s changed a bit, but in essence he can’t be targeted at all by Rampages). This Creepers ability is both appropriate for the dominant Alpha beast of the setting and a great hobby opportunity to put some different Creepers on there if you are using an alternative sculpt, or just want to put a little zing in the salsa.
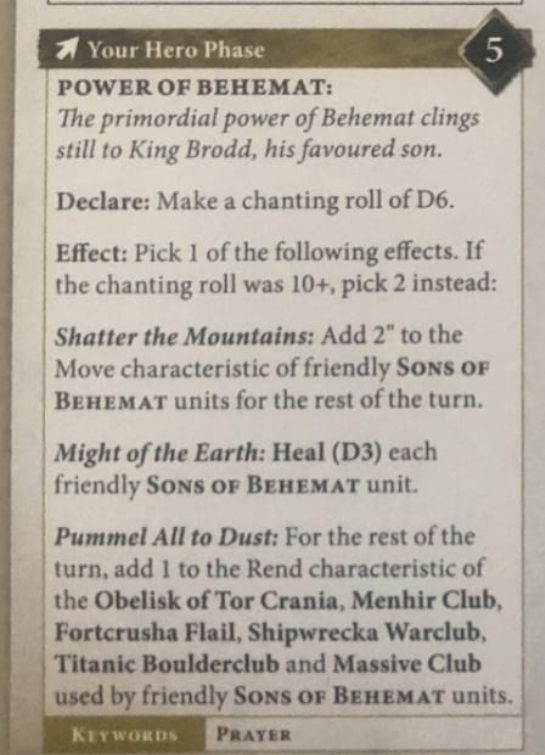
The Prayers demand an extreme chanting roll of 5+ (or 10+ for the double effect), so you won’t be hitting that every time, and the only downside to Brodd is that he’ll effectively be a CP drain as you’ll generally want to chant on your opponent’s turn too.
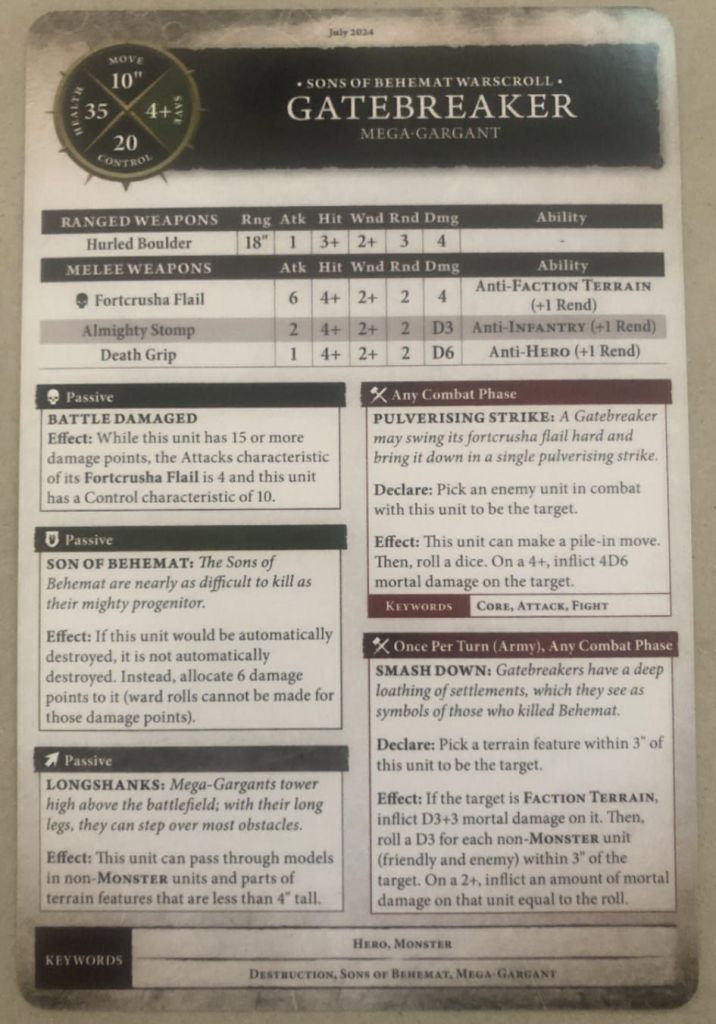
The other Megas are generally “as you were” in essence. The Gatebreaker will still be hugely popular: hitting on 4s leaves you open to debuffs, but if you get left fishing for 5s to Hit, he can simply Nope out of combat and take one huge almighty smash that can outright win you games. I know. I’ve done it.
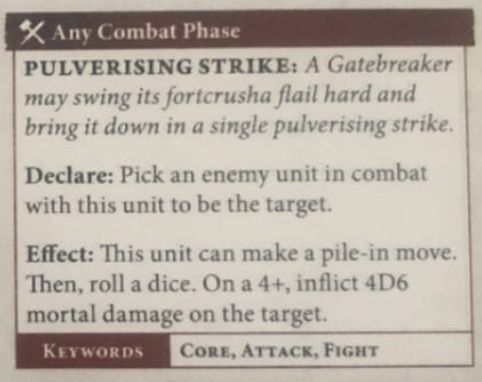
Worth noting is that his Smash Down is not a Rampage ability, so it won’t stop you using one of your army’s signature moves. It just happens. Weaponising your enemy’s faction terrain into mortal damage against them is amazing, and The Executioner will remain immensely popular.

The Warstomper is every bit as competitive, and for some reason, GW perseveres in making him the cheapest Mega even though he is definitely not the worst. A great recipient of the Calloused Feet artefact as noted above, and best of all, his extra attacks into larger units are no longer capped. Huzzah! Great quality of life boost that, and I’ll be running him a lot.

I’ve written an entire article on the Kraken-eater which you can catch over here. The TLDR is that his ability to kick objectives is locked behind a 2+ now, which is a strange choice from an internal balance perspective. He was already crushingly unpopular, and the 2D6″ kick is more than dicey enough without making it randomly fuck you over entirely. Taking a Kraken is probably a mug’s game in all honesty, but then I guess I am a bit of a mug. He’s cool and unique, and while he’s probably not competitively optimal, he’s good enough to take if you like the guy (which I do). Check out that link above to see some of the fun you can have with him on this GHB’s battleplans.
The Beast-Smasher rivals the Kraken-eater for being the least chosen Mega, and again these will be the bottom two in Indexhammer 4th. The debuff to enemy Monster attacks is sweet, but his Beast-Breaking Strike is not enough of a step up from the Gatebreaker’s equivalent to compensate for how much more situational it is. Maybe a Teams pick, that is still strong into low DPS armies but serves as an anti-Gargant mirror bully?
In summary: I reckon you take Brodd in every list, then whichever combo you like of Gatebreakers and Warstompers. I’ll usually double down on Gatebreakers and occasionally take a Kraken-eater as a pet unit choice.
As a reminder – these warscrolls are included in full at the bottom of the article.
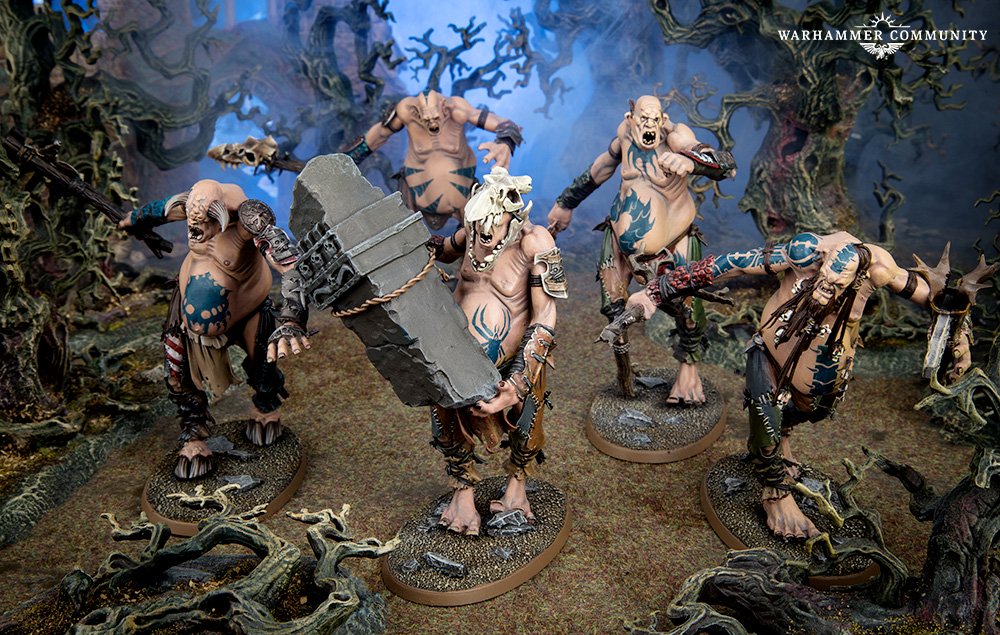
Won’t somebody PLEASE think of the children?
I’m not a Mancrusher guy (the 5+ save is a deal breaker to me), but our man Calvin is pretty sweet on them. The Mob gets a handy horde discount and enhanced charge mortals, and the solos are still good for standing on board edges to secure Battle Tactics without overcommitting a whole Mega to a job that is beneath him (or her).
You will see them, and you’re not crazy for putting a few in your early lists, but my own preference is to run with 4x Megas initially.
And what about the God of Earthquakes?
You can use Kraggy, but I’m really not feeling it. Including the ward he’s effectively 27 wounds on a 4+ save and I’d rather have 35 wounds on a 4+ 6++, thanks all the same. I just don’t think he helps Sons meet their win condition, although you could probably have some fun with Kraggy, a couple of Breakers and some Babies as a drinker’s list. Dammit I feel like I’ve just talked myself into writing up that list – pencil it in for later.

Key Combos

Let’s take a look at a few cool loadouts you can mess around with:
Unbreakable
Take King Brodd, then take the Monstrously Tough Heroic Trait on another Mega. Wrap them up with two more Megas in Breaker Tribe for army-wide 6+ wards and you’re looking at two Megas with 35 Wounds on a 4+ 6++ and two GigaChads each packing 40 Wounds on a 4+ 6++. That’s going to take some serious shifting, and I’d probably make it my own competitive starting point for the army.
Massive Flex
In Takers Tribe, you can choose a second artefact at deployment. With Glowy Lantern as one of them, we have absolute control over which Manifestation Lore to choose.
Then you bring out your suitcase of Endless Spells, show your opponent the huge range of tech you can slam down on the table, and make them sweat before a dice is rolled in anger. Looking at a horde? Choose the one with Gravetide. Not too concerned about unbinds? Take a punt on Krondspine. And if you’re facing hardcore anti-magic that will stop you ever casting it, you don’t have to take Glowy Lantern at all; just double down on damage artefacts.
To give a couple of examples of situational picks you might go for:
- If the opposition has a big bastard that needs to be taken down, or just a lot of heroes to engage with (the mirror match springs to mind), then Kingslaughter Cowl comes very much into play.
- This one can combo up nicely with the Furious Temper Heroic Trait to get you +3 attacks on all profiles for that one big turn. 9x Gatebreaker attacks at (minimum) Rend 2 Damage 4? Yes please! And then you’ve got 5 Stomps and 4 Death Grips still to come.
- If you’re looking at a horde army throwing a high volume of low-quality dice, you might even look at the Glowy Shield to bounce mortals back into them.
This level of list tailoring at the tabletop really is unheard of in AOS.
Stamp Collector
A really solid Aggro combo to wrap things up: take the Extra-Calloused Feet for more stomping. The best guy to use this is the Warstomper, since he’s got extra attacks on that profile already, so we’ll get more mileage out of the additional rend and damage. That’s already 5 attacks at Rend 3 Damage D3+1 (Rend 4 against Infantry!).
Then we’ll combo it up with the Furious Temper Heroic Trait. We’re now on a massive 7 attacks on that profile, and plus 3 Death Grips and a Fuck Ton +2 with the Titanic Boulderclub.
Get Brodd’s Rend prayer off and we’re up to Rend 5 into Infantry (Rend 4 into anything else), and if we do the whole thing in Takers Tribe (or simply use All Out Attack), a nearby mate can give him +1 to hit on all of the above.
Into a large unit, you’re looking at 32 attacks on 3s and 2s at astronomical rend and pulverising damage. Even into a single model, with plenty of it at rend 4, not much is walking away from that.
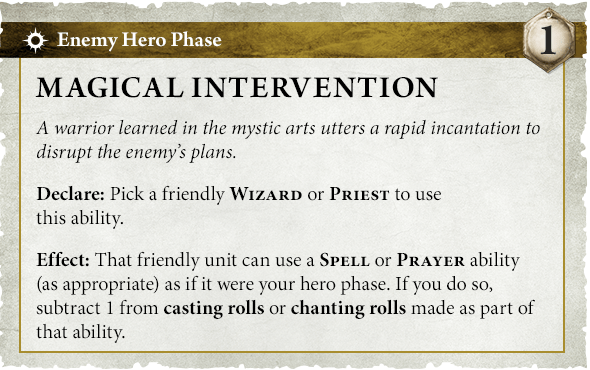
Activation Wars
You have no Strike First / Strike Last tech, and you’re mostly a combat army. So when faced with the proliferation of Activation Wars tech, what can you do other than charge in and get massacred on your own turn?
Well, this is somewhat of a problem for Giants, but hopefully not a deal breaker. You do have some scope to remove models outside of the combat phase, via limited shooting plus mortal damage from your various Rampages, in addition to anything your Manifestations can pump out. All of those things can remove models before the combat phase rolls around, and reduce the amount of damage you cop before you get to swing. But you’re not going to blowing up whole units with this stuff.
So you’re probably just going to have to cop it to a large extent. And that’s your real Activation Wars play – you can usually weather one round of combat from most things in the game, especially if you’re teched for it with things like the Breaker Tribe ward and the various means you have of reducing enemy attacks. If there’s a glass hammer that needs to be shattered, you might just have to go bowling in with a couple of Megas and wear it.
And if that doesn’t sound ideal (it often isn’t), then you’ve also got old faithful: just stand on circles. Don’t engage: Sons are not an army that has to force the pace, and your main win condition is supremely passive. Megas put their opponent on the clock, and on most missions, the onus is on your opposition to make something happen while you are happily racking up the VPs.
So your main weapons in reality are knowledge and judgment. I’d start every game by asking your opponent what Strike First / Strike Last tech they have, and think really long and hard before engaging with those units. Do your utmost to whittle them down as far as possible outside of combat before engaging, and use Manifestations to block charges and limit how many models can surround your model’s base.
Control Score
Sons of Behemat are the kings of Control. You’ll be using Rally to try and heal back above the 15-wound threshold wherever possible, and using your large bases to block access to the objectives. Other armies have to work for it, but dominating the Primaries is your thing.

Battle Tactics
You can check out the full list here.
Seize the Centre is OK on missions where there are central objectives that you want to be near anyway. Otherwise you’re looking at throwing two Babies under the bus.
Take the Flanks is better than it might look at first glance – remembering you only have to toe the 6″ line, not be wholly across it. You should usually be able to achieve this while scoring Primaries on a lot of maps.
Slay the Entourage will be pretty achievable in most games – once you can reach that one unit, going to town on it with a Mega or two should usually bring it down.
Do Not Waver is a cracker for Sons – “not dying” is what they specialise in. Lock it in.
Attack on Two Fronts is really solid too: those Control 20 minis just love walking onto objectives and saying “That’s mine now, thanks”. Similarly Take Their Land is another one you excel at.
In the Destro space, Time to Get Stuck In will be hard, having to haul ass with the vast majority of your army to get that big base across the line. Possibly easier if you take some Babies because you have a smaller base to drag behind you and 3 units won’t constitute about 1500 points of shit.
The Kunnin’ Approach is quite achievable too. What will be quite funny is that I can imagine a situation where you need to leave an enemy unit alive and tagged in combat, say 1 Hobgrot or something, to score this the next turn. And you go for the Gatebreaker Smash, hoping to fail the 4+ coinflip and leave it alive.
All in all, there’s not a huge number of bankers, and you aren’t especially great at denying them either (other than being hard to kill yourself). But there are enough decent opportunities that I think you should be hitting at least 4 most games, and you can make ground back by denying Primary points to your opponent too. Sons are hardly a juggernaut of Battle Tactic supremacy, but it wouldn’t put me off taking them either.
Preferred Manifestations
Well the good news is, if you buy access through Glowy Lantern, you don’t have to commit until you’re at the table. And you can check out our guy Calvin’s review of the universal options over here.
You’ve got one big cast, might as well make it a good ‘un. Krondspine is the basic bitch choice, but hey, look who I’m talking to – it’s OK, we’re all Gargant players here. Casting on an 8+ makes it tricky and I’d be much more likely to take it if I can deploy and contest objectives near a Place of Power.
After that, I’m looking for the biggest base and the most movement blocking at the lowest casting value. Purely based around what will stop things getting into combat with me while I stand here winning the game. Morbid Conjuration fits the bill, with the ludicrously large Gravetide (CV7) as well as the movement-screwing Shackles (CV6).
Primal Energies is also worth a look, with Lifeswarm (CV6) healing you back up – have I mentioned that Gargants like durability buffs? It’ll be pretty fucking funny the first time you Rally and Lifeswarm back up above your Control 20 threshold. Ravenak is also a heavy hitter with large base to block movement so don’t sleep on this one.
I could rattle through them all and make a case for them, but I’d make those three your shortlist. Just make sure you bring as many Lores as you possibly can to the table to freak your opponent out at Deployment.
Technical Briefing
Firstly, when you Suplex an enemy off the objective, make sure you do so in a manner to prevent them piling back onto it. And this usually means leaving a bit of your own base dangling off the objective, to place them even further away.
If you utilise the full 0.5″ gap for a completed charge, plus the full 1″ that they can finish away from you after the Suplex, you should be able to place them far enough away that they can’t pile back on:

Secondly, Gargants hunt in pairs. There’s safety in numbers because it prevents your Megas being isolated and annihilated one by one, and with your objective control more vulnerable in 4th (even on smaller objectives) you might also need that extra support to hold Primaries:

In terms of Listbuilding structure: If you take a Mancrusher Mob, the points saving typically gets you 1 extra Baby on the side. So you can take 3 Megas and 3 solo Babies, or 3 Megas plus a Mob and one solo Baby (for 4 Babies in total). You lose the flexibility of having four smaller units running around, but you do still have one extra unit cutting loose, to score BTs and perform general peon tasks.
As a thought experiment: if you feel like you can live without Brodd, a structure of 4x Warstompers and 1x Mancrusher is 2k on the nose. So if you like running 4 Megas, but you feel like you’re really suffering from having that one loose unit, that’s how you can make it work.
Similarly, running a few Warstompers will help you hunt out that +1 CP for the first Battle Round by finishing 50 points under. A structure of Brodd, one Gatebreaker and two Warstompers puts you on a neat 1940 points if you value that extra CP. There’s really no good reason for the Warstomper to be the cheapest Mega, so you wouldn’t be crazy for running a couple of them.
In terms of drops, you’re probably looking at two Regiments. Each Mega can bring along one more (plus any number of babies) for the ride:
There’s a subtle question about whether you go as high as 3: in this GHB, you’ll want to include as little as possible in Brodd’s Regiment to minimise the +1s your opponent gets from Priority Target. So there’s an argument for putting him in one on his own and busting up to 3 drops by choice. Food for thought.

And in that space, you’ve already got high rend (and access to more if needed from Brodd’s Prayer) so for our own choice I’m looking at either Priority Target (to improve our annoying 4+ to Hit rolls and assist with scoring Slay the Entourage) or Bodyguard to play into the DPS theme.
Sample List: Unbreakable Tribe
I’ll probably start out with this chicken-shit defensive list for a GT I’ll be attending in Melbourne this August (same one I shared in the Kraken-eater article earlier this week):

Allegiance: Sons of Behemat
– Battle Formation: Breaker Tribe
Regiment 1
King Brodd (520)
– General
Gatebreaker Mega-Gargant (500)
Regiment 2
Gatebreaker Mega-Gargant (500)
– Heroic Trait: Monstrously Tough
Kraken-eater Mega-Gargant (480)
– Artefact: Glowy Lantern
Total: 2000 / 2000
Wounds: 150
Drops: 2
You’ve got two 40-wound Giga-Chads in Brodd and your General, and an army-wide 6++ ward as long as you’re bunched up. And the Kraken-eater helps to make sure that you are always bunched up. Two drops, most likely selecting the Bodyguard GHB ability to reduce incoming attacks and make life even harder for your opponent.
Glowy Lantern brings the flexibility to choose a Manifestation Lore at the tabletop, and Brodd being a Priest provides a second method of binning off Manifestations beyond battering them, which is important when the stupid things are standing in your way.
All in all, this is a very simple list with a very simple gameplan, and perfect for getting to grips with the new edition. The Kraken-eater puts a bit of zing in the salsa, and with the right set of missions, could make the difference between scoring a podium and missing out. If you don’t have my regrettable weakness connoisseur’s eye for the Kraken-eater, you could slot in a Warstomper as your 4th Mega and probably make it a stronger list overall.
I’ve also written up an ultra aggressive combat list on the Patreon to accompany this article, with a feature on why I’m hot on MSU Moonclan Stabbas to follow next week, so Patrons who are interested in Destro armies should keep an eye out for those.
Final Verdict: Is It Cool? Is It Good?
Yes to both of the above – I’m happy parking Sons of Behemat in the top right quadrant, both powerful and interesting.

If you’ve been following Plastic Craic for a while, you’ll know that when we review something, we review it; we’re not here to promote GW’s products for them. So you can be assured that when I say they’ve done a great job with this Faction pack, I mean it. I’ll be maining this army myself and I can’t give it a stronger endorsement than that.
Yes you’ll be standing on circles a lot, but GW has also given you the tools to play Sons as an aggressive melee army like never before. You’ve got a fresh new mini-game of tipping out a whole suitcase full of Manifestations and tailoring your selection (plus your potential second artefact) to the opposition at deployment, and if you need to put a bit of spice back into the marriage after a while, you can always throw a Kraken-eater into the army and start playing soccer.
We wanted to keep the Suplex – we did keep the Suplex – and as a Giants player myself I’m very happy with where they’re at. This is a really strong Faction pack and a really strong outcome for the biggest of boyz.
Further Reading
Rob has been absolutely killing it with his own Faction reviews. I highly recommend all the Faction videos he’s putting out right now:
https://www.youtube.com/@thehonestwargamerstreams
Life’s too short to mess around with weirdly paraphrased not-quite-the-rules, and Rob has done an immense service to us all by putting the actual rules in our hands. The drip-drip can be a frustrating time for us all, so thanks to Rob for cutting through the noise.
We also did a deep-dive on the Kraken-eater earlier this week, which goes into a lot of detail on a pet unit of mine and and how he can help you win games in this GHB:
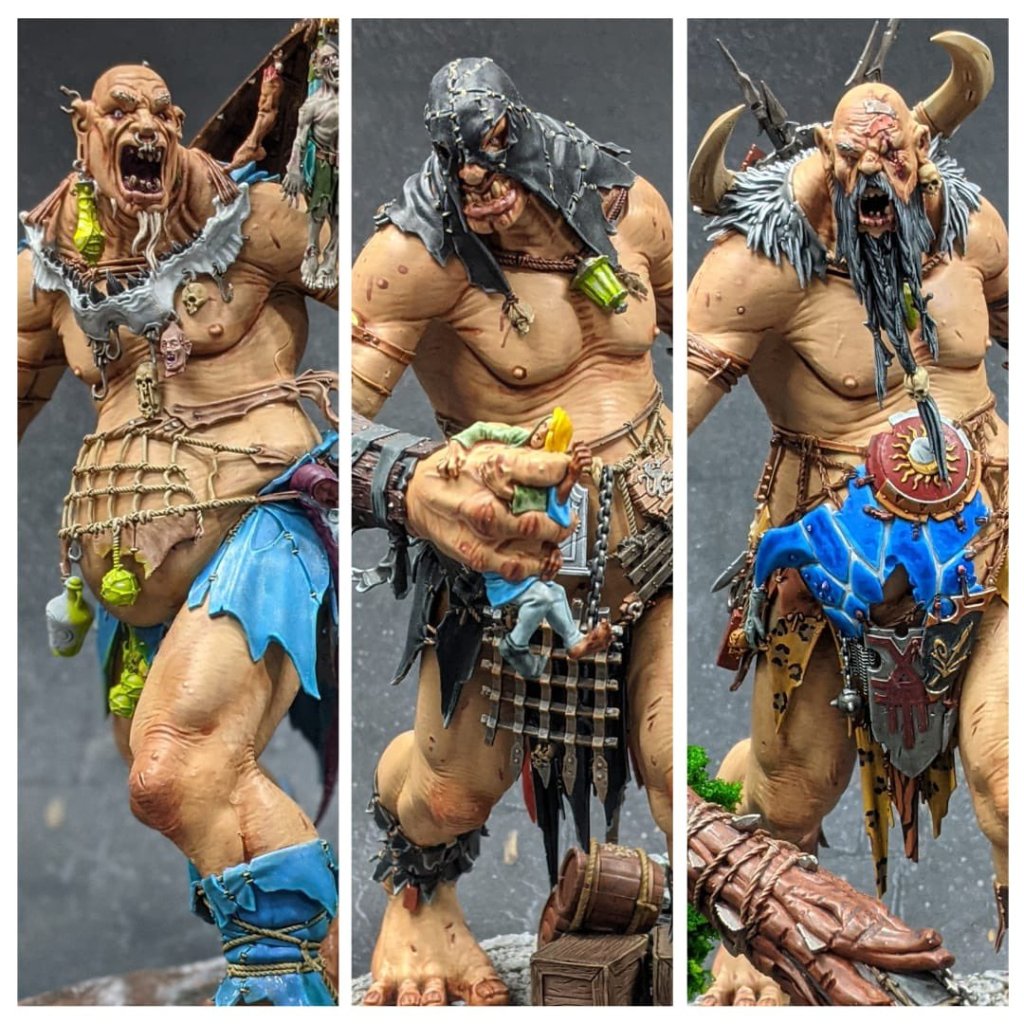
And finally, if you appreciate the finer things in life, check out this magnificent, extensively-converted SOB army from Cara:
Other than that, check back next week: our next faction focuses (as voted by our Patrons) will be Skaven from Theo, and Tzeentch from Calvin.
I hope everyone rolling dice this weekend has an absolute blast, and if not, enjoy writing lists – see you on the other side.

If you’d like to help us continue our work, we’d love to have your support. All Patreon Tiers include Discord access, exclusive articles and regular contests. Our Tiers are priced to be within everyone’s reach, so please click here to join us today!


4 thoughts on “Massive Flex: Sons of Behemat AOS4 Faction Review”