

by Peter Atkinson
Men have Read Books, Screencapped Books and Shared Around Images From Books, and as such, we as a community are now in full possession of every Battle Tactic for every faction. This article is an update to the one we previously published when we had only the majority of the information (and not all of it) – the latest updates being Death and Chaos, so if you’re across the rest of it, feel free to skip ahead.
Our writing team has a ton of experience (and success) at Age of Sigmar; we also have knowledge now of the full 8/8 options that will be available to every army in the game, so we believe that we’ve got enough knowledge now to explore the nuance around these Battle Tactics and offer some early thoughts on how you might approach scoring them – and denying them.
We’re here today to analyze what we’ve seen so far: how achievable they each look, but also which way they steer army construction and how they could impact the flow of the game.
Ready? Let’s go.
The Background
By way of context, the original article from WarCom laid out how BTs will work in broad terms. They also specified that there will be six Universal tactics plus two per Grand Alliance, and in the article they showed us precisely half of them (three Universals plus one from each GA):
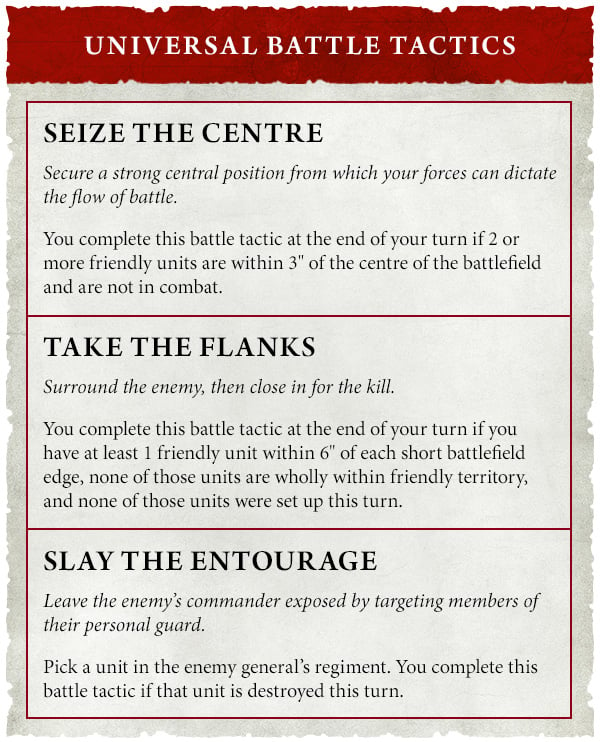


Image credit: Games Workshop
Adding in the rules that have been shared we now have eyes on all six Universal tactics and both options for every GA:
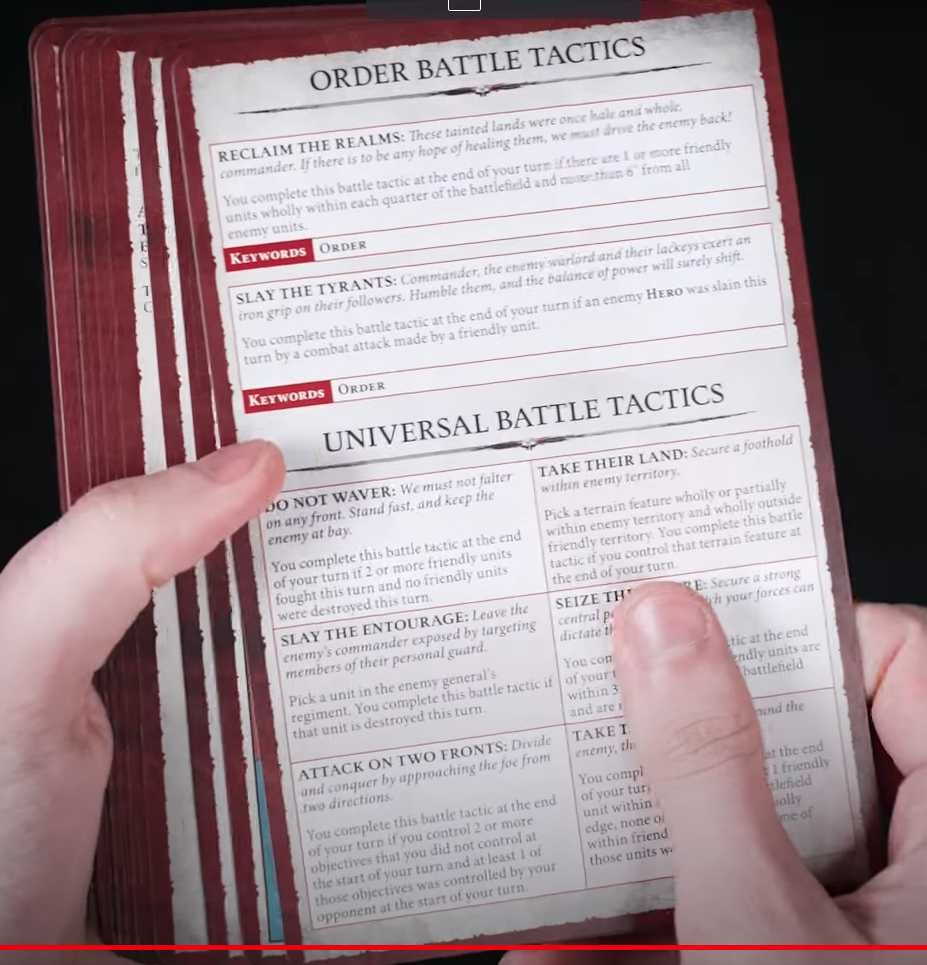
Brilliantly, the two BTs covered by that strategic thumb had already been revealed anyway, and we’ve included the clean photos for the Grand Alliance tactics in their respective sections down below.
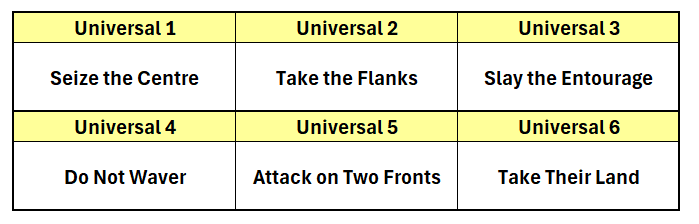
So this is the state of play as we launch into 4th Ed:
Let’s figure out what we think of them.
Analysis: Universal Tactics
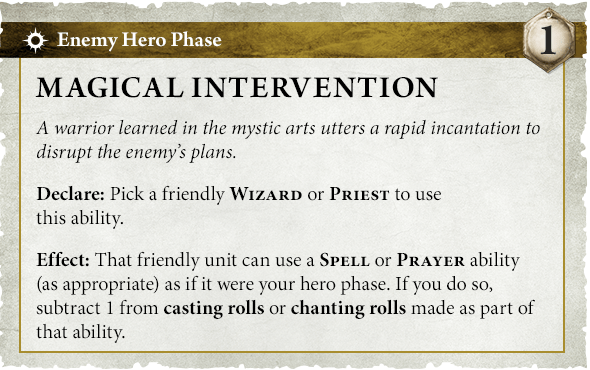
Spoiler alert: We’re going to be talking about the Redeploy and Countercharge command abilities quite a bit here (in the context of battle tactic denial), so I’ll drop them in once for reference:

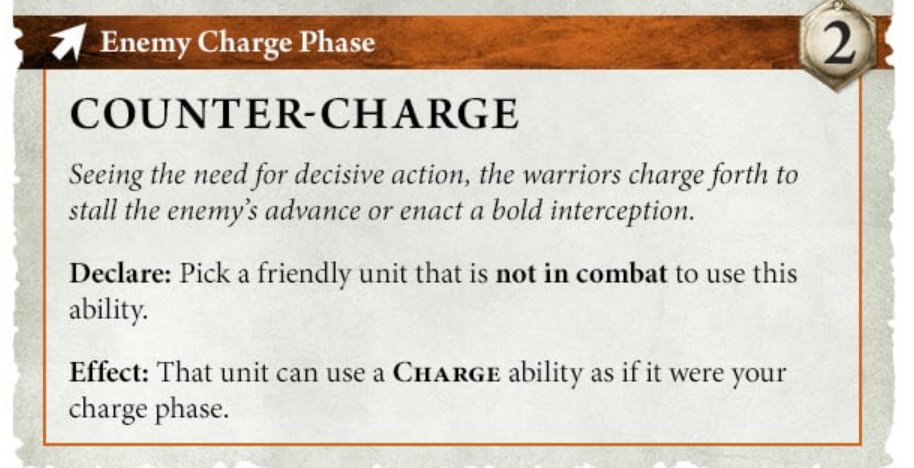
Credit to Games Workshop. Note that Counter-Charge costs two CPs, so it ain’t cheap!
Seize the Centre
Even us crayon-eating Destro players are smart enough to push a couple of units into the middle of the board, so it’s an often going to be an early-game gimme if you go first. In terms of list construction, it might be worthwhile having cheap throwaway units that you can plonk in the middle and trade with. Your opponent sends up a combat unit to deal with them, then in turn you deal with their combat units, as the game quickly builds to a crescendo of violence.
Counterplay: The obvious thing to do is to do it first yourself. If you’re already there, especially with an anvil unit, your opponent won’t be able to get there without being in combat. So it rewards going first. If your opponent is going for this one, you can always attempt a countercharge to force them into combat, so it might actually be harder (or at least less automatic) than it looks at first glance. This BT also punishes people for backboarding a gunline because they give away the opportunity to countercharge and hence lose an opportunity for denial. Seize the Centre could also incentivise you to put a deathstar unit on your own frontline to score this one: the kind of unit that you can ram up the guts that no countercharging unit will want to tangle with, and will clear house if they do. Either that or tank a big hit, and prevent your opponent from scoring this one straight back if they go after you, because they’ll be bogged in combat with you.
Overall ease of scoring: B+. This will sometimes be harder than it looks in practice, given that your opponent can “force” combat with the universal Counter Charge CA. Will they want to spraff 2 CPs for the chance of a long-ish charge though? I’m looking forward to hearing stories of 3D6 countercharges messing with the efficiency of this tactic. Still an easy late-game banker to score out once you’ve tabled your opponent, though.
Take the Flanks
Note that it’s within 6″ of the short board edges (not “wholly”), so pie-plate units can now score this. Deep striking units cannot contribute though, so the Skitterstrand Arachanrok is still stuffed. The scoring unit cannot be in your own territory at all, which is obviously harder on maps which are half-red, half-blue and easier when there’s a neutral zone. The “within” part means that you can string out a screen and just tap the edge of the 6″ boundary – you don’t need to send a cheap unit off on its own to stand on the perimeter, it can be fulfilling a useful purpose and still keep in touch with the rest of your army.
Counterplay: Pushing up on both flanks will make it harder for your opponent to have that space to move into, and while there is no stipulation that they can’t be in combat, you might be able to push up far enough that they can’t get past. So again, the best Counterplay might be going first and holding a high line yourself.
Overall ease of scoring: B. Structurally very similar to Seize the Centre, but a little bit harder because you have to get a little bit further. Could get easier if we get some more favourable maps than we’ve seen so far.
Slay the Entourage
“Kill a specific unit” always favours shooting, because they can just pick it out from across the table without getting there the hard way. Ah well.
Counterplay: If you’re not up against shooting, screening your relevant units is the obvious way. There should be more line of sight blocking terrain around in 4th too which will help protect you from the Dakka. You can make this one tricky by taking a tough General in a Battalion of his own, which pushes up your drops but denies them any soft peripheral targets. And if your general is a small hero you might be able to hide him from most shooting, and with the assistance of terrain, even from sniper units.

Overall ease of scoring: C. This will usually be a win-more Tactic that rewards you for smashing through your opponent’s army until they’ve got nowhere left to hide. If you’re already on top it clearly gets way easier, but in terms of trying to play strategically for Battle Tactics and objectives, this one doesn’t really offer you much of a pathway. You just get there by brute force. Easier for gunlines of course.
Do Not Waver
Now you’re talking! Fight stuff, smash stuff and win.
Note that the Fight ability can be chosen by any unit that is in combat or that charged this turn – so if you do complete the charge, you’ll get the chance to “Fight” (and pile in as part of that) even if you happen to smash your targets and run out of stuff to krump before all charging units have activated. So that aspect does have good quality of life:

Counterplay: If your opponent has brought a combat army then it’s already geared up to do this, and it will be hard to stop. You can Redeploy to leave them a longer charge, but if they’ve moved up multiple combat units, then your chances of them failing all their charges gets exponentially slimmer. The sneaky way to get around it will be our new best friend Countercharge, which would allow you to get a combat unit of your own into one of their softer units, and switch off the second stipulation (“no friendly units were destroyed…“) by lifting the unit you crash into.
Also worth noting that the charging units don’t actually have to kill anything – just Fight, and not die. So your own chaff will be a liability here, offering a charging target that can’t really hit back worth a damn. You’ll actually want to use your combat units to screen your chaff in these cases, which is quite funny.
Overall ease of scoring: A for combat armies, Not so much for gunlines. There’s some element of jeopardy here – as there should be – if you flub your charges, perhaps with the assistance of a clutch 6″ Redeploy. But you can’t ask for much better than this, really.
Attack on Two Fronts
Warhammer is a game of fighting stuff and taking objectives. We just got rewarded for fighting stuff, and now we get rewarded for taking objectives. I can dig it.
Counterplay: You can limit opportunities by not taking objectives in the first place – especially pregame – and then putting your opponent in first. They can’t take it off you if you don’t hold it. But then they’ll probably just score Seize the Centre instead, so that’s maybe not the best plan; and then as soon as you do start capping Primaries, you’re setting this one up for your opponent anyway. Best advice really is just the standard Redeploy or Countercharge options to up-end the table state after your opponent has shown their hand, or limit yourself to taking two objectives and castling the hell up. The goal is to make it really hard to have either one of those taken from you.
Overall ease of scoring: A-. Castling armies might be hard to knock off here, but that’s Warhammer. If you haven’t built the power in your list to blast someone off a single Objective then it’s perfectly fine for the game to ask that question and expose the answer.
Take Their Land
This one will vary with the Battleplan maps, but is effectively very similar to Attack on Two Fronts. You’re trying to capture a lump of plastic instead of a disc, but the main difference is that it has to be wholly outside your territory (and at least partially within theirs). This implies that there will be at least some maps with “grey zones” between both players’ territory (so a terrain piece could be wholly outside of yours while only partly within theirs), but that remains to be seen. Note that deepstriking units can score this one.
Counterplay: You really need to scan the map and terrain placement for this one. There’s probably only a handful of eligible pieces on most maps, so putting something near them would be a good start. At the very least, you should be able to avoid giving it away for free to 5x Liberators or a Skitterstrand coming on from off the board by having a few of your own models nearby.
Overall ease of scoring: TBC. Depends entirely on the map. Will become a bit of a skill test (or at least a mental fatigue test) when tired players forget to stand near relevant terrain after a long day of gaming and let you drop a unit straight onto it.
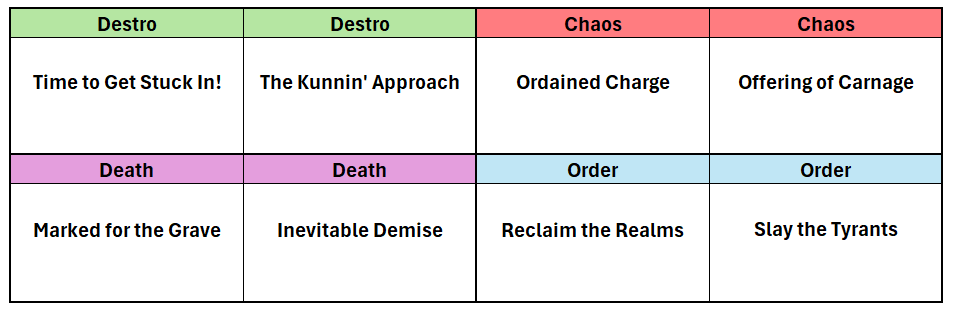
Analysis: GA Tactics
Order Battle Tactics
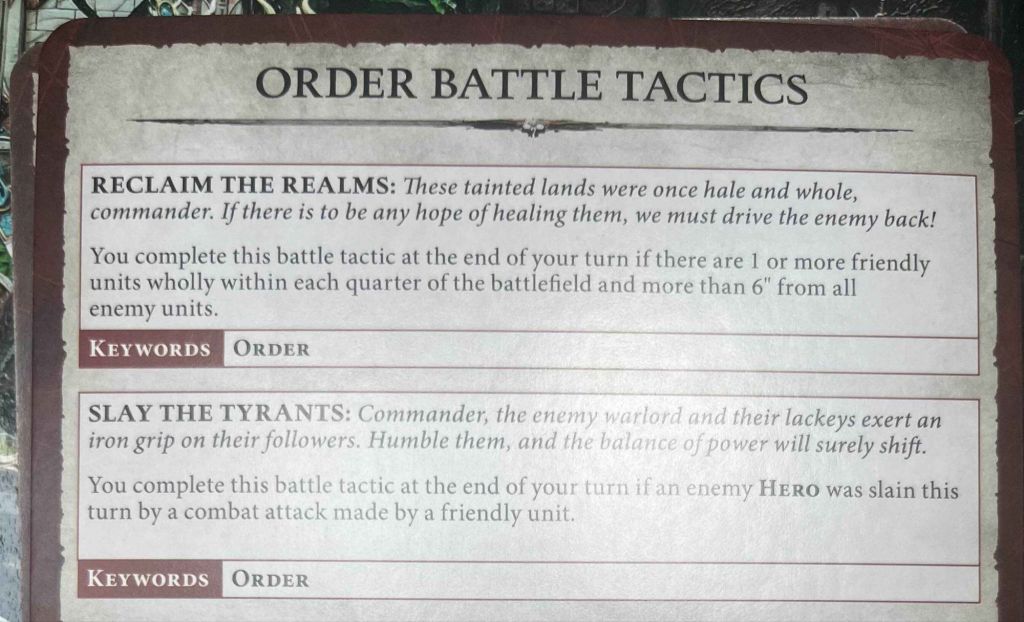
Order: Reclaim the Realms
This one has a heavy Stormcast theme, and it suits them down to the ground. You can score Reclaim just by dropping a couple of units out of deepstrike and into the backboard. You can also just walk across the halfway line, of course.
Pedantry Corner
I think we all know that “quarters” are envisioned as per the image on the left, but one could argue that the image on the right also represents quarters of the board:

If so, on wide maps you can just deploy directly into each quarter, and Badda Bing. Now I can be a bit of an asshole, but not even I would have the chutzpah to argue for this one in a game. Just an observation.
Counterplay: It’s tough to stop them simply walking up the board at any point in the game. You can at least make it a tiny bit harder by 9″-zoning the corners of your deployment zone, so they have to drop in front of you and you can clean them up in response, without having to send your stuff heading backwards:

Overall Rating: A. Piece of piss. Even if you don’t have deepstriking, you just have to walk a couple of units across halfway.
Order: Slay the Tyrants
Kill an enemy Hero in combat. Another one that rewards melee or mixed arms over gunlines. I like it. Look out for opportunities to score this one by softening them up first: knock off a few wounds with magic or limited shooting, then orf with their head.
Counterplay: You’re looking at screens and lucky Redeploys, until you run out of screens.
Overall Rating: B-. You’ll occasionally see someone crack off a bunch of unlikely armour saves or fortuitous Wards, setting up the classic “It came down to that prick surviving on one wound” stories. Occasionally the bastards just won’t die and it is what it is. You also have to get there the hard way, which is fine by me. Fighting your way through chaff, then delivering the coup de grace by decapitating the dickhead leading them is just the absolute essence of Warhammer.
Destruction Battle Tactics
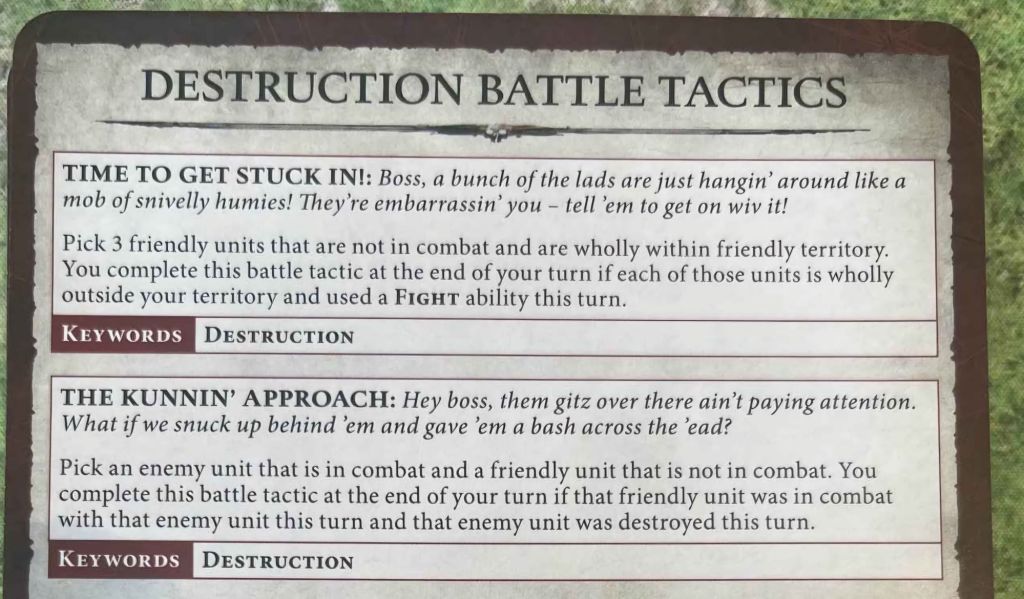
Destro: Time to Get Stuck In
Yikes, that’s a lot of criteria. Start wholly within your territory and end wholly outside it and fight with all of them and it has to be 3 separate units. Honestly, this feels like the kind of jumping-through-hoops garbage that 3rd Ed Kruleboyz got saddled with. Compare it to the Universal option “Do Not Waver”, and not only do you have to get an extra unit in fighting, but you also have to move a big chunk of your army a significant distance… it feels pretty stiff. You do at least get the quality-of-life factor that completing a charge is enough to enable the Fight ability later that turn (as noted above).
Counterplay: Well they have to fight for starters, so old mate Redeploy to deny the charge can cut that off at source. It’s got the same denial of board-domination possibilities (move up yourself, hold a high line and stop them moving up the board) that we talked about in the Universal options above, plus you can deny charges, plus you can stop them fighting by smashing their teeth in before they do. Fight First could give you an easy denial if you smash one of the three units that charged you. But because there’s three of them, you should get to activate second even in a normal activation sequence (they’ll go first and third) so you have another chance to pick up one of the three (!) charging units at that point too.
Overall Rating: D+. Vince on Warhammer Weekly thinks this is easy, and I think he’s insane. The positional aspect alone is comparable to an entire Battle Tactic’s worth of work. The additional denial possibilities around preventing the charge (or killing one of the charging units before it swings) just make it even weaker.
Destro: The Kunnin’ Approach
Can the leaked second tactic pick up the slack from Time to Get Stuck In? Partly. This one seems a bit wordy at first but when you read back through it and visualise what it means, it’s a lot less conditional than it seems. The starting point is an enemy unit has to be in combat; you have to choose one of your units, and your unit cannot be in combat itself. So you basically have to charge a unit that is already tagged, and kill it.
It’s very open ended how you kill it and with what – the friendly unit you pick does not necessarily have to strike the killing blow, and you can’t cuck yourself out of it by accidentally rolling too high on charge mortals or something like that. For what looks like a heap of pre-conditions, quality of life is actually reasonably high here.
Counterplay: Well the Destro player has to name their unit, so you can ruin their plans by killing it on their own turn. Counter Spell, Counter Prayer, Counter Shoot. All the kind of stuff that makes the player doing it think they’re really clever, but of course there’s counterplay to that counterplay, starting with picking a friendly unit that can’t be popped cheaply, and continuing through managing the “closest unit” for Covering Fire.


Covering Fire can’t move up to 2 CPs quickly enough
Overall Rating: B+. Yeah I don’t mind this one. It might look highly conditional at first, since they need to be tagged in combat, but how a big an issue is that in practice? Pretty minor I’d say. 9 times out of 10 you’d want to select an enemy unit that’s already tagged anyway, so they can’t Redeploy away from you and stiff you out of it.
The main limitation in practice is the timing window: you can’t score it early, because you won’t have them tagged in combat yet, and you probably can’t score it late because your units will be getting thin on the ground and you need at least two of them (one to tag, one to charge). It’s pretty close to a mid-game banker though, so I’ll take it.
Chaos Battle Tactics
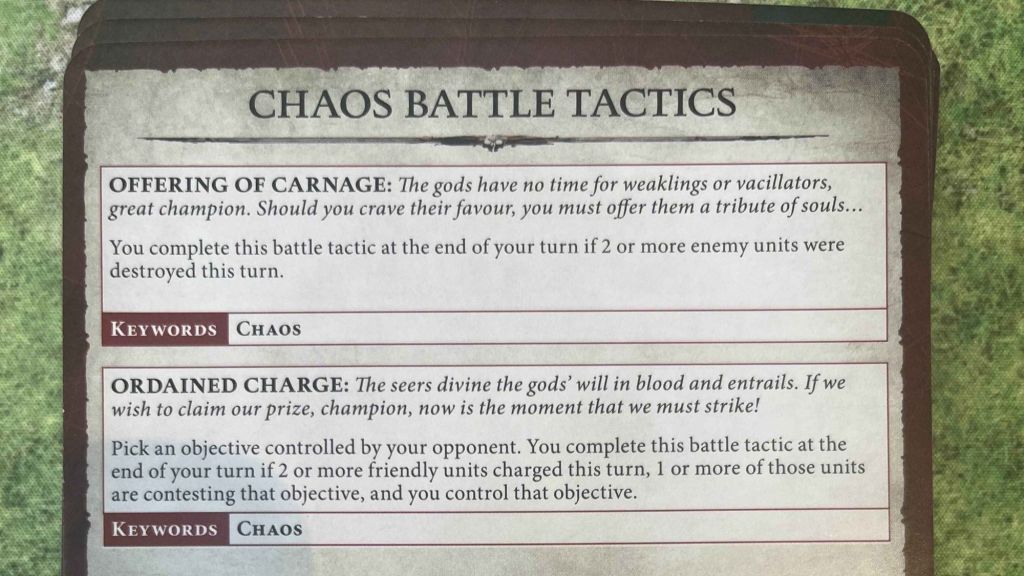
Chaos: Ordained Charge
Charge with two units, and at least one of them has to get onto an objective.
Counterplay: Well they can’t take an objective you don’t hold, but “just never take any objectives” is a plan with obvious downsides. Similar to Attack on Two Fronts though, it’s something to think about for the early game – it might not be worth capping that objective Turn Zero.
Overall Rating: A. Just a better version of the Destro one. Only needs to be two units instead of three, no positional requirements in terms of territory and less chance for one of your units to get jagged in the middle of the activation sequence. Yes you have to get onto an objective, but you’ll kinda want to do that anyway. Standard provisos around your opponent hitting big Redeploys apply.
Chaos: Offering of Carnage
Kill stuff and get free VPs. Talk about being rewarded for doing what you wanted to do anyway.
Counterplay: In my case? Run four Megas and say “Good Luck”. That being said, Slaves to Darkness seem to be pretty out of whack with most of the game so they might just step up and achieve it anyway – I wouldn’t rule them out from lifting two Megas in a turn. I guess one other thing to keep up your sleeve is using Counterspell to cast a defensive spell (or Prayer) on your opponent’s turn, if you have such a thing available, but they don’t even have to nominate which of your units they’re targeting so it won’t always help you.
Overall Rating: B+. Chaos players, you get rewarded yet again for charging stuff and fighting stuff. Don’t forget to pick up the complimentary champagne on your way in, and if Monsieur would like a free handjob, just ask any of our attractive staff who’ll be happy to help you out.
Death Battle Tactics
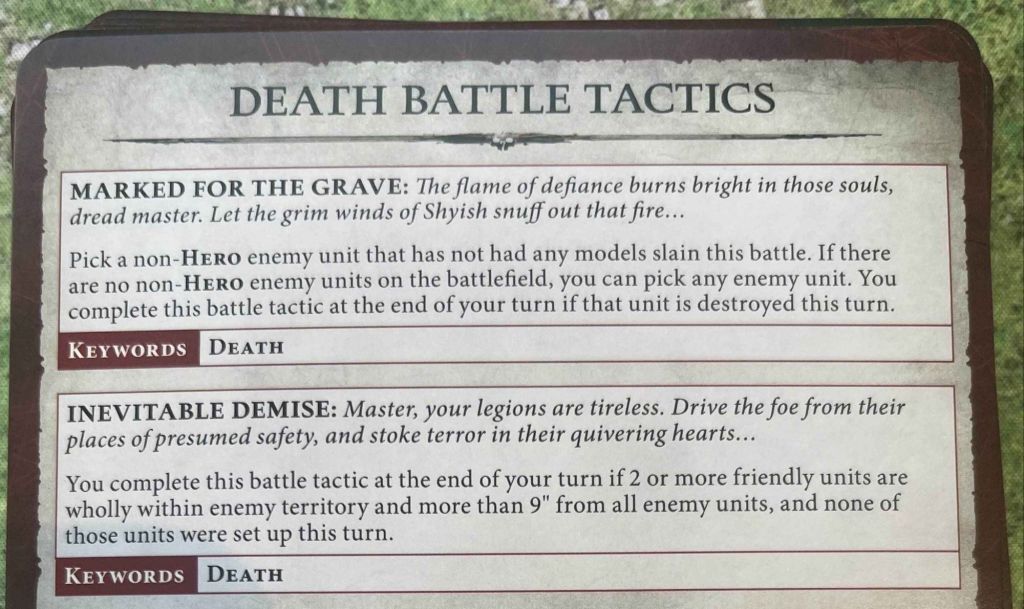
Death: Marked for the Grave
Kill something. Includes blasting them with shooting and magic – it’s all gravy.
Counterplay: I dunno, get tabled? Other than extreme target denial through having your own army annihilated, you might be able to protect that one specific unit by….drum roll please…Redeploying it once your opponent moves up close. I’m going to assume your opponent is not stupid enough to pick a target unit that’s already backboarded behind multiple screens, but hey, a new Edition could bring an influx of Space Marine players so you never know.
Be aware as the Death player that if you do end up fighting against only your opponent’s heroes (which allows you to target them instead of any other unit), you can pick this tactic in the middle rounds when you’ve already tagged those heroes in combat, and therefore they can’t Redeploy – thereby denying their denial.
Confused? Don’t be. It’s a gimme.
Overall Rating: A. Easy, and you’re getting VPs for doing what you would do anyway.
Death: Inevitable Demise
Zero out of ten for thematic rules writing here, GW. The name is evocative but it’s got fuck all connection to what the BT is asking of you, which is just shuffling some shit around the board. The only thing meeting its Demise here is any concept of ludonarrative harmony.
There are obvious risks to nudging a couple of units around the middle of the board to go for this one – that would be a great way to allow your opponent repositioning opportunities and therefore screw yourself out of it. So what you’re more likely looking at is swooping on an isolated target to clear out a 9″ zone by mercking it, or waiting till right at the end of the game when you’ve pretty much tabled the fucker.
Counterplay: Quite a lot, because that 9″ bubble is a right pain in the arse. There are loads of units that can move in their opponent’s turn, such as goblin wolf riders, plus the small matter of Redeploy and Countercharge to piss on their chips.
Overall Rating: C+. Even when you do get suitable gaps opening up on the board to move into, Demise is asking you to redirect a portion of your resources away from the main battle. The big 9″ exclusion zone is a real challenge, but when you do score this one, you’re either going against the grain of where you’d choose to send your troops – or else you’ve already won the game anyway.
Broader Analysis
Living on Cabbage Soup
Chaos gets free VPs for charging stuff and fighting stuff – nice and thematic, but those BTs would have been equally as thematic for Destro, who instead are left eating a shit sandwich with easily the worst package. Order is also really solid and Death is a mixed bag. They only had to write two BTs for each GA, but the quality is still all over the place here – and Destruction will be living on watery gruel for an entire edition. Poor execution.
Flow of the Game: Will the Path to 28 VPs be Ruptured?
Thinking ahead to the ebb and flow of Battle Tactic scoring in 4th Ed – we’ve been talking a lot about scoring and denying tactics in this article, but there will be times when you don’t actually want to. The underdog mechanic is already looking pretty strong:
- You get an extra CP.
- Each Battleplan has its own additional incentive to come in with a lower score, giving a bonus ability to the player who is trailing.
- The two you’ll see below are +1 to hit on the charge, and D3 damage to every unit standing on a chosen objective.
So when we’re talking about Seize the Centre being a great option if you go first: will you actually want to go into Round 2 with a lead? It’s going to be driven by the army matchup plus the particular twist in each mission, but I can imagine a situation where some games play out a little like Nexus Collapse in the current Handbook.
Experienced competitive players know that the optimum situation in Nexus is to see what your opponent scores first, then come in just 1 VP under that yourself, so you control the board state. What you’ll see there is that people usually deploy in little circles around the perimeter of the objectives, avoiding capping it Turn 0, and retaining precise control over what they score and when.
Is the underdog mechanic as powerful as detonating one third of the primary objectives every time? Perhaps not, but it doesn’t have to reach that nuclear level to incentivize similar behaviour. What’s more, since there are no book tactics, you might not have the same expectation and requirement to max-score yourself every round, because most people will be dropping one or more along the way.
Anyway. Long-term readers will know that I’m hardly afraid to stick my neck out when I’m ready to make a call on something, but I’m afraid I don’t have a complete flowchart I can hand you right now to walk you through optimum scoring strategies on every Battleplan (not yet, at least). The conclusion this time is purely that the flow of scoring through 4th Edition is likely to feel very different, and your objective in list construction is not necessarily building a shining path directly between deploying your army and hitting Maximum VPs (which will be 50 in new money) – there’s a lot of power in being able to switch gears now and score at your own rhythm. .
There’s still great value in getting to grips with BT scoring and denial because you do want to have the tools and knowledge ready to hand to execute both when the time is right. Well either that, or just smash your opponent off the table and score out from there, which let’s be honest is how a lot of 3rd Ed games really ended in practice.
Final Thoughts – Pro Combat
I want to shout out the pro-combat tilt in a couple of these (Slay the Tyrant and Do Not Waver, plus the underdog bonus on Border War below). Easy tactics, but only if you’re good at fighting, and I’m rapt to see it. And even if the ruleset as a whole favours combined arms over true combat builds, I can live with that. In 3rd Edition terms: give me a few Longstrikes plus some Fulminators or Annihilators prowling around over a full army of double-tapping Shootcast any day.
Will we miss faction tactics? I know I won’t. I’m perfectly capable of memorising that kind of information, I just don’t want to, and I don’t see any value or achievement in it. I’m not the biggest fan of BTs anyway, but if we’re stuck with them, then fewer is definitely better.
Finally, I just want to note that the Battleplans are heavily weighted to half-red, half-blue maps:


Note that the first map is just from the “Core Rules” missions, that nobody will ever play. Nonetheless there’s a lot of 50:50 maps in the full set
The full set has been leaked, and there are some that do have a DMZ in there (notably, Shifting Objectives has just 6 of 16 tiles coloured Red or Blue). Just bear it in mind when you think about tactics like Take Their Land or Time To Get Stuck In that those Wholly Outside and Wholly Withins are shaping to be tough in the majority of missions – which in turn supports the proposition that it could be less common to hit the full 5 BTs in most games.
Anyway, I hope that helps to get the cogs whirring. We’ll do a separate follow up article where we cross-reference the Battle Tactics to the Battleplans, but that’s a discussion for another day. The big thing to look forward to this week of course is the full points and faction packs dropping – we’ll be reviewing them here on PC in detail, in an order voted on by our Patrons.
Our aim is to bring you better reviews, from better players, and I can’t wait to get into smashing out some lists with you all. It’s been a long time coming, hey.
Have a good weekend, nerds – catch you on the other side.

If you’d like to help us continue our work, we’d love to have your support. All Patreon Tiers include Discord access, exclusive articles and regular contests. Our Tiers are priced to be within everyone’s reach, so please click here to join us today!


Marvelous piece man, fucking marvelous, guaranteed to get brains churning all weekend!
I’m going on the record here and now that by October the top tables of every serious event will be all about tabling your opponent. The frustrated lads from Destruction will lead the way out of necessity and that’s going to turn it all on its head.
Mark my words, come the last week of November Matt Rose is going to be in Atlanta scratching his head and crying in his beer about how we can’t have nice things with such brutish customers.
LikeLiked by 1 person
Haha thanks mate. Glad you enjoyed it
~Pete
LikeLike