

I’m sure everyone has seen the entire Ogor Mawtribes Battletome at this stage: YouTube men have read books, blogs have done that weird paraphrasing of the actual rules and the pdf has been shared around every Discord and group chat. I wouldn’t be adding much to conversation at this point by rattling through every warscroll one after the other, and so today’s article will pick out some tricks and combos that I spotted and that I found interesting.
I’ll be playing this book a lot: I’ve been playing Gutbusters with some success since 1st Edition, back in the era when the Devs were too lazy to give them a single page of rules in the old GHBs, so it’s fair to say I’m invested. You can expect a fair bit more coverage here over the coming weeks including some list ideas and unit analysis. Now let’s get into it.
1) Friendly Fire
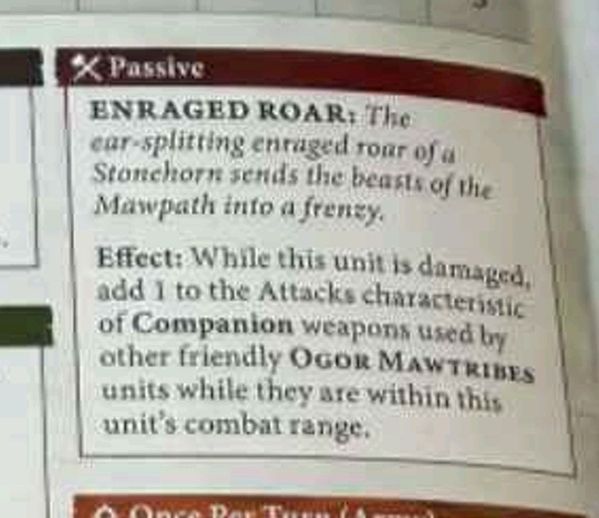
There’s a couple of abilities in this army that key in when you’ve taken damage. The FLoSH kicking out extra attacks to his fellow Stonehorns (or general Cav) is a big one:
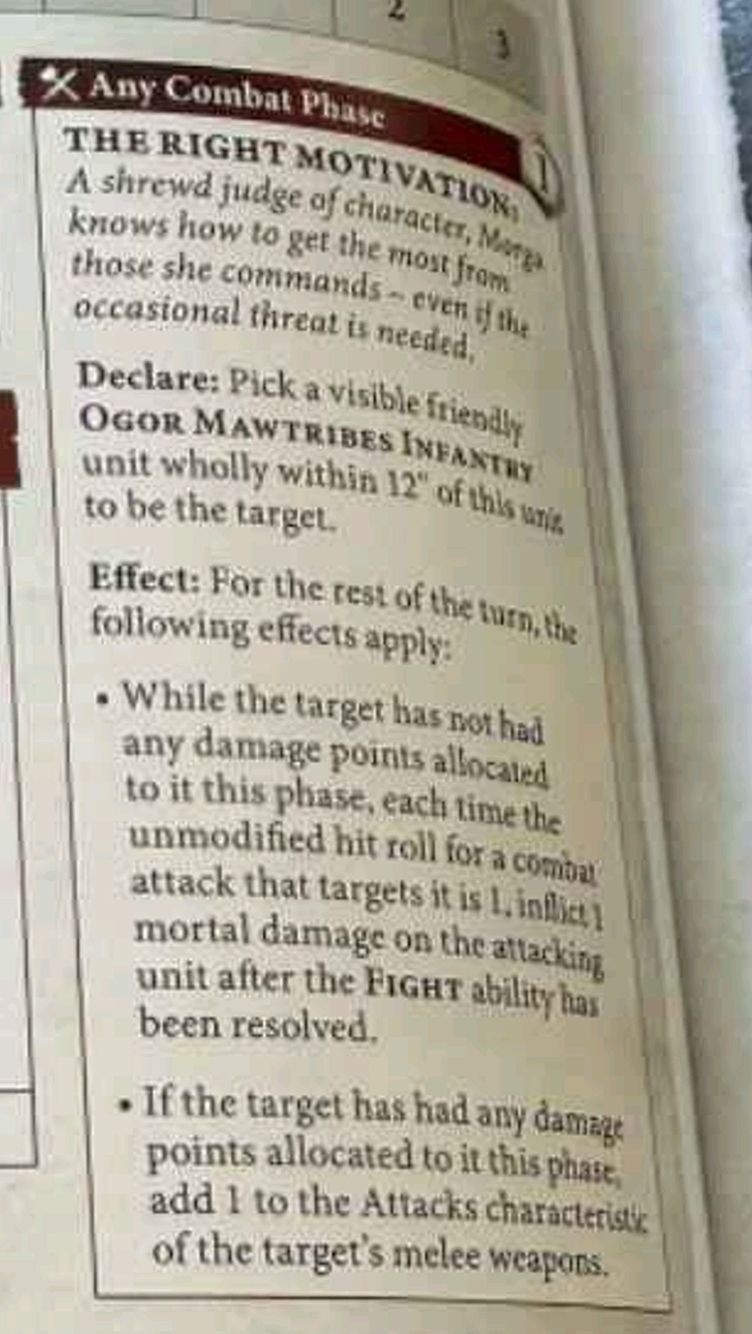
And Morga (the named version of the Rhino) can do something similar to any Mawtribes Infantry unit (final dot point):
What if your opponent has not had the good manners to apply a tiny amount of chip damage at just the right time? Well there’s a couple of good sources of friendly fire in here that will proactively trigger the bonuses.
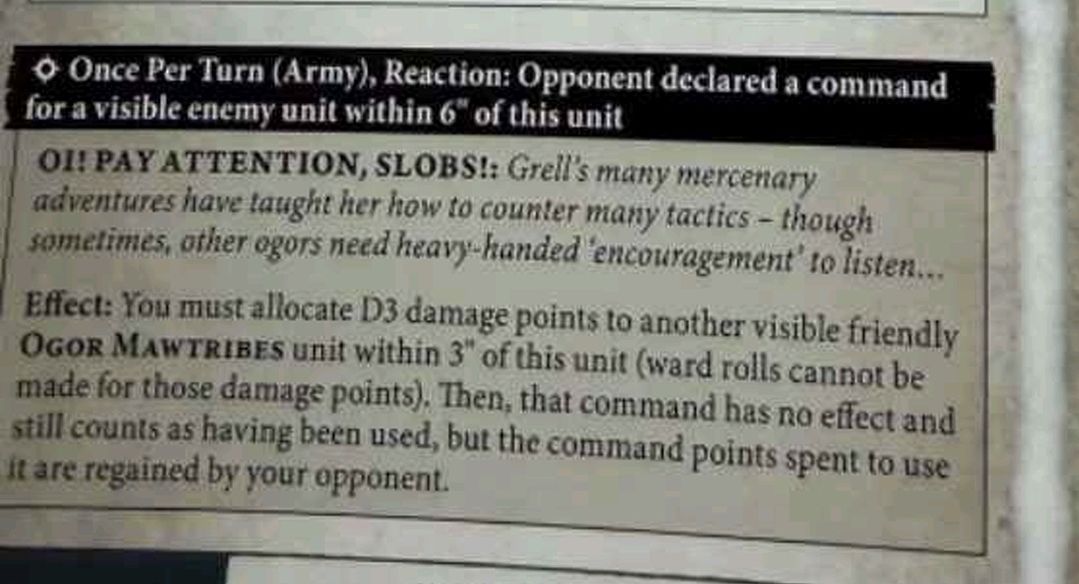
Firstly from Grell:
And secondly the Ironblaster (as collateral damage):
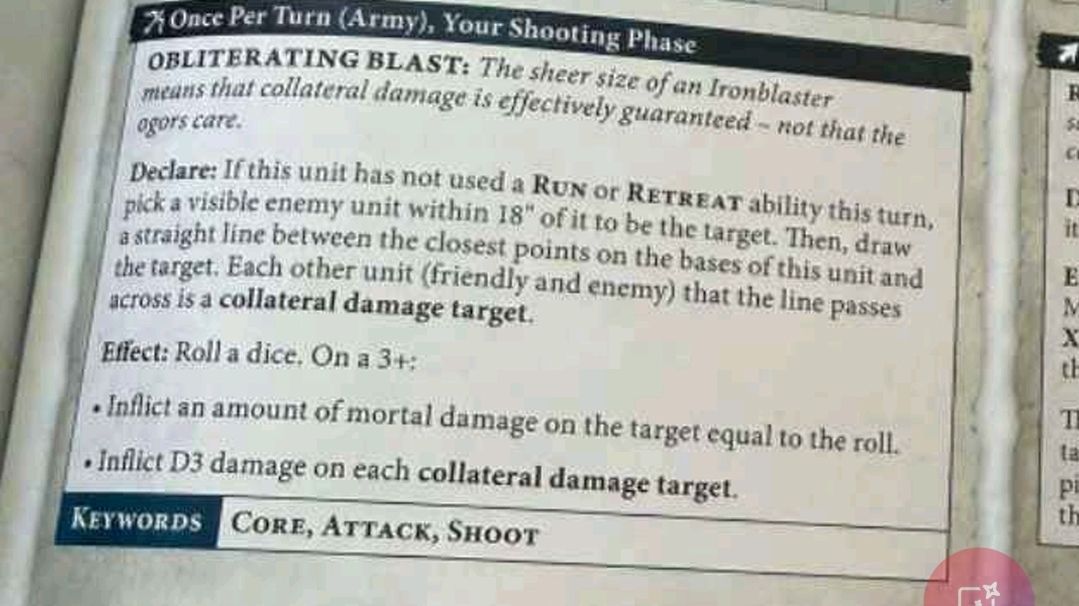
If you like the Stonehorn buffing Companion attacks, but you’re worried Grell can’t keep up, maybe she could hitch a ride on a Thundertusk? And the best thing is, in both cases, those D3 chip mortals won’t risk killing any 4-health models.
2) Redd’s Lozenge of Doom
I reckon the points for this book are all over the place – both types of Rhinos have awesome rules but feel spenny, whereas Gluttons and Hunters are both very sharply priced. So I’m using plenty of the latter in my own listbuilding.
Similarly, I reckon Redd is way better value than the foot Butcher, even at more than double the cost. So my starting point for a lot of lists right now is Redd in the middle of 2x blocks of 10 Gluttons. That way he’s giving out the 6+ ward to both units.
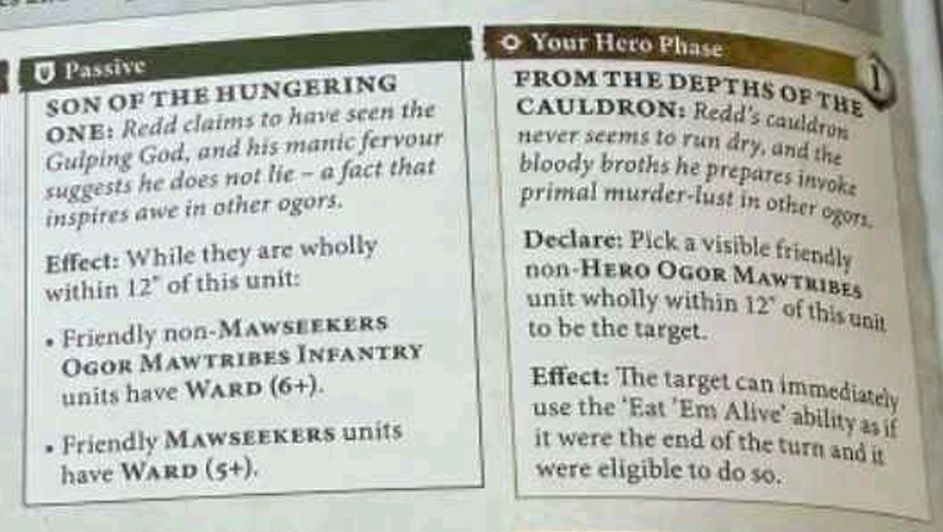
You can pick one of those Glutton blocks for early access to the Eat ‘Em Alive Battle Trait and go in one of two directions from there:
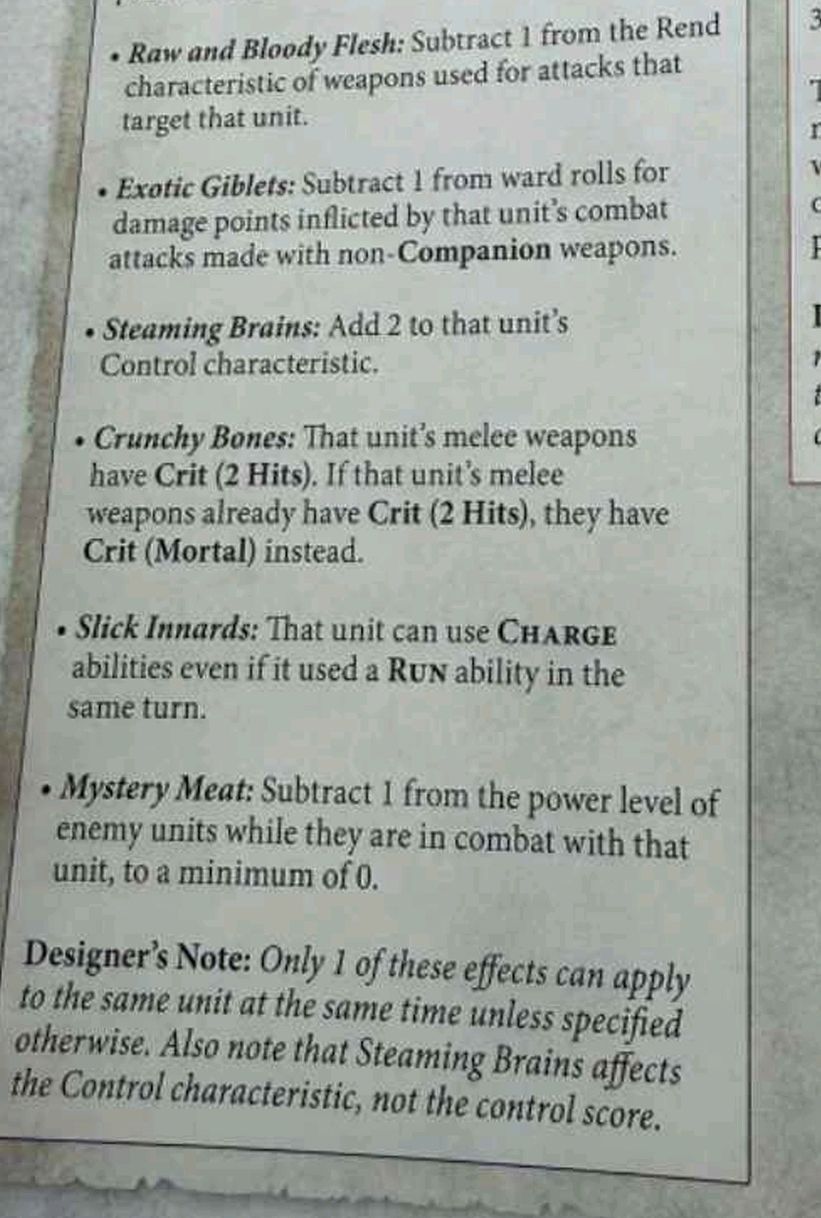
- Either give them the Run + Charge, and cast Redd’s own extra movement spell on them, to get them zipping up the board
- Or get them ignoring 1 pip of rend, which compounds with the Gluttons’ own +1 to save when they’ve been charged to form a meat wall
Those Gluttons are now on an effective 3+ 6++ save without even using All Out Defence. They’re really gonna take some shifting: in the words of Mark Twain, denial ain’t just a river in Egypt1. One unit of Gutseers perched near Redd will give him +1 to cast on both of his spells too:
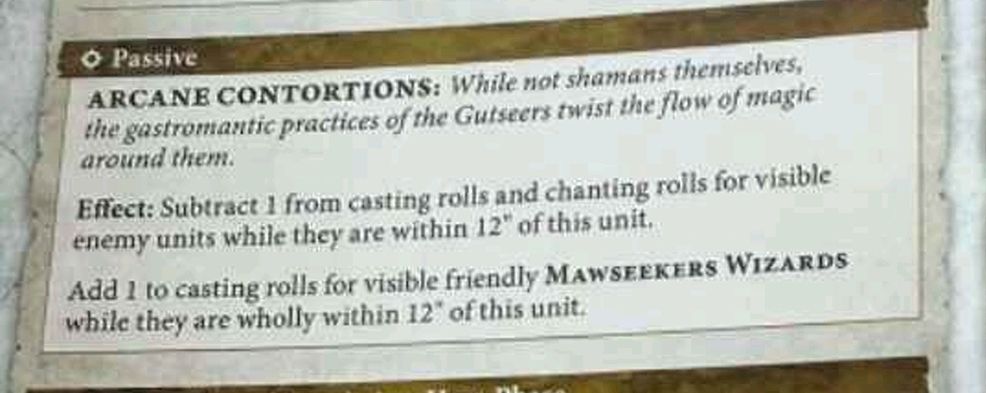
So a lot of my lists right now are starting with this 1400 point castle:
- Redd
- Gutseers
- 10x Gluttons
- 10x Gluttons
…and then using the last 600 points to answer other questions this army faces2.
3) The Crit Mortal Parlay
The new Eat ‘Em Alive Battle Trait shown above allows you to graduate from Crit 2 Hits to Crit Mortal:
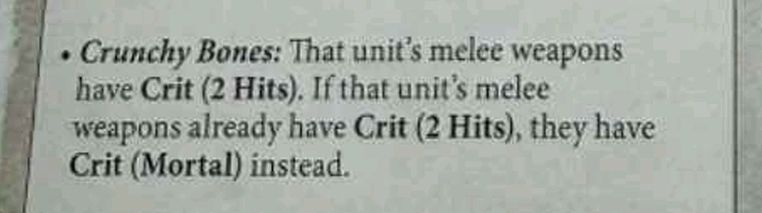
For the cost of 1CP, Redd can give one unit a headstart every round with his Depths of the Cauldron ability shown above. What other play do we have in this space?
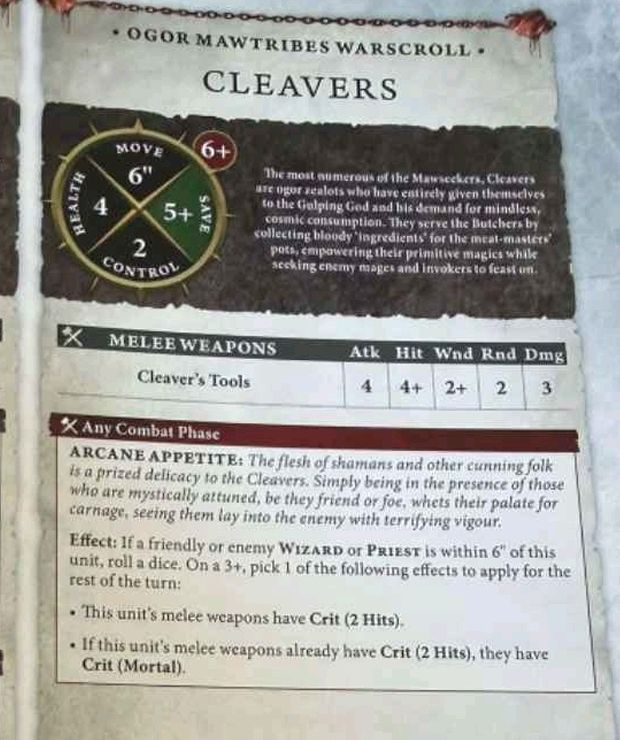
Well, Cleavers can interact with that Battle Trait (in either direction), albeit on an annoying 3+ roll:
But watch out for the Nonbo with the Huskard on Stonehorn:
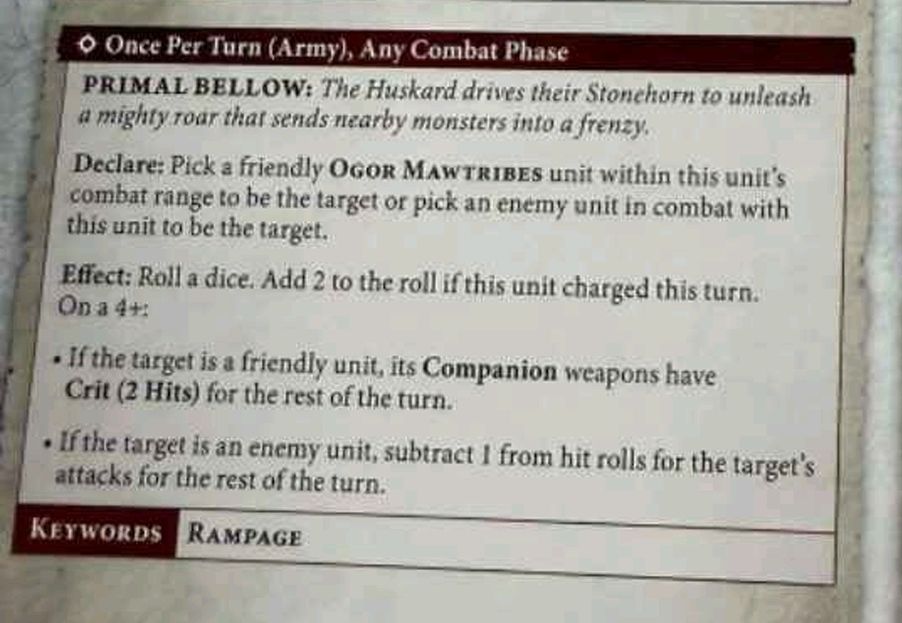
Companion weapons don’t get the benefit of the Battle Trait, so this one won’t parlay into the Crit Mortal option. If you’re faced with elite armour and you have the relevant units, I’d start by trying for the 3+ with the Cleavers and then make your decision on what to do with Redd from there.
4) Double Penetration
There’s a cool new Battle Trait that lets a BCR hero deepstrike in with any unit from the Regiment they are leading:
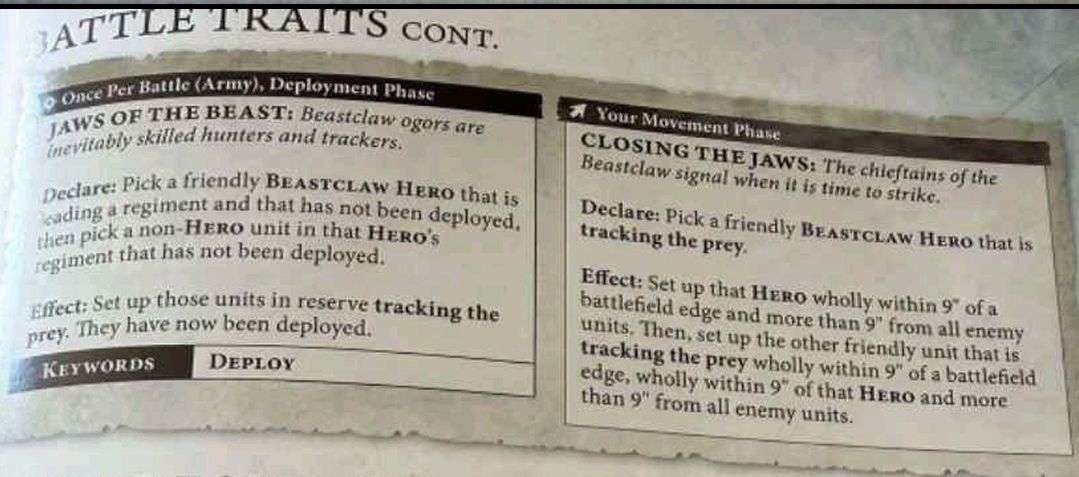
This doesn’t have to be a BCR unit, so the Huskards and Frostlords (who take any Ogor Mawtribes in their rego) could bring an Ironblaster along with them, do that once-per-game Zzap! (which we saw above in Friendly Fire) sideways through their army and blast out a heap of mortals plus collateral damage.
But even better than that might be the Bloodpelt Hunter who has been dumped into the BCR side despite having nothing remotely frosty about his appearance. That’s good news from a gaming point of view though, because he’s a cheap hero with fairly scary shooting (especially into Monsters) and he can bring the new Hunters with Sabrefangs along with him.
Those Hunters offer solid shooting output plus a few mortals when you get charged, and after they’ve unleashed the payload, they’re still a bunch of cheap wounds right up in your business. They also have a teleport on their own warscroll:
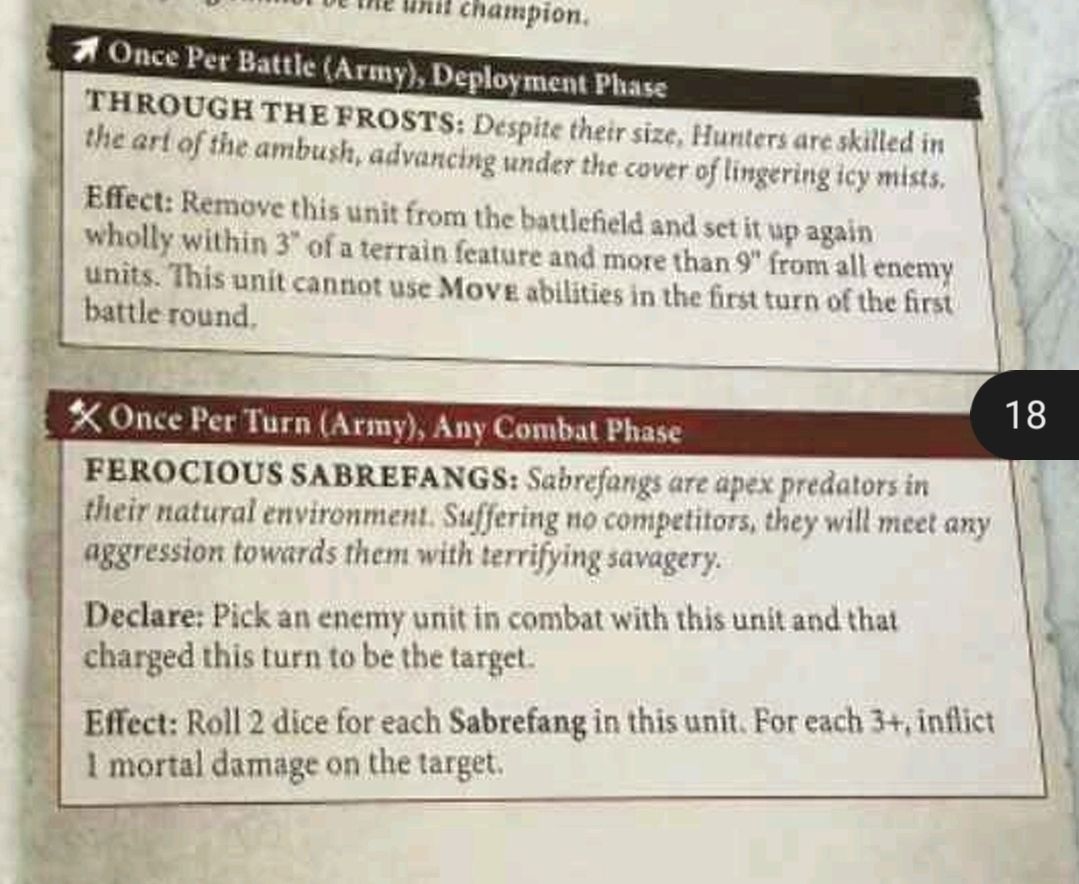
So one combo I like is putting two reinforced units in your list for 320 points each. They both offer 40 wounds on the table and 19 shooting attacks at Rend 1 Damage 2. You bring one unit onto the board edge with the Bloodpelt Hunter via Closing the Jaws, teleport the other with their own ability, and that’s 80 wounds that they’ll have to deal with plus a barrage of shooting damage.
There’s even more synergy there because if your Hunter can squeak a shot through, he can even trigger +1 to Hit on both units:
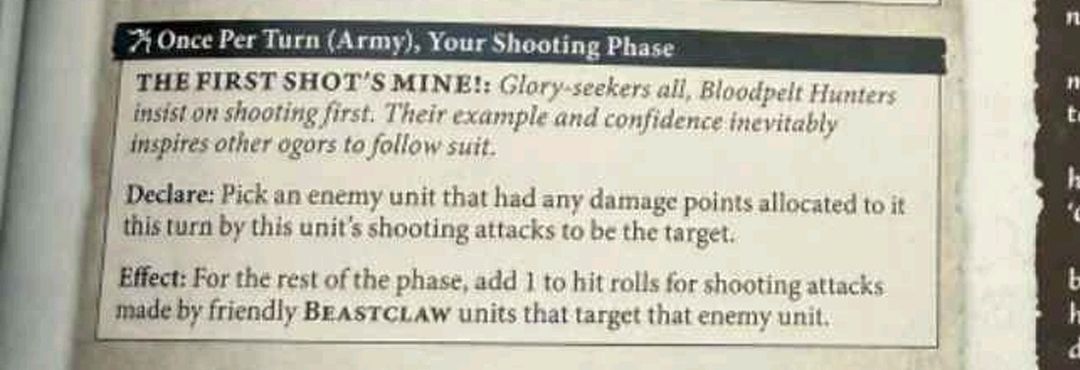
That’s a 770-point combo but it’s also 88 wounds right up the table and banging away. I rate it.
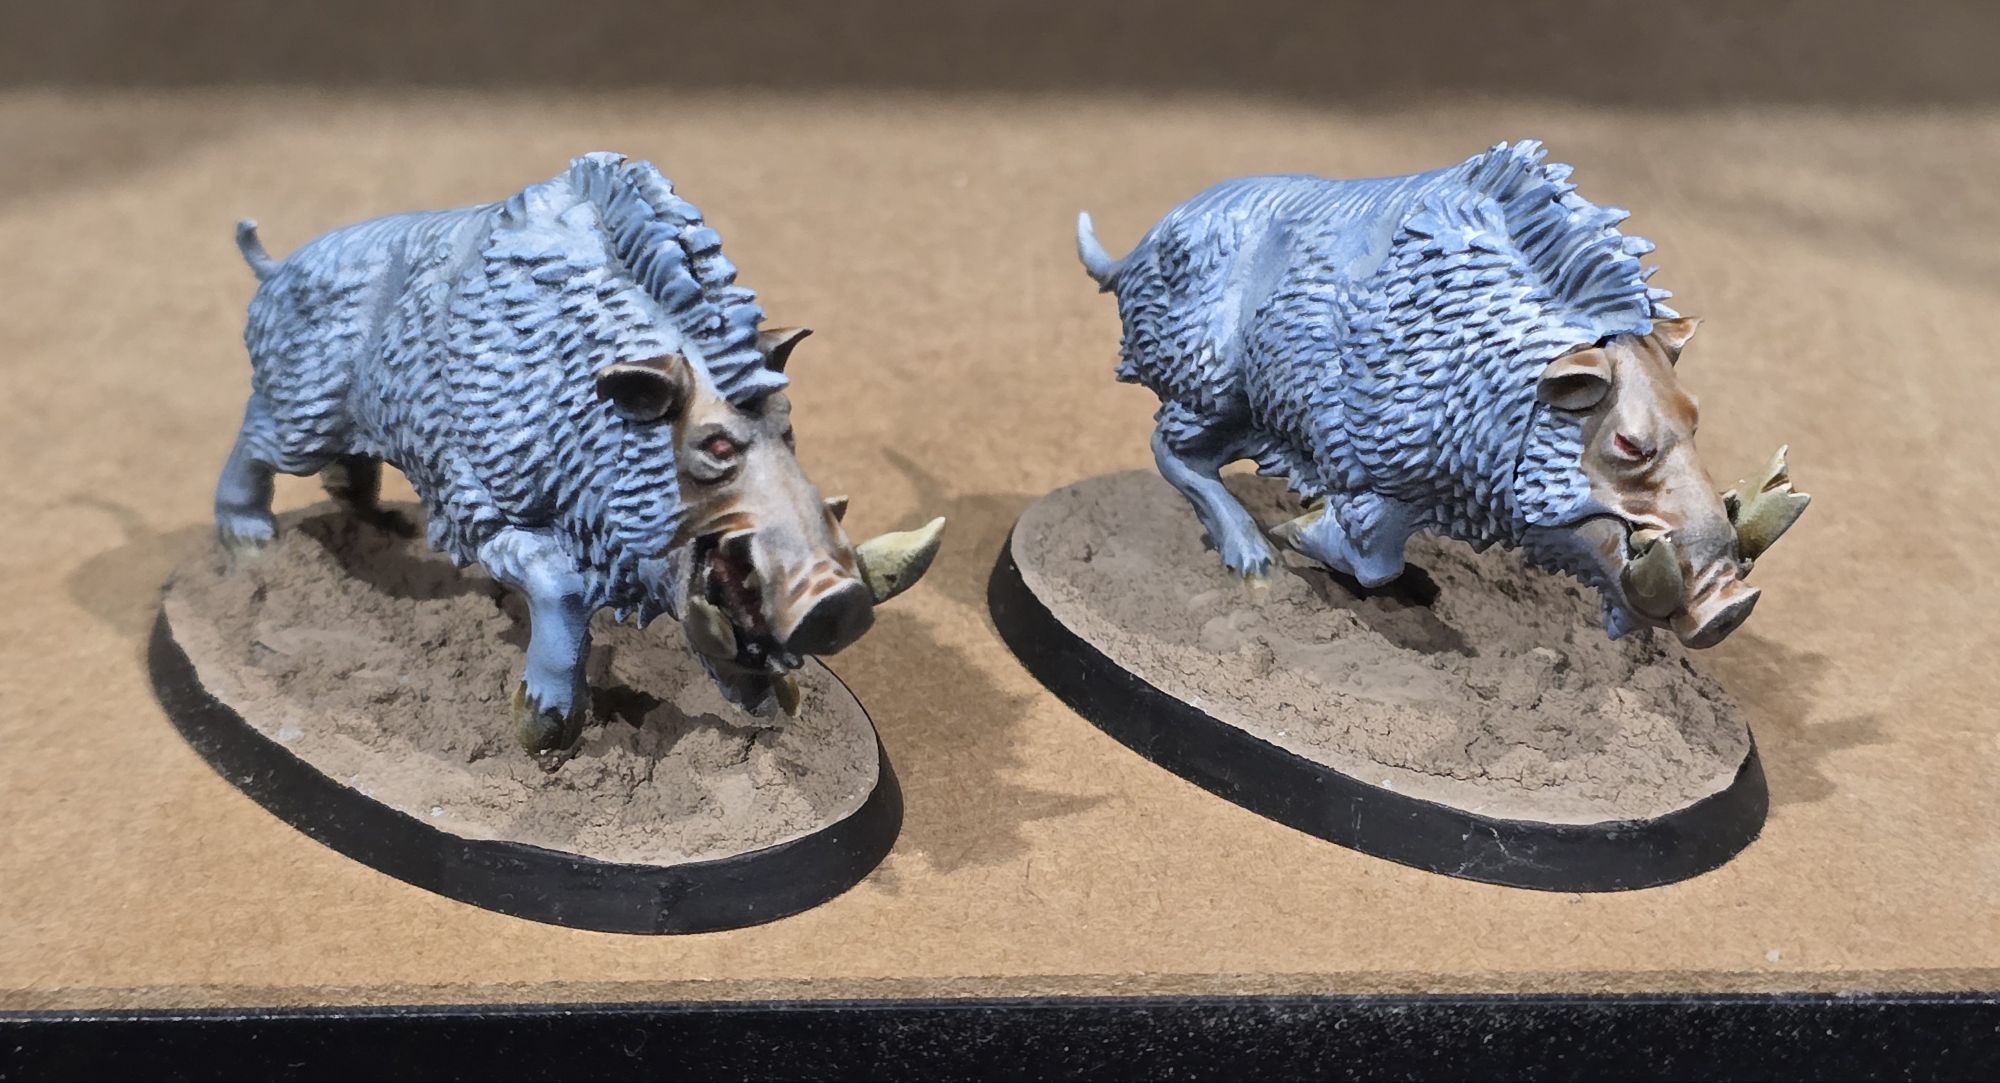
These guys have a bit of a Warband feel and buying 4 kits might be setting yourself up for frustration if they get nerfed. So you do what you like, but I’ll be upcycling my old Leadbelchers since they’re already Shooty Ogors – if I’m feeling fancy I might give some of them crossbows from the old Stonehorn kits – and the cats will be riderless boars from my beloved Bonesplitterz.
5) 8″ Deep
There’s a lot of opportunity for High-IQ play with this battle formation:
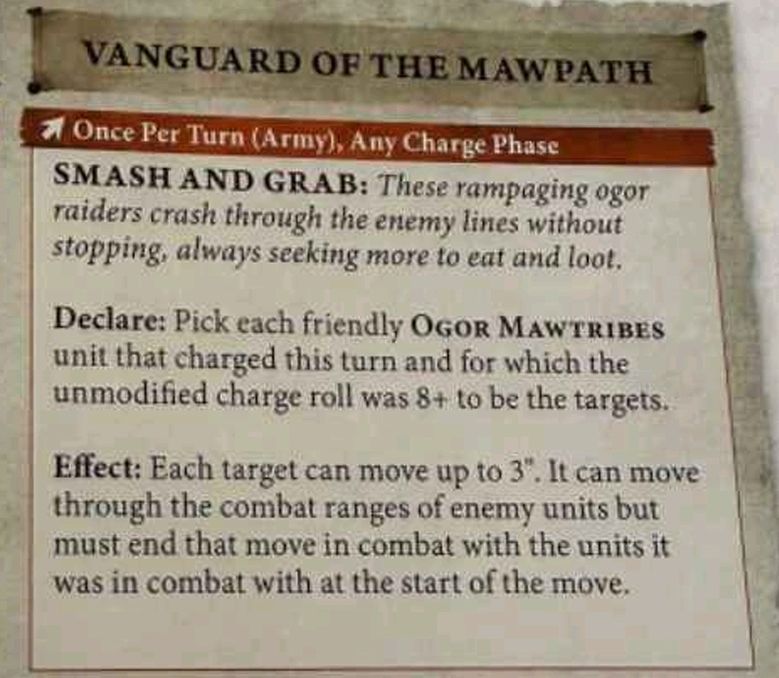
Hitting an 8+ on 2D6 is roughly a 40:60 chance (odds against), so how can we boost those odds?
First port of call is Kragnos, who gets you charging on 3D6. All three dice are part of the charge roll (they are not a modifier) so you can hit an 8+ very easily (it’s actually equivalent to rolling a 2+ on one dice).
The Tyrant on Glutthorn also offers a good way to boost your odds. In AOS, modifiers are pluses and minuses; the rerolled dice is still part of the unmodified roll:
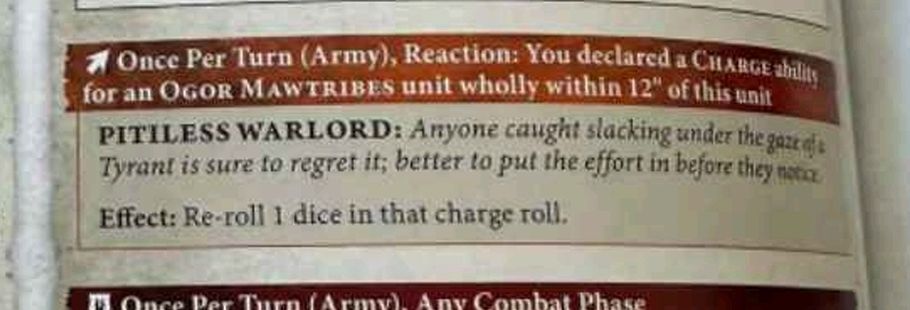
And once you do hit it, there’s a lot of interaction with the Bull Charge battle trait we saw earlier (repeated here for convenience).
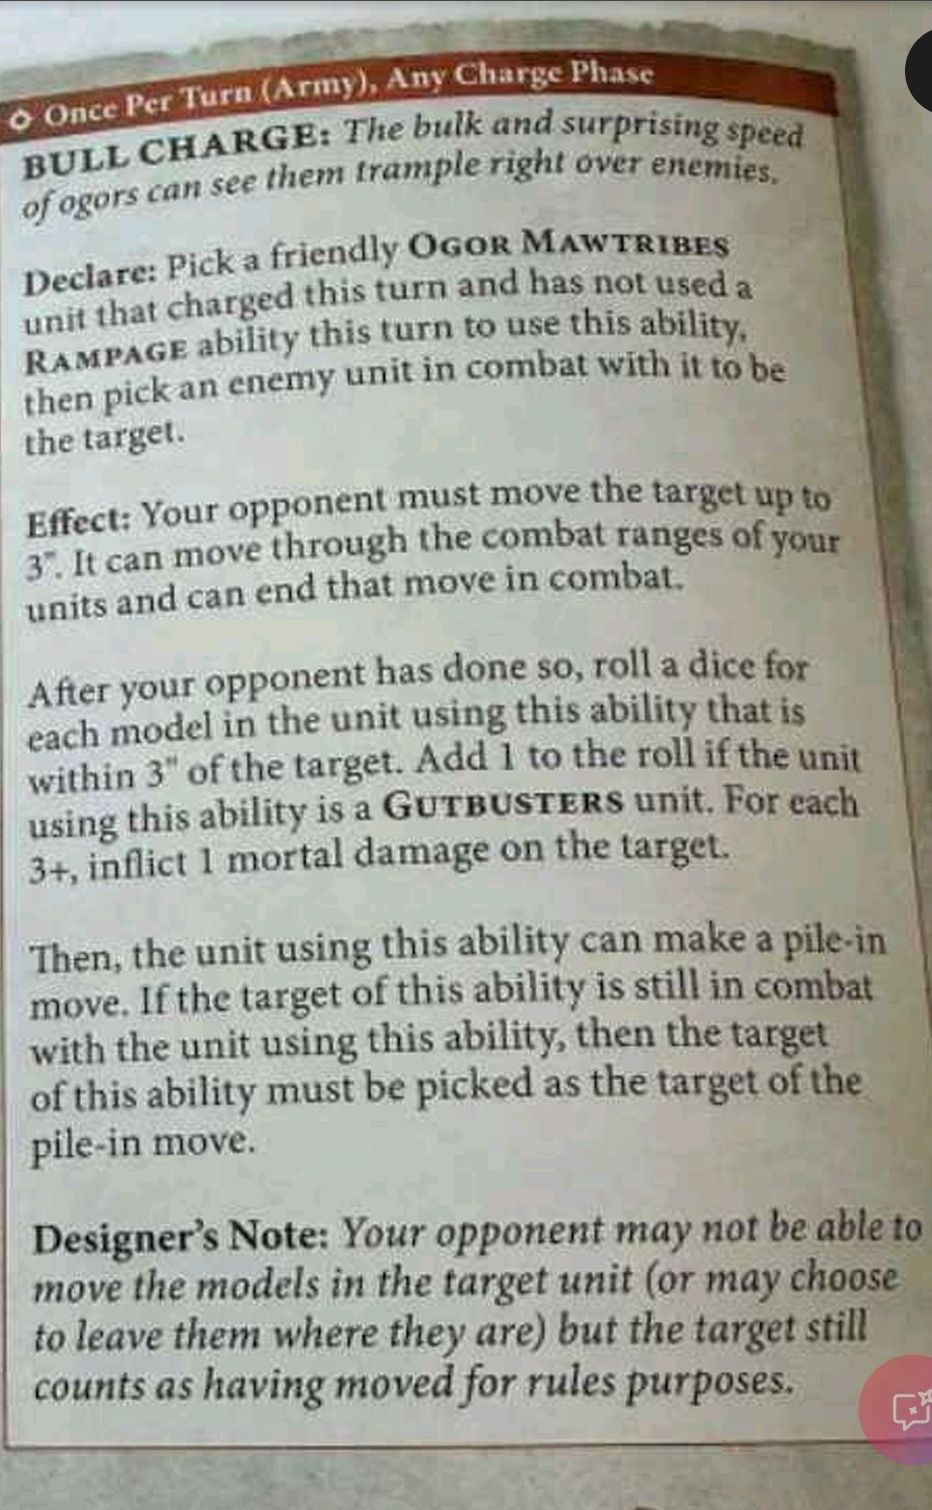
A couple of things that spring to mind are:
- Use Smash and Grab first, to wrap around the opponent. Prevent them from getting away and maximise your mortals
- Use Smash and Grab first to bring a different unit you couldn’t reach into combat, and use Bull Charge on that second unit
- Use either or both 3″ moves to get equally as close to another unit as the one you charged, and choose that as the target of your normal combat pile-in
There’s a lot you can do with 9″ of movement in the combat phase when you get technical, and both Kraggy and the generic Rhino can help you get there.
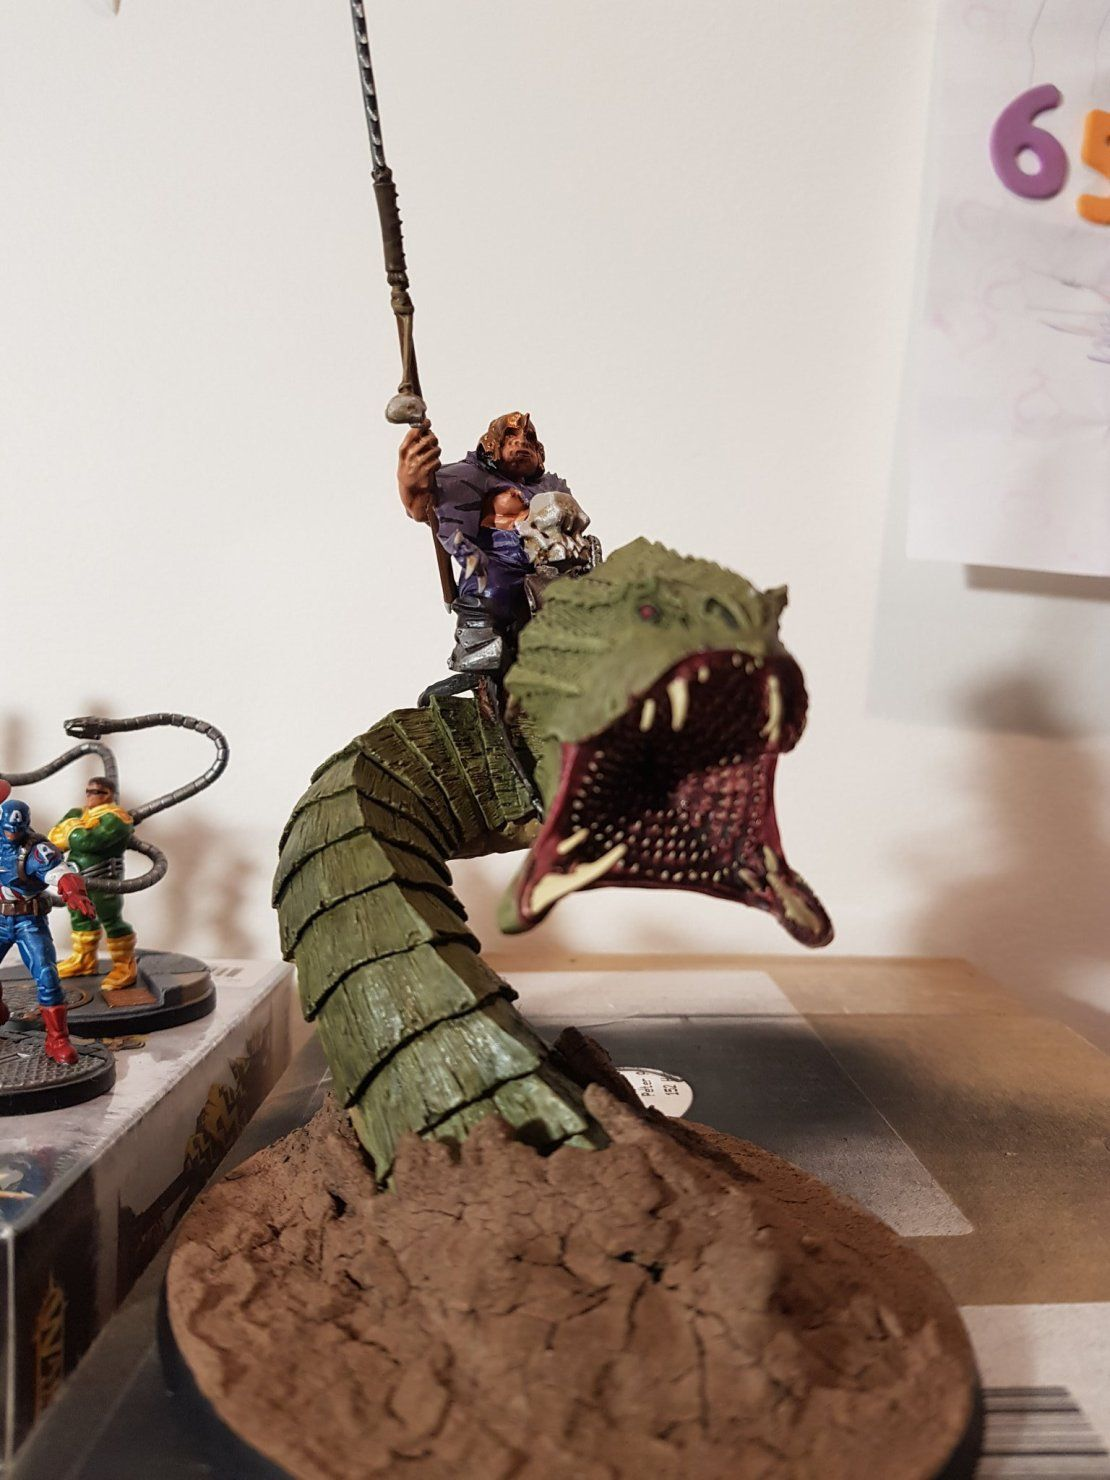
So those are my favourite combos with the new Ogor book. I’ve got a list that I can’t wait to try and few sketchy ideas for various skew builds that I’m looking forward to fleshing out. So for now I’ll leave it at that, and sign off with a photo of my boy Bollgo.
Credit for cover image: Tom Lees

If you’d like to help us continue our work, we’d love to have your support. All Patreon Tiers include Discord access, exclusive articles and regular contests. Our Tiers are priced to be within everyone’s reach, so please click here to join us today!




One thought on “Ogor Mawtribes: The Coolest New Tricks and Combos”